 My Intelligent Financeالعربية
User guide — Mac
Every everyday task on the Mac, step by step, with pictures of the Mac's windows. Click a task to open it. The same guide is in the Mac app: Settings › User guide, or Help.
Using an iPhone or iPad? iPhone and iPad guide
Before you start
The Mac app
- The Mac app is the same app, with the same data from iCloud. Set up on one device first; then open the Mac app, online, and it receives your data (see iCloud, and more than one device).
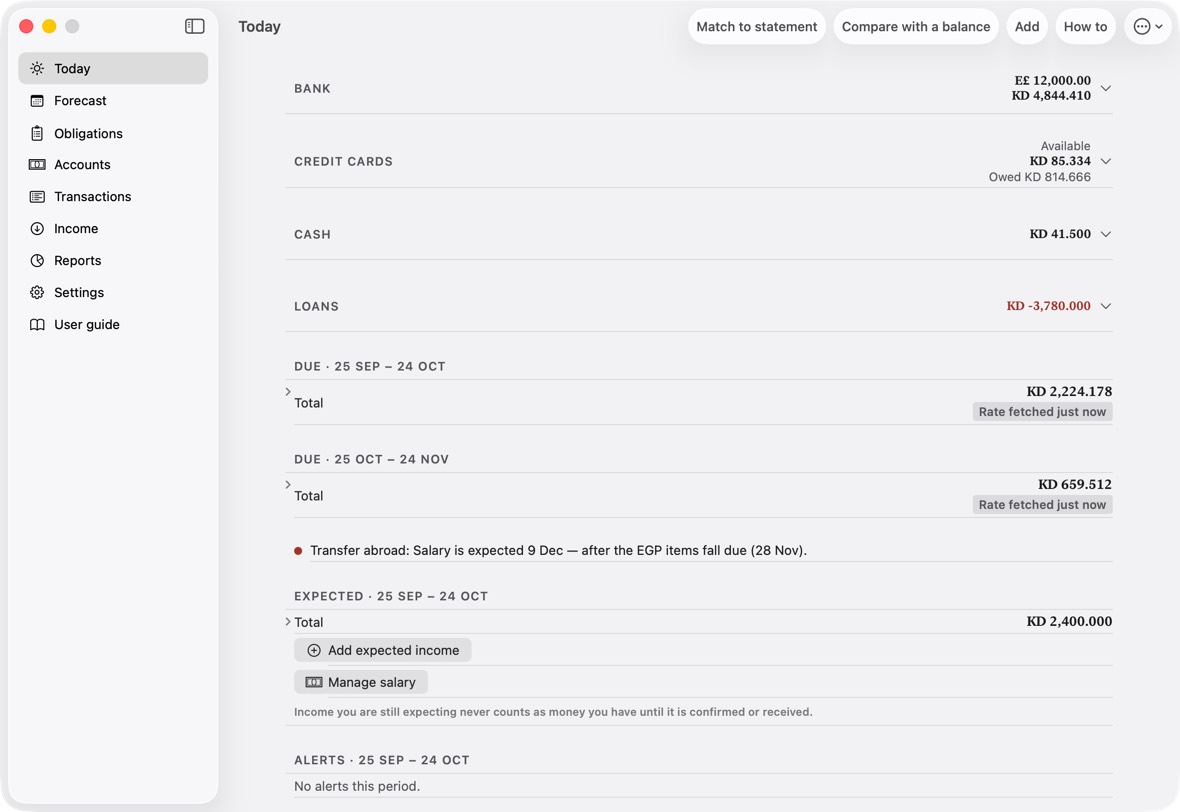
- The sections are in the sidebar, the guide among them. The menu bar has the rest: File › Quick Add (⌘N), Match to Statement… (⇧⌘M), Export My Data… (⌘E) and Reconcile… (⇧⌘R); Edit › Search Transactions (⌘F); Go, a section each (⌘1 to ⌘9); and Help › Intelligent Finance Guide (⌘?).
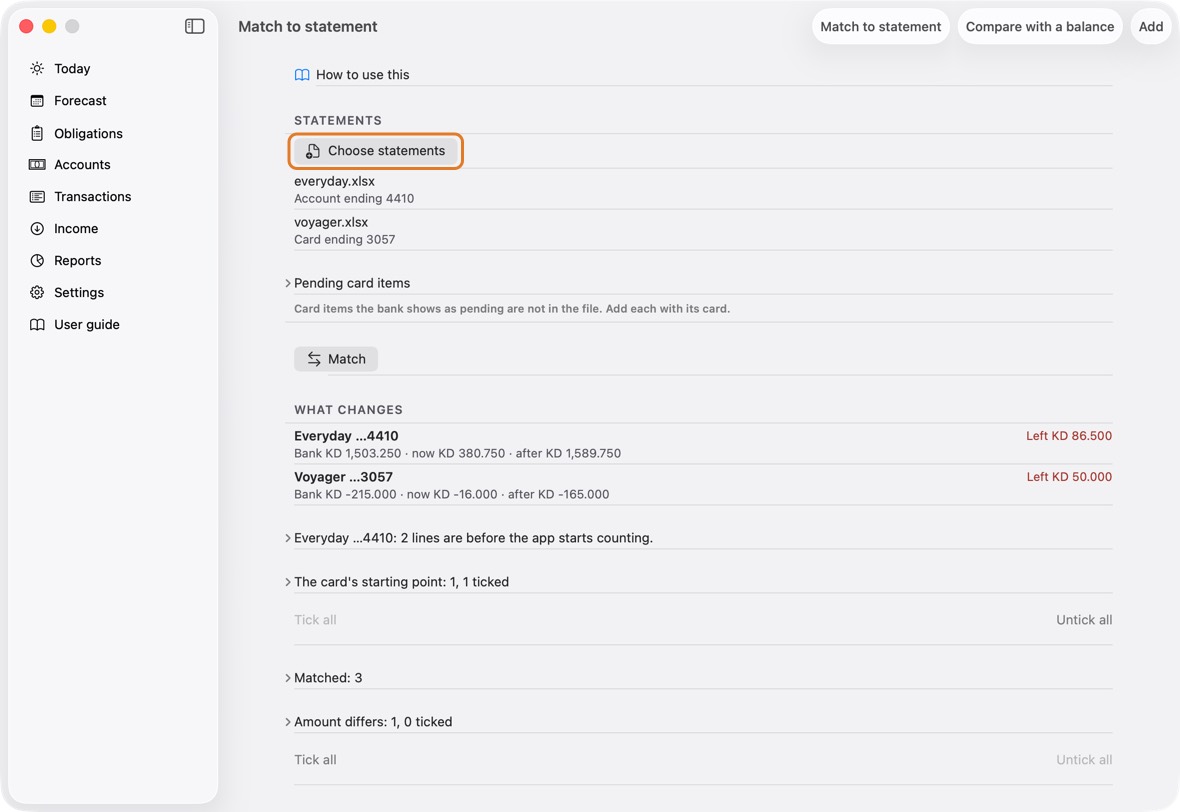
- Statements: drag your .xlsx or .csv files from Finder onto the window, and Match to statement opens with them. Or click Choose statements in Match to statement.
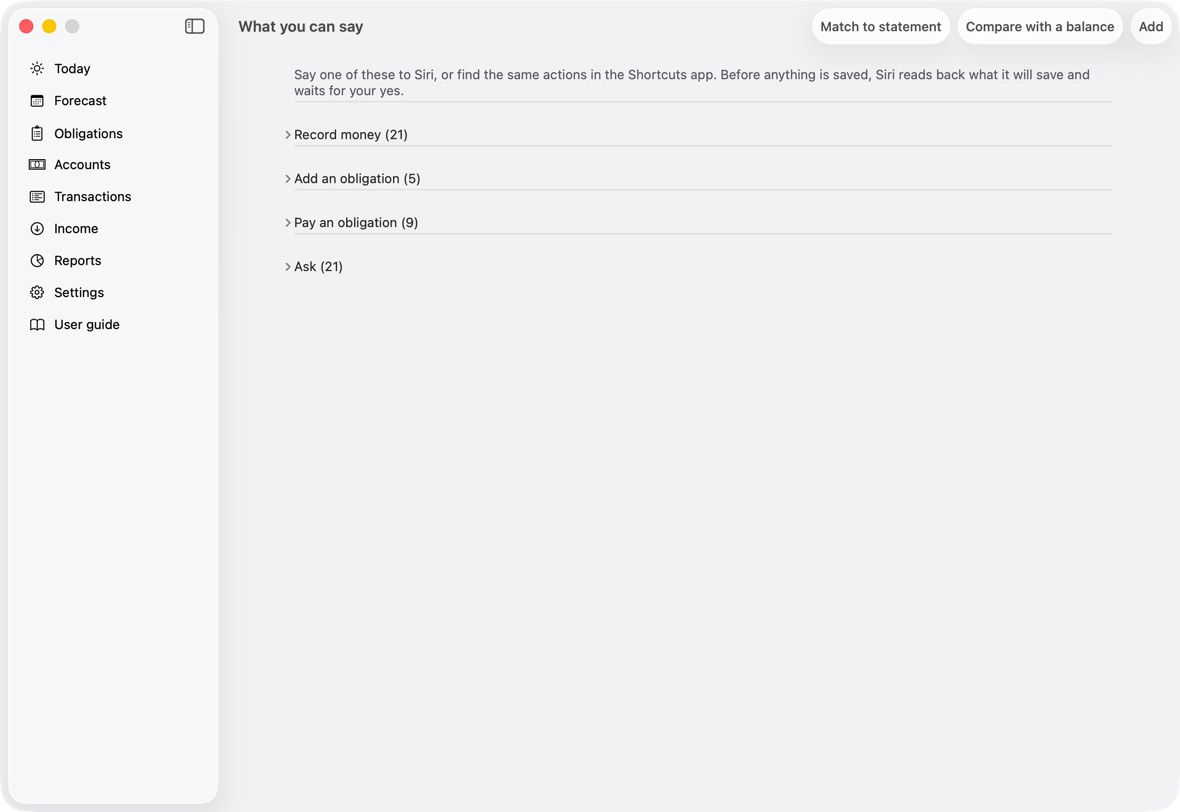
- Siri and Shortcuts: the same phrases as on the iPhone, with Siri and in the Shortcuts app. The small cards that suggest a phrase inside the app's screens appear on the iPhone only.
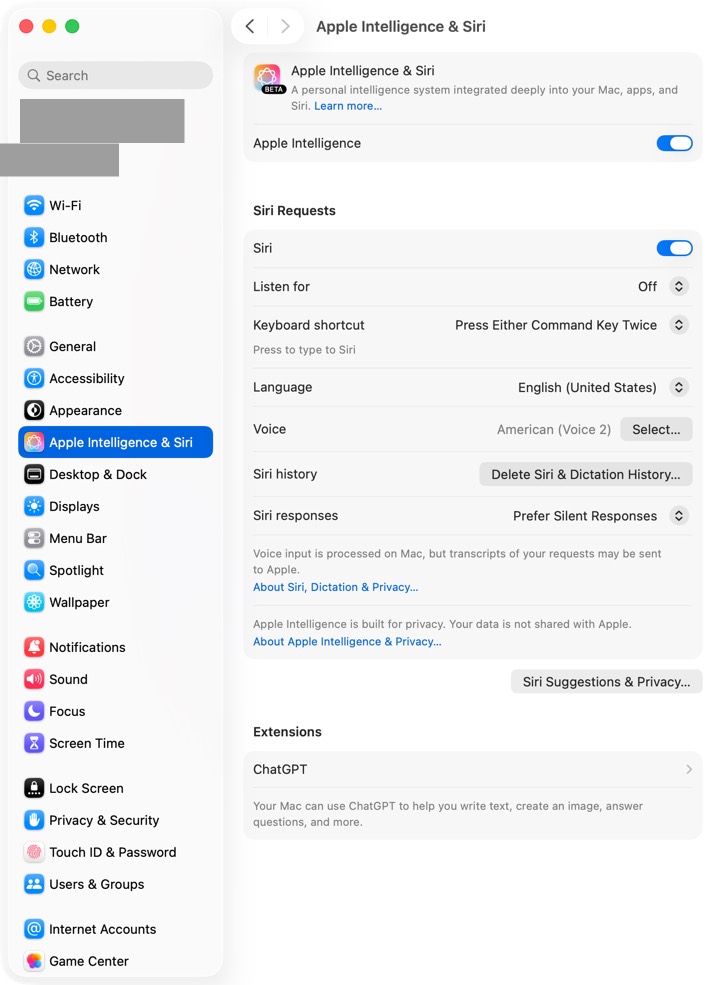
- The assistant's written explanation needs Apple Intelligence: a Mac with Apple silicon, with it turned on in System Settings › Apple Intelligence & Siri. Without it, the figures show as on an iPhone without it.
You should now see the sidebar on the left of the window, and the shortcuts beside each command in the menu bar.
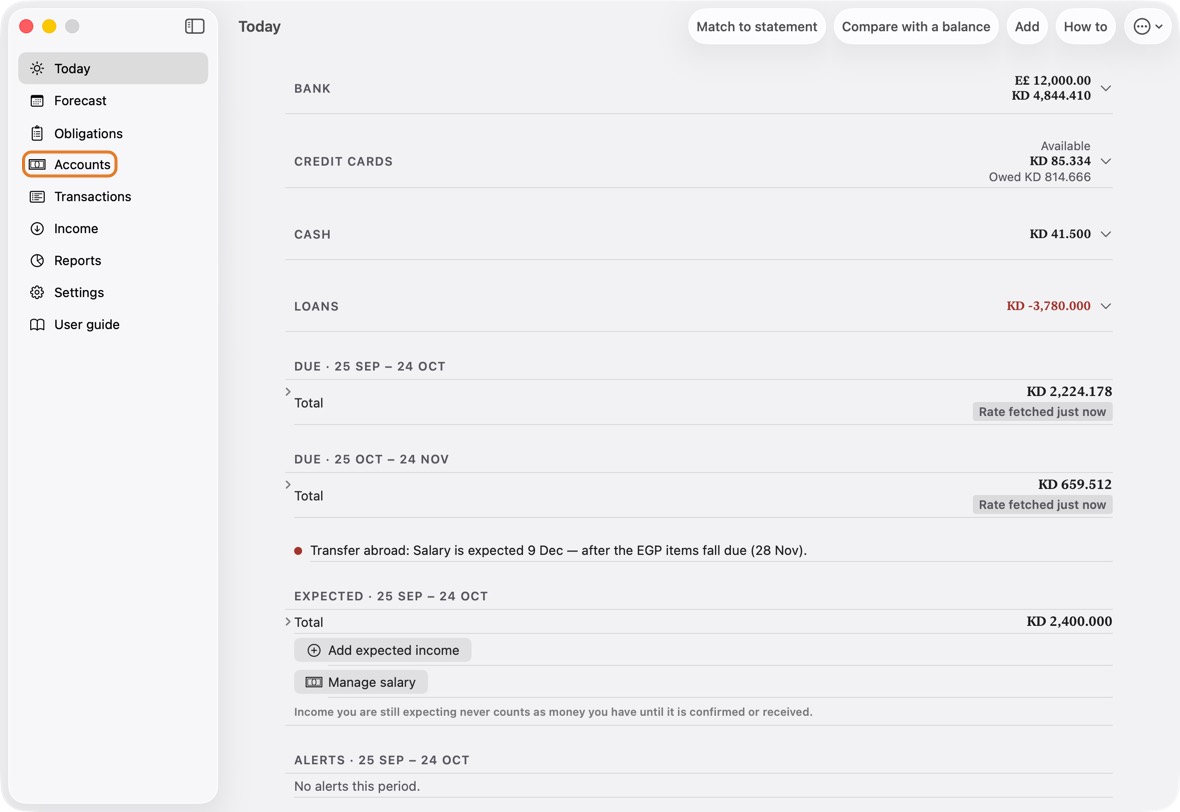
- This guide is also in the app: Settings › User guide.
- The window remembers its size; each section opens beside the sidebar.
What works without Apple Intelligence
- On an iPhone without it (an iPhone 13, say), or with it off, these work fully: everything you record by hand; Today and Forecast; obligations, loans and debts; Match to statement with Excel (.xlsx) and CSV statements; the advisor's calculation and its suggestions; and Siri, every phrase.
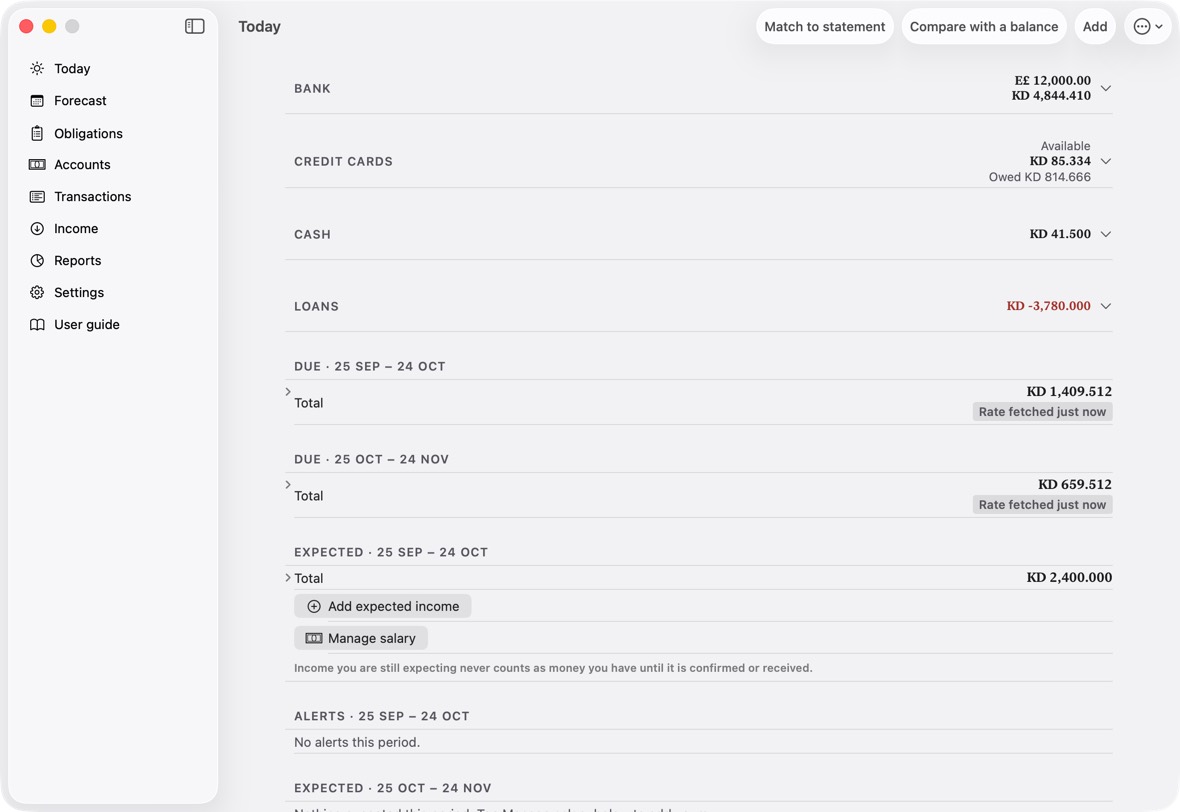
- These need it, and are hidden without it: the advisor's written explanation (its figures still show); Scan a receipt; Type it in words; the payee name suggestion when you add a transaction; and reading a statement from a PDF in Import a statement (Excel works, and Match to statement takes Excel or CSV).
You should now see the advisor's calculation, complete, with a line saying why it has no written explanation.
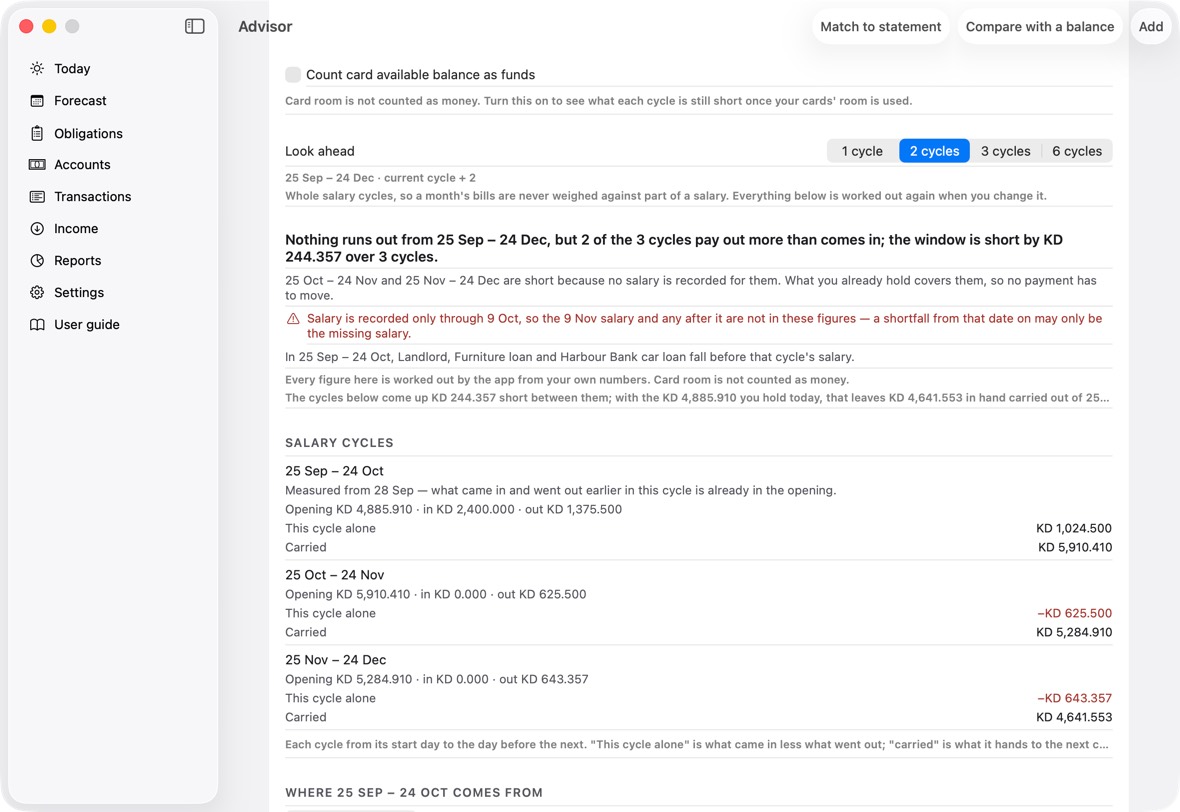
- The figures and the payments it suggests moving are the same with or without Apple Intelligence.
iCloud, and more than one device
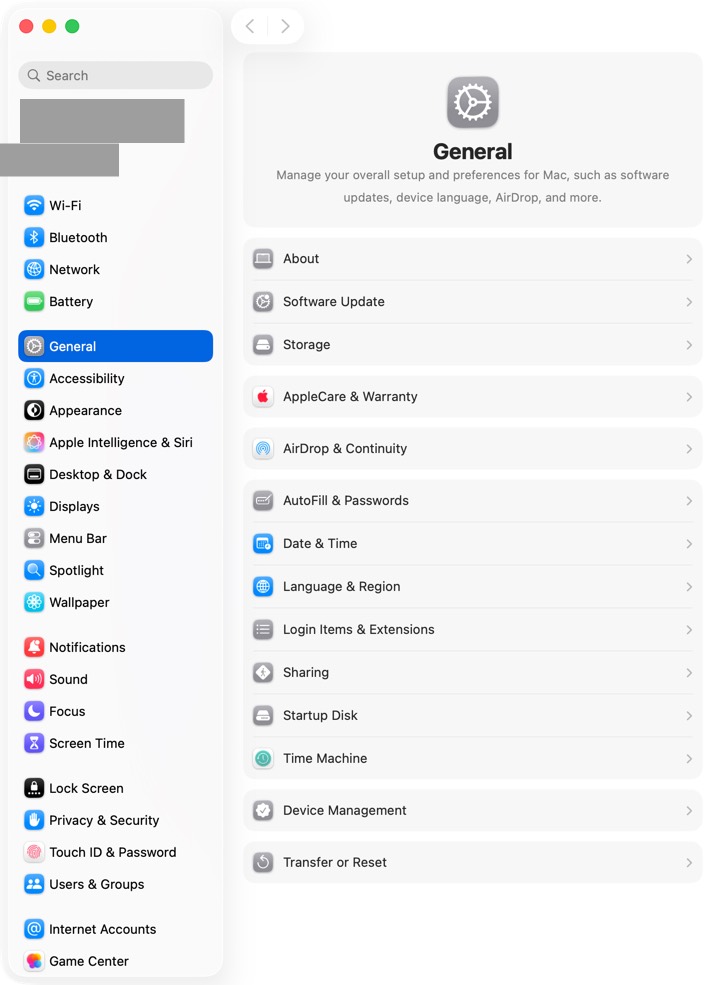
- Sign in with your Apple Account in System Settings (at the top of its sidebar), and turn on iCloud Drive under iCloud. The app keeps your data in your own iCloud, so an iPhone, an iPad and a Mac see the same.
- Set up on one device. Open the app on your other devices after that, online: each looks for your data in iCloud first, and shows Your data is coming from iCloud instead of Setup.
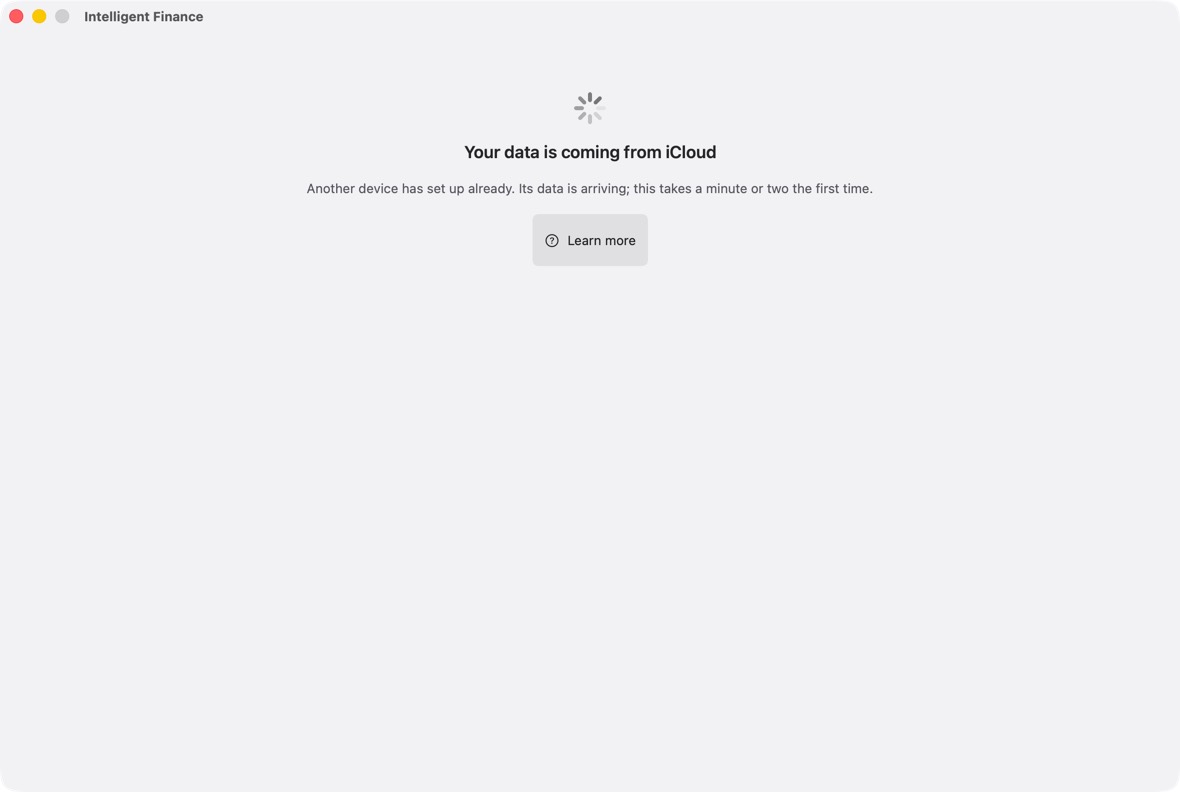
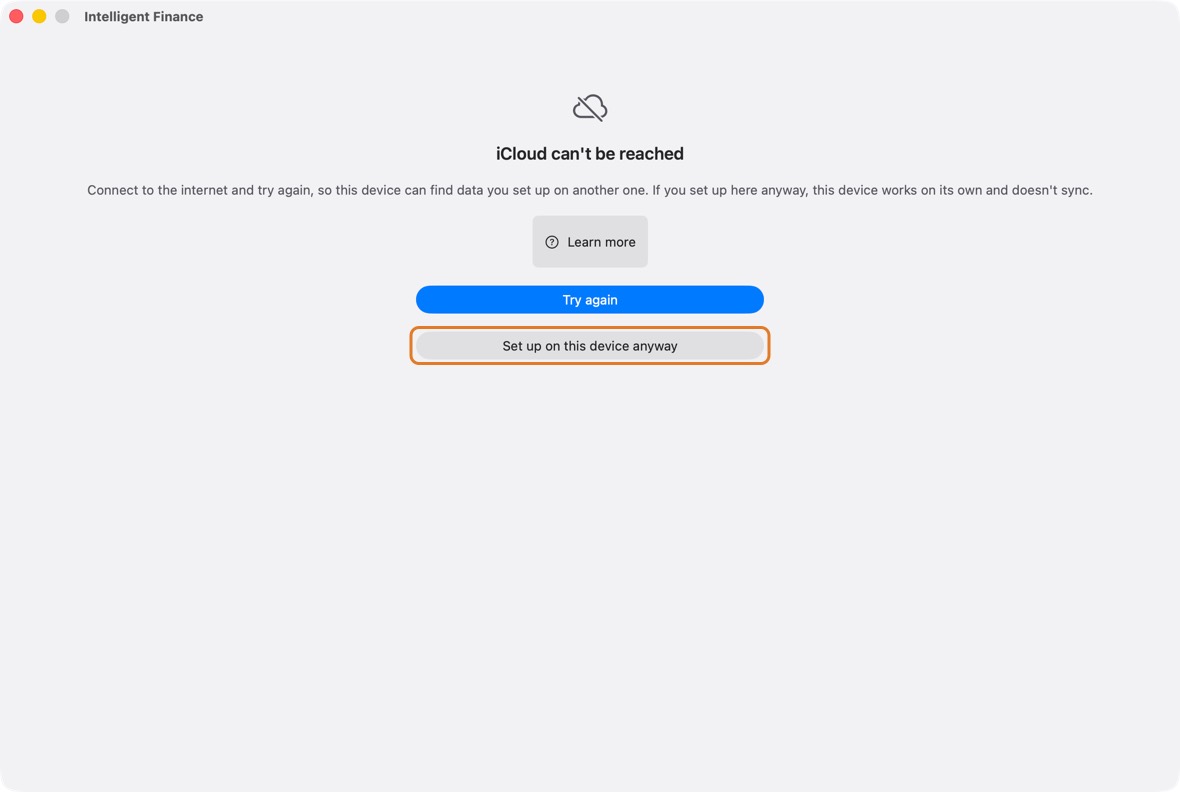
- If iCloud can't be reached when a new device looks, it says so. Click Try again once it is online. Set up on this device anyway makes a device that works on its own and doesn't sync: use it only if this is your only device.
- Backups you export can be saved in iCloud Drive too, so they are safe if the Mac is lost.
You should now see your Apple Account at the top of System Settings, and the app's data the same on each device.
- At the top of System Settings' sidebar: the Apple Account you signed in with; iCloud and iCloud Drive are inside it.
Where to keep your statements
- Save the statements you download from your bank in iCloud Drive, in one folder.
- Before you choose them in the app, open the folder in Finder and make sure each is downloaded: a file with a cloud beside it is not on the Mac yet. Click the cloud to download it.
You should now see each file under Choose statements, with the account or card it was placed on.
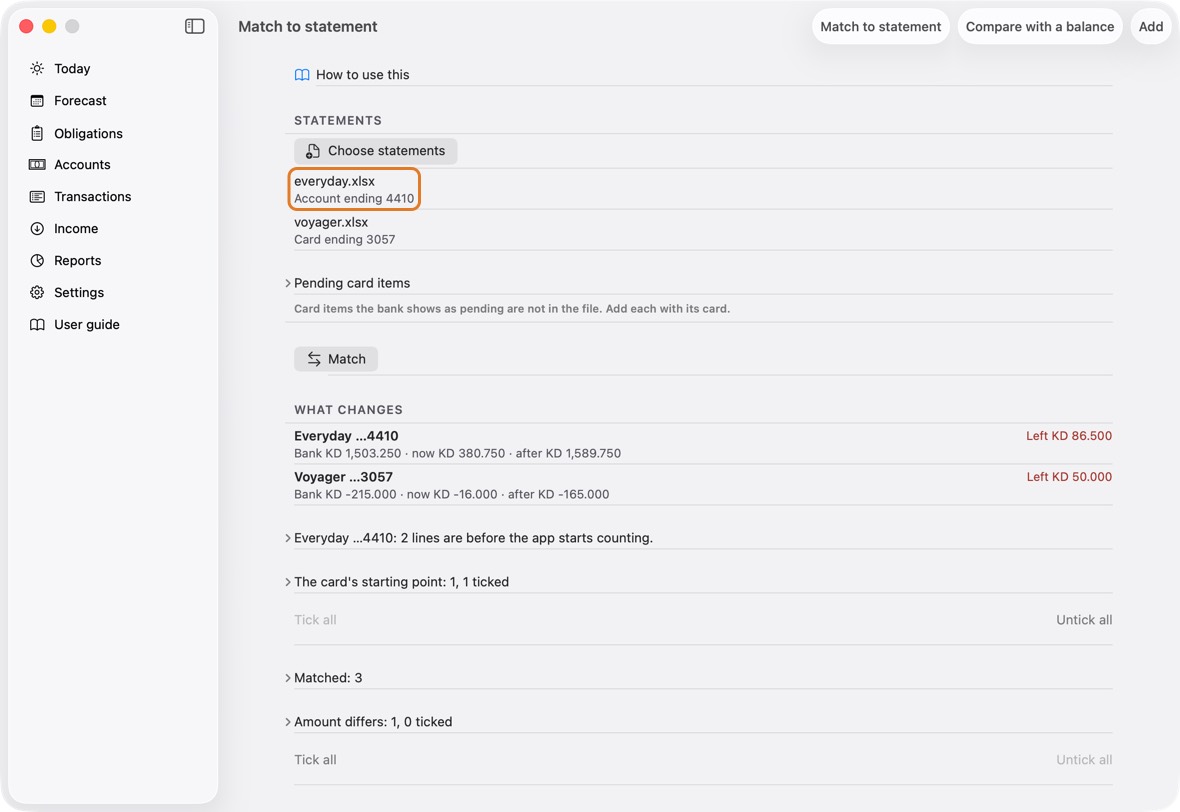
- Account ending … or Card ending … under each file name.
Getting started
Set up the app the first time
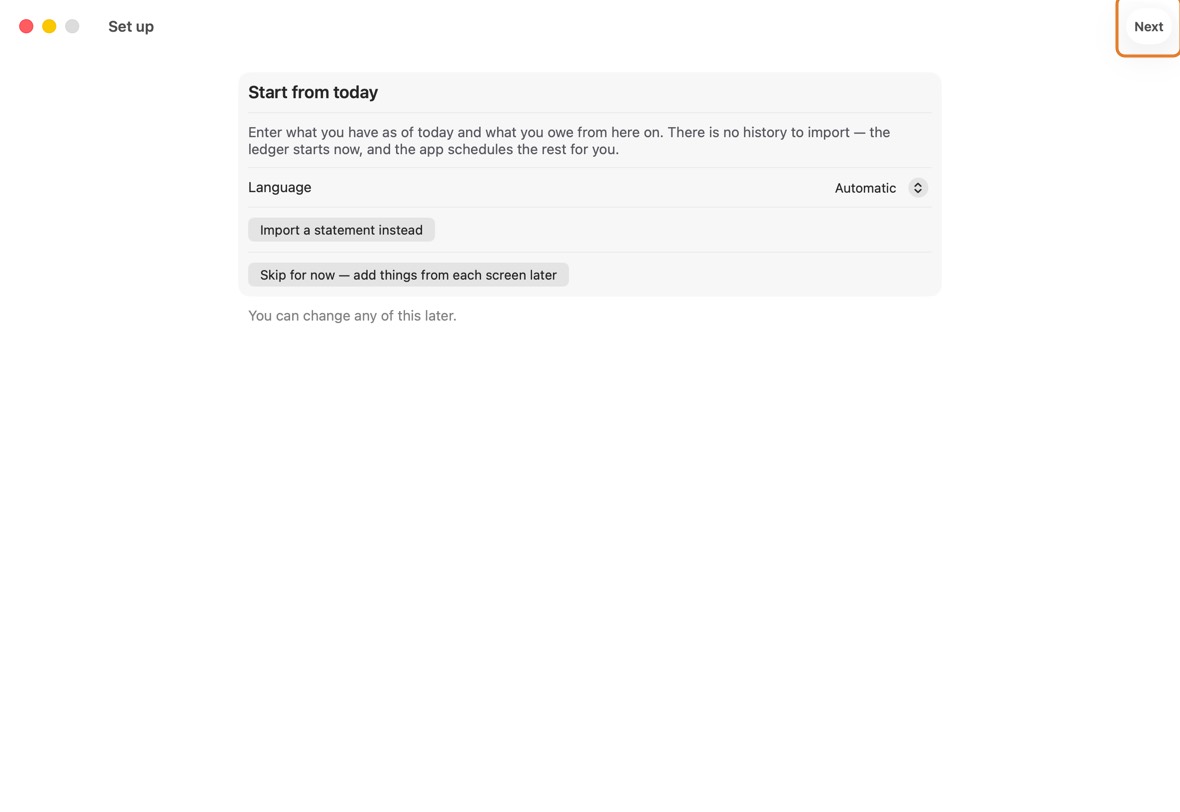
- Open the app. Set up opens by itself. Choose your language, or click Next to start.
- Choose your Main currency: the currency everything is added up in. Under Also held, turn on any other currency you hold.
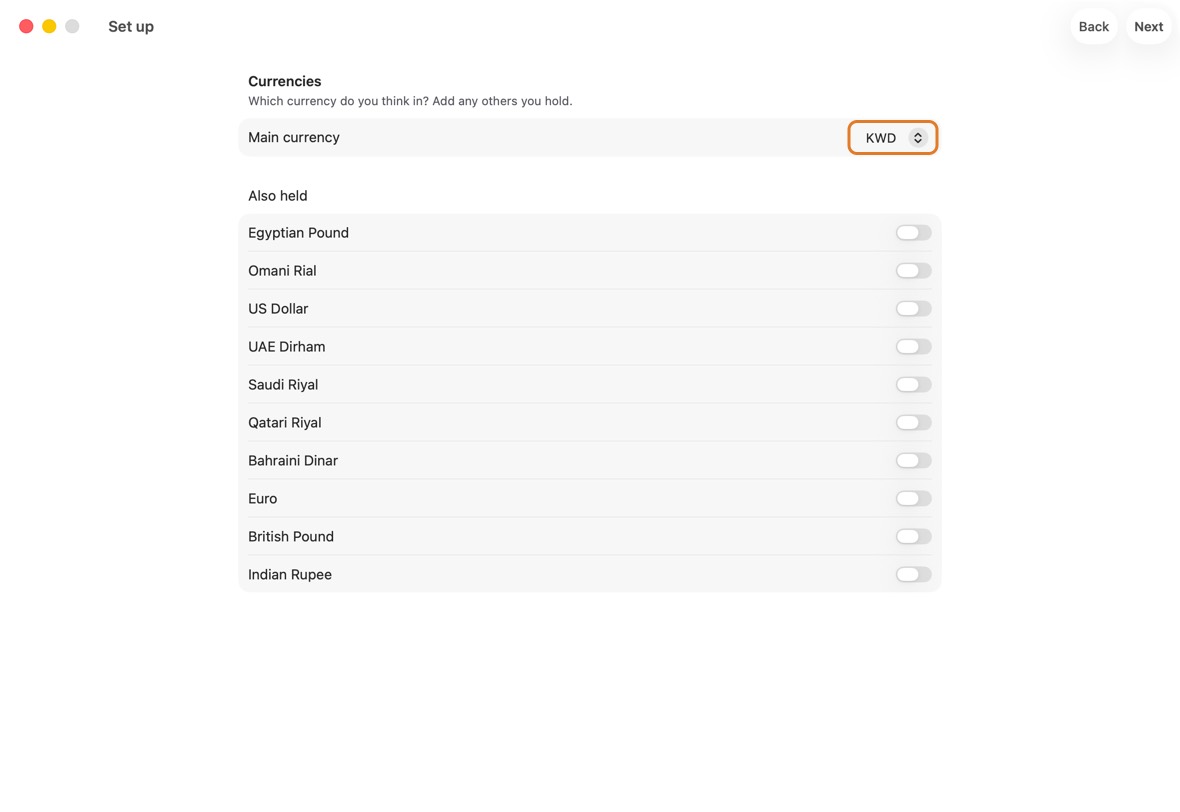
Field Must fill? What it means Example Main currency No The currency the app adds everything up in.
If you leave it: Kuwaiti dinar. Change it if most of your money is in another currency.KWD Also held No Any other currency you hold money in. Turn on each one, so its accounts and cards can use it.
If you leave it: None. You can add an account in another currency later.US Dollar - Under Accounts, type each bank account: its name, its Last four digits and its Balance today. Click Add for another.
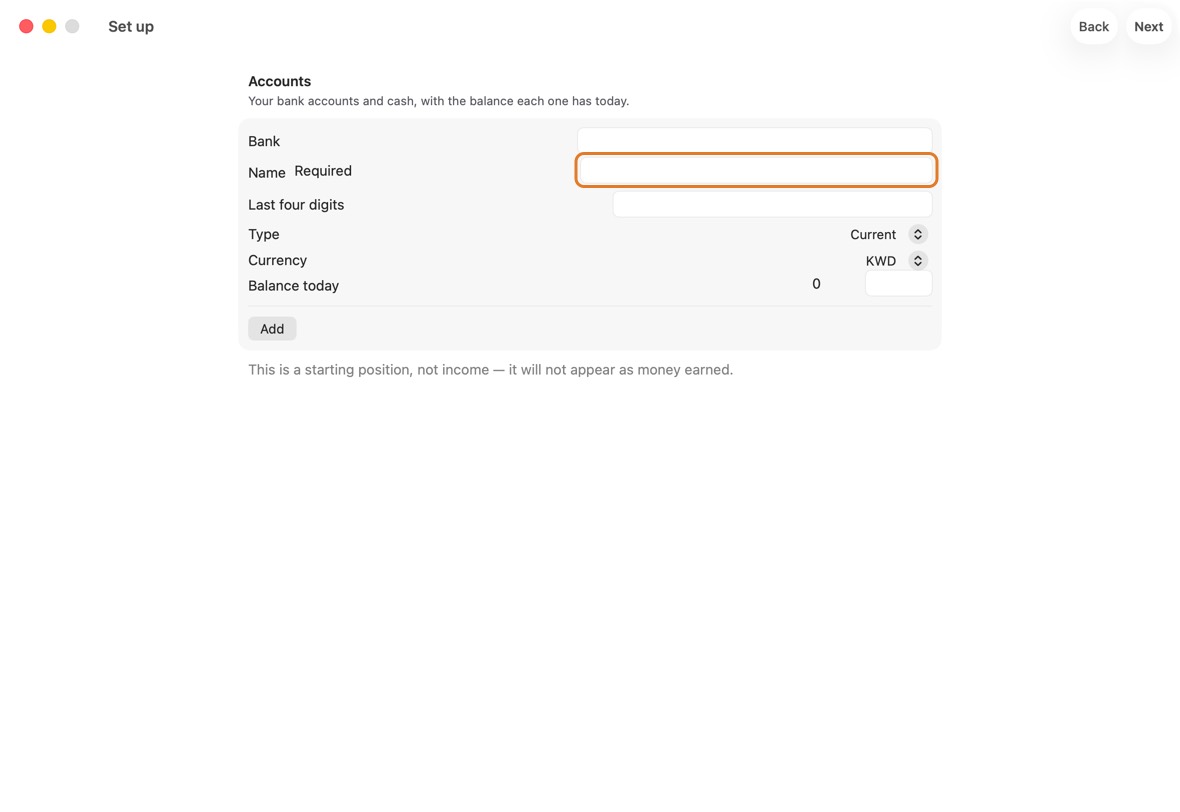
Field Must fill? What it means Example Bank No The bank the account is with. Harbour Bank Name Yes What you call the account. Everyday Last four digits No The account number's last four digits, so a statement can be matched to it. 4410 Type No Current, savings or cash in hand.
If you leave it: Current. Change it for a savings account or cash.Currency No The account's own currency.
If you leave it: Your main currency. Change it for an account in another currency.KWD Balance today No What the bank says is in it today. Everything after today is added from here.
If you leave it: 0. Type the bank's figure.1,844.410 - Under Cards, add each card. A credit card also needs its limit and what it is Owed today.
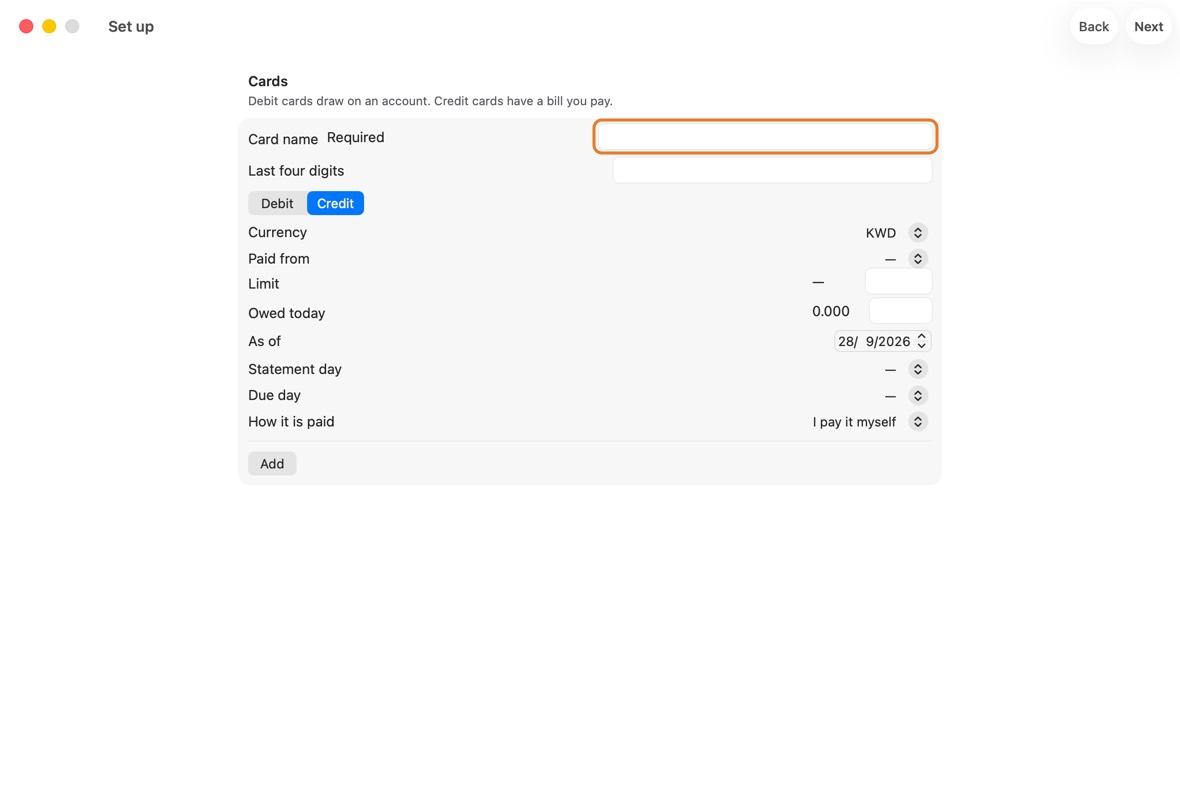
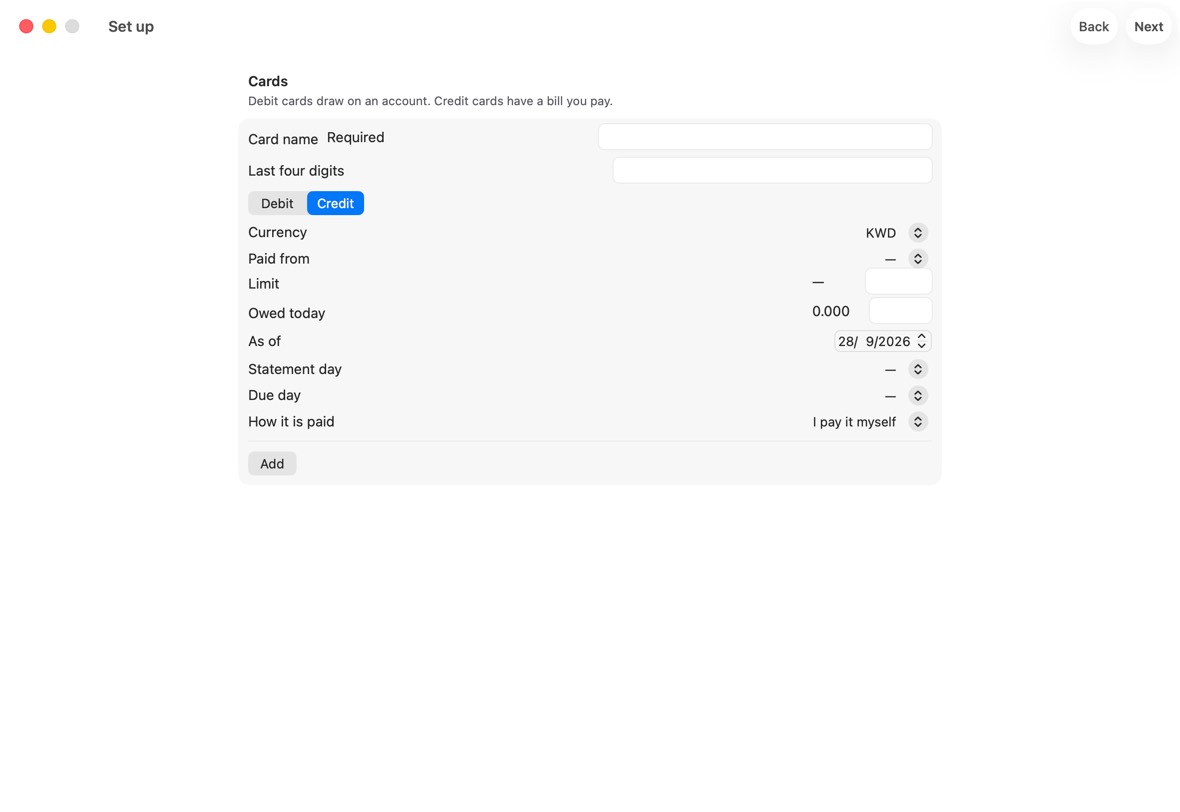
Field Must fill? What it means Example Card name Yes What you call the card. Voyager Last four digits No The card number's last four digits, so its statement can be matched to it. 3057 Credit No Credit: you pay the bank later. Debit: the money leaves the account at once.
If you leave it: Credit.Currency No The currency the card is billed in.
If you leave it: The currency of the account that pays it.Paid from No For a credit card: the account its bill is paid from.
If you leave it: The first account. Change it if the bill is paid from another.Everyday Draws on No For a debit card: the account it takes the money from. Everyday Limit No Credit cards: how much the bank lets you owe on it. 900 Owed today No Credit cards: what you owe on it on the day below. 318.740 As of No The day that figure was true.
If you leave it: Today.Statement day No The day of the month the bank prints the statement. 20 Due day No The day of the month the bill must be paid by. 5 How it is paid No In full, by yourself, or by automatic debit.
If you leave it: I pay it myself.Owed today is what the bank says you owe, and As of is the day that was true. Purchases after that day are added on top.
- Under Income, turn on Salary, type the amount and the day it is Paid on day.
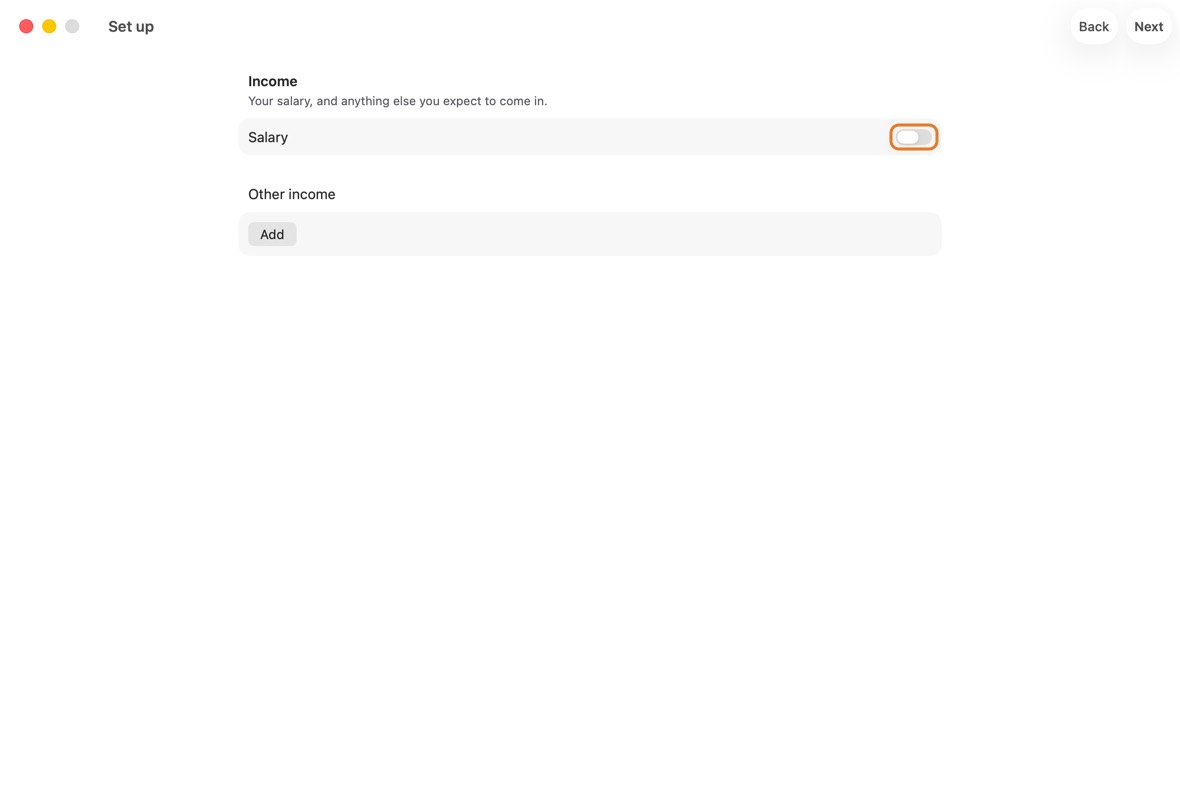
Field Must fill? What it means Example Salary No Turn on if a salary comes in each month.
If you leave it: Off.Amount Only if Salary is on What arrives each month. 1,500 Paid on day No The day of the month it arrives.
If you leave it: The 28th.28 Into No The account it arrives in.
If you leave it: Your first account.Everyday What is it Only if you add other income Any other money you expect, one at a time. Bonus Expected on No The day you expect it.
If you leave it: Today.Repeat No Whether the other income comes once, monthly, quarterly or yearly.
If you leave it: Once. - Add what you pay regularly: click a starting point such as rent, then type who it is for and the amount.
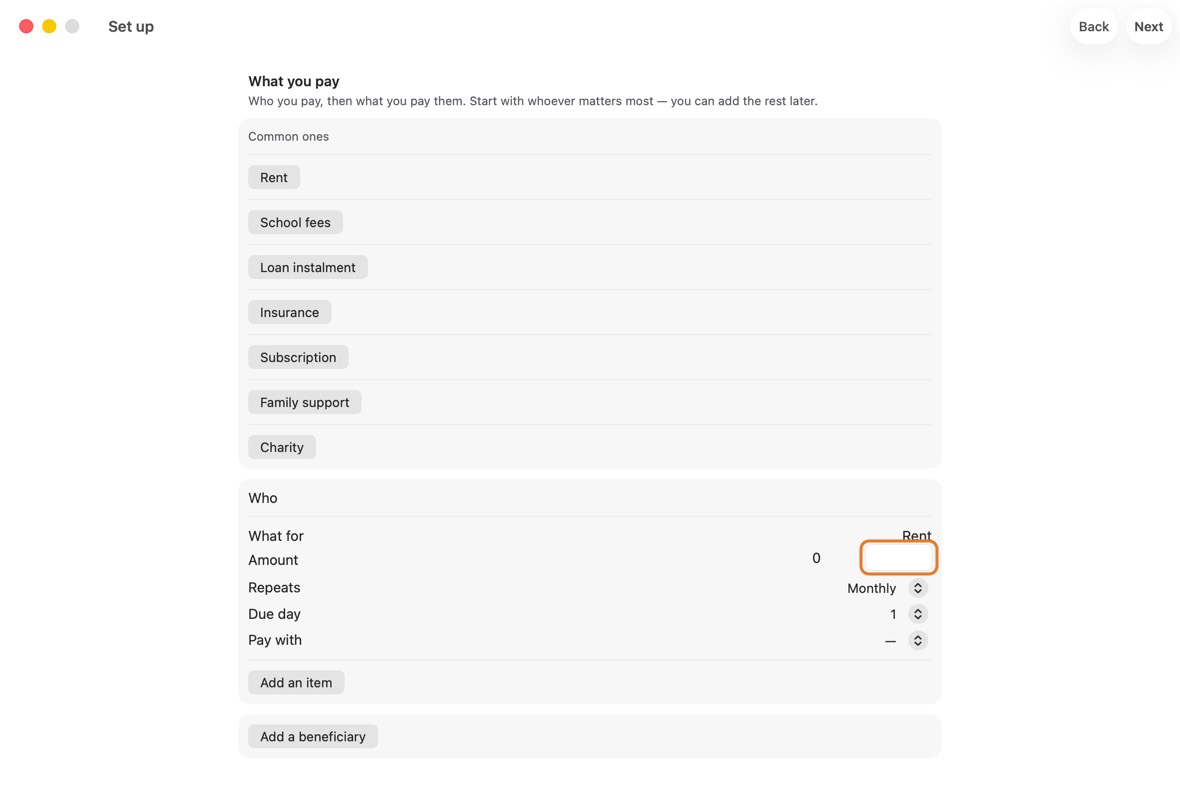
Field Must fill? What it means Example Who Yes Who you pay. Landlord What for No What it is for. Rent Amount Yes How much each time. 420 Repeats No How often it comes back.
If you leave it: Monthly.Due day No The day of the month it is due. 1 Pay with Yes The account it is paid from, or Decide when paying.
If you leave it: Nothing: you choose. Next waits until each one with an amount has its choice. - Add your loans, and money you borrowed from or lent to people, then click Go to Today.
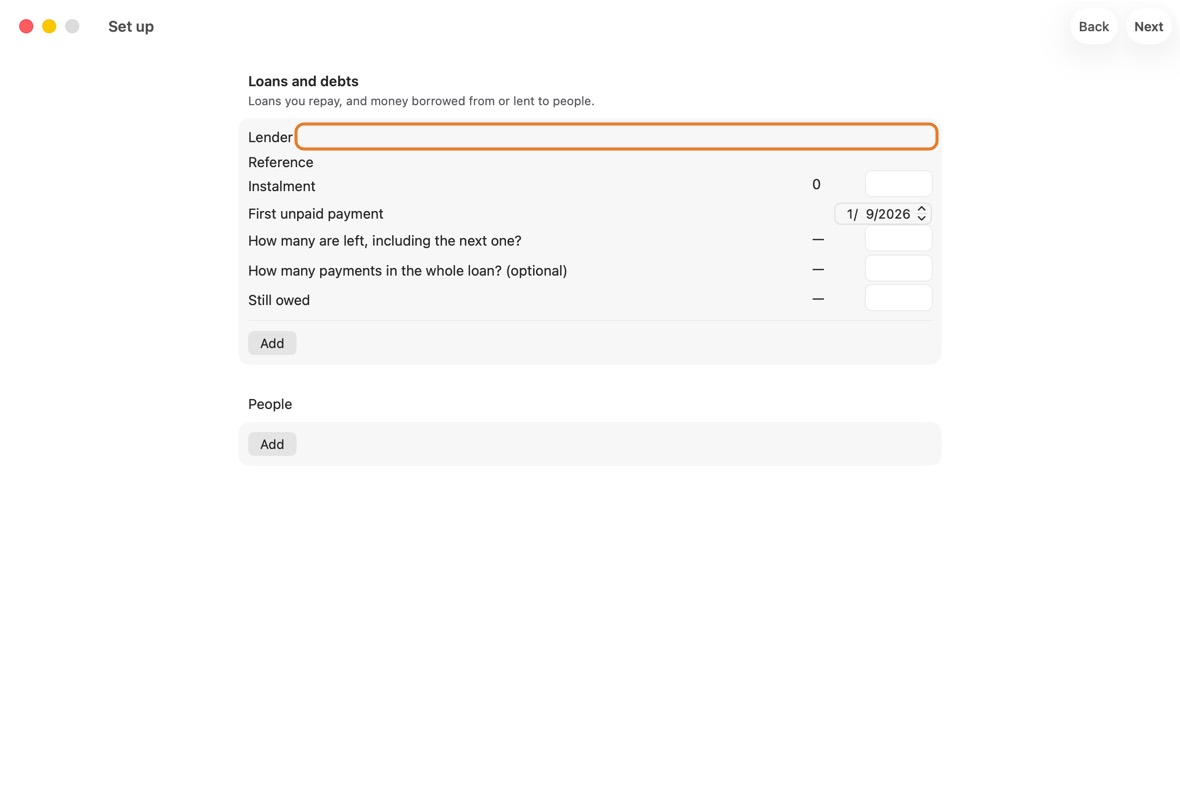
Field Must fill? What it means Example Lender Yes The bank or company you owe. Harbour Bank Reference No The loan's number at the lender. 7700002468 Instalment Yes What you pay each month. 145.500 First unpaid payment No The date of the next payment you haven't made yet. Its day is the loan's day each month. 7 Nov 2026 How many are left, including the next one? Yes How many payments are left, including the next one. 20 How many payments in the whole loan? (optional) No How many payments the whole loan has, if you know it — for "7 of 12 paid". 24 Still owed No What the lender says is still owed, if you know it. 2,900 - People: who it is, whether you borrowed or lent, and the amount.
Field Must fill? What it means Example Who Yes The person. Sami I borrowed No Whether you borrowed from them or lent to them.
If you leave it: I borrowed.Amount Yes How much. 200
You should now see Today, with your accounts, cards and what is due.
- At the top, Bank, Credit cards, Cash and Loans: what you hold and owe. Click one to see each account or card.
- Due: what you have to pay in each cycle, its total, and when a rate was used.
Run setup again
- Open Settings.
- Click Run setup again.
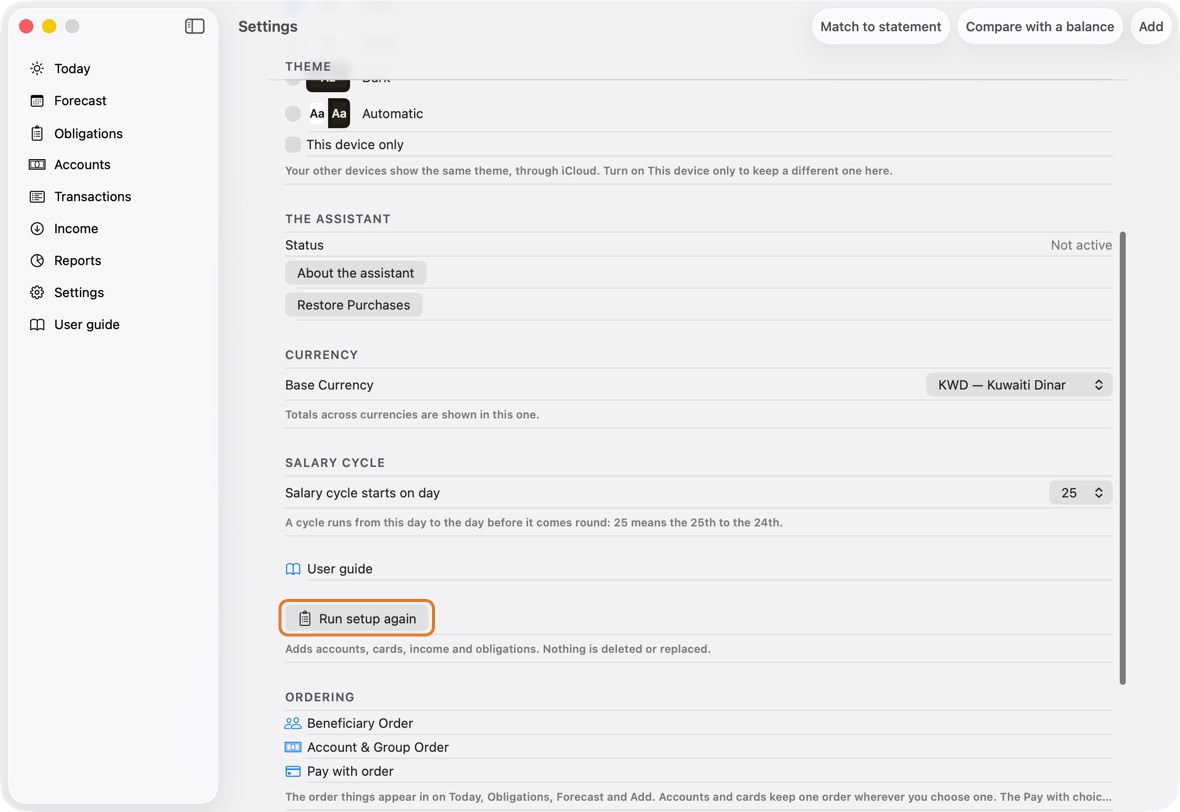
- Add the accounts, cards, income or obligations you missed, then finish.
You should now see what you added beside everything you had. Nothing is deleted or replaced.
- Today, with what you added beside everything you had.
Change the language
- Open Settings. Under Language, choose Automatic (the device's language), English or العربية.
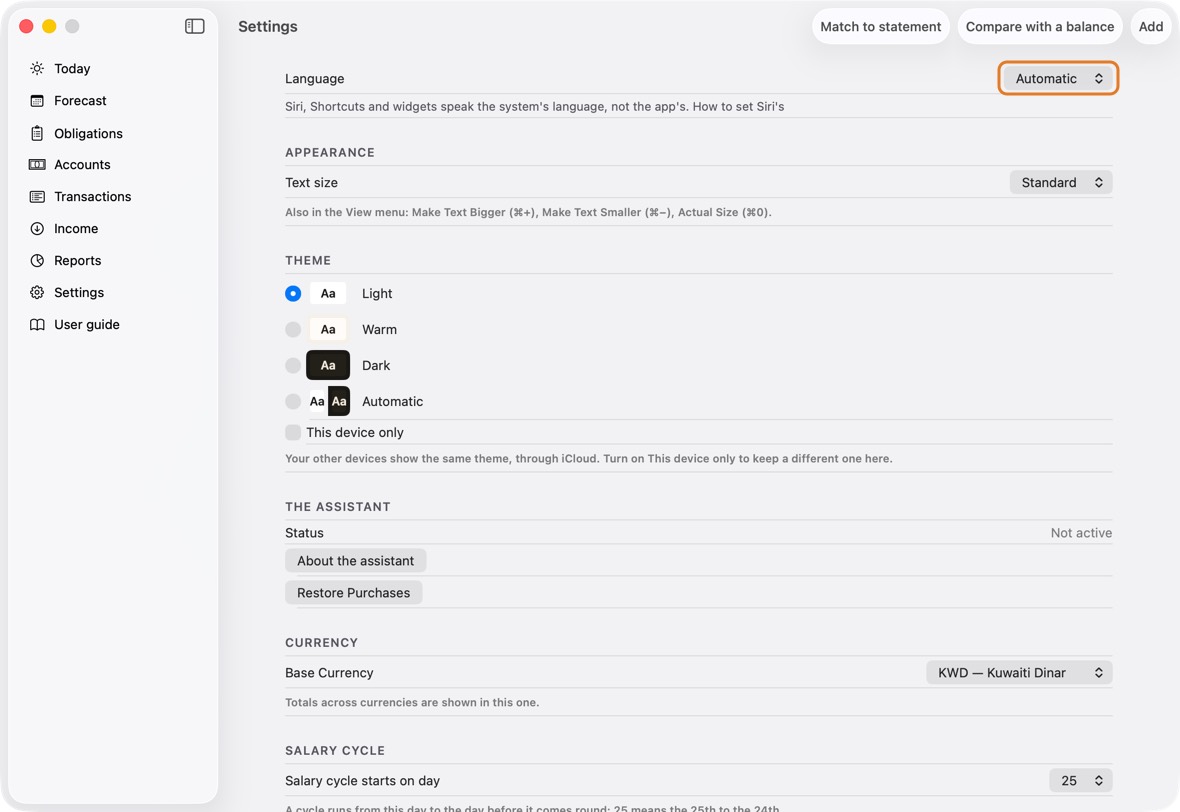
- Click Restart now. On the Mac and iPad the app closes: open it again from the Home Screen. On the Mac it opens again by itself.
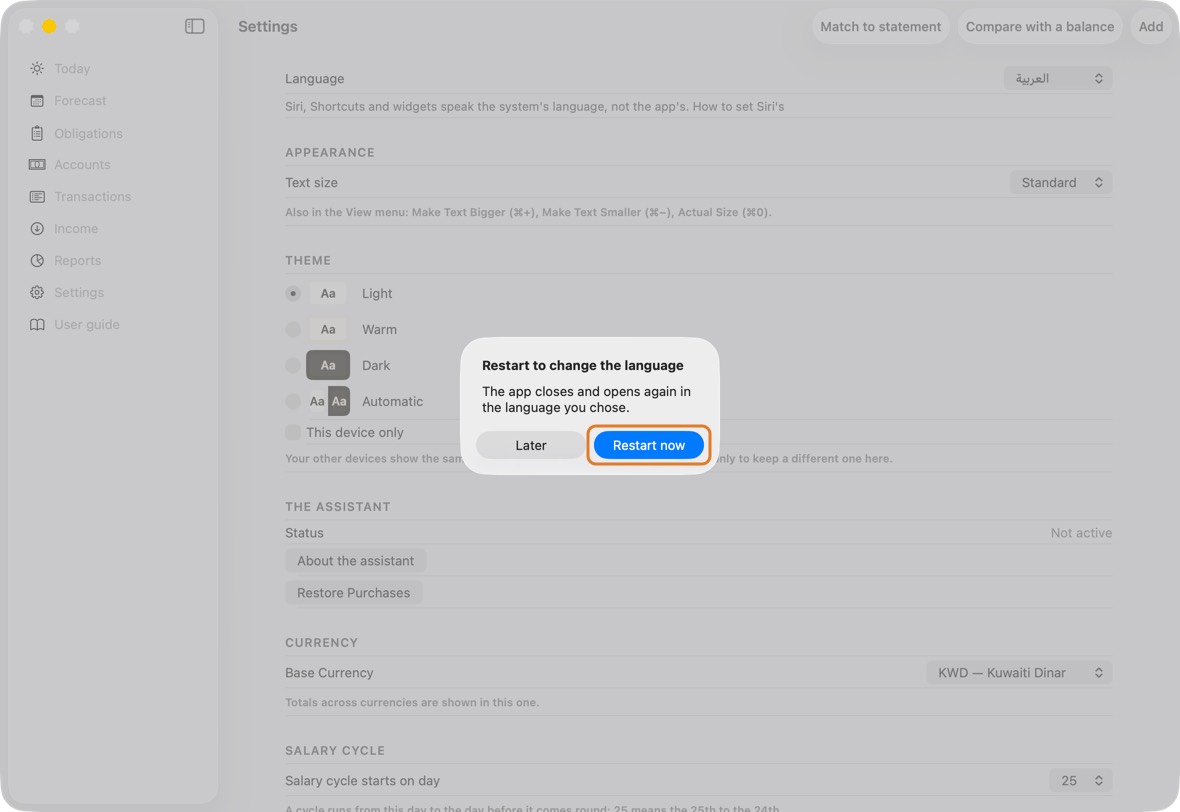
You should now see every screen in the language you chose, right to left in Arabic, with dates and figures in 0–9.
- The choice is kept on this device only.
- Siri, Shortcuts and widgets speak the system's language, not the app's: see “The app's language, and Siri's” under Before you start for Siri's.
Make the text larger or smaller
- Open Settings. Under Appearance, choose a Text size: Small, Standard, Large or Larger.
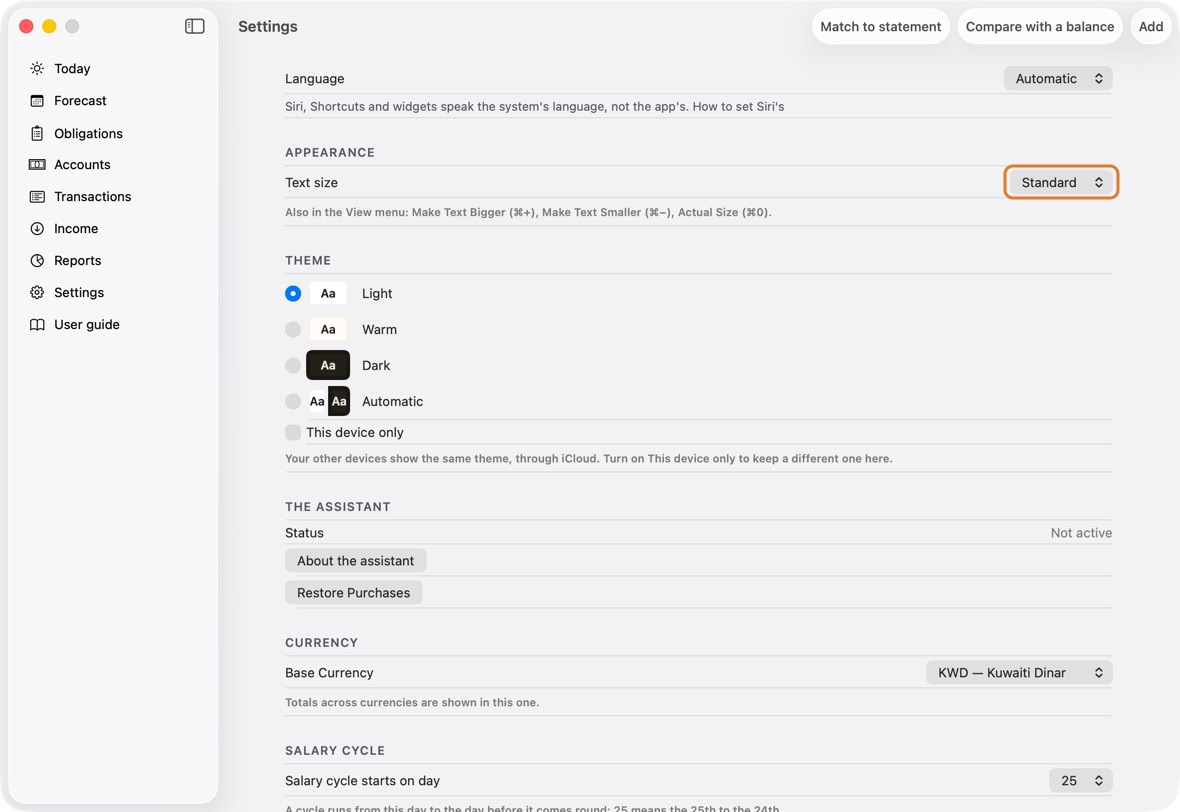
- On the Mac, the four sizes are the app's own; on the iPhone and iPad, Standard follows the size set for the whole device.
You should now see every screen's text at that size. Long lines wrap; nothing is cut off.
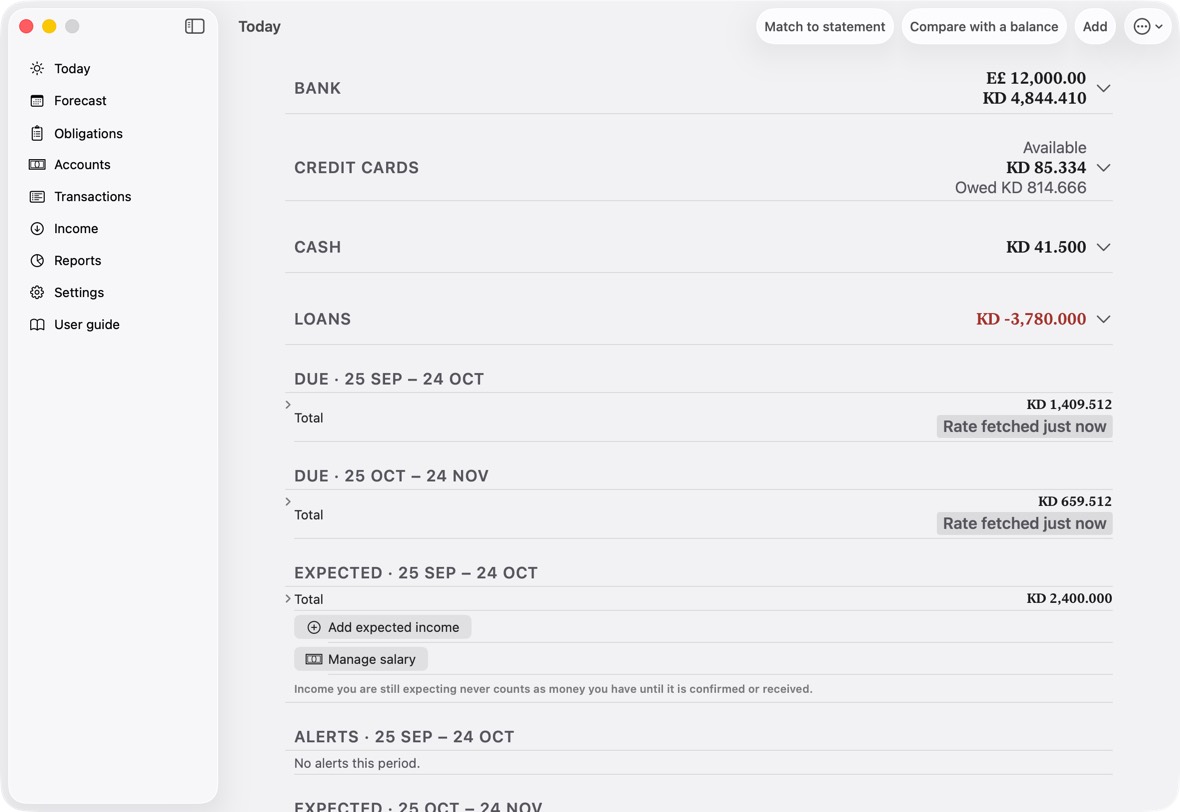
- The size is kept on this device only: a Mac and a phone can each have their own.
- On the Mac, the View menu has Make Text Bigger (⌘+), Make Text Smaller (⌘−) and Actual Size (⌘0).
Choose a theme
- Open Settings. Under Theme, choose one: each shows a small preview of its colours.
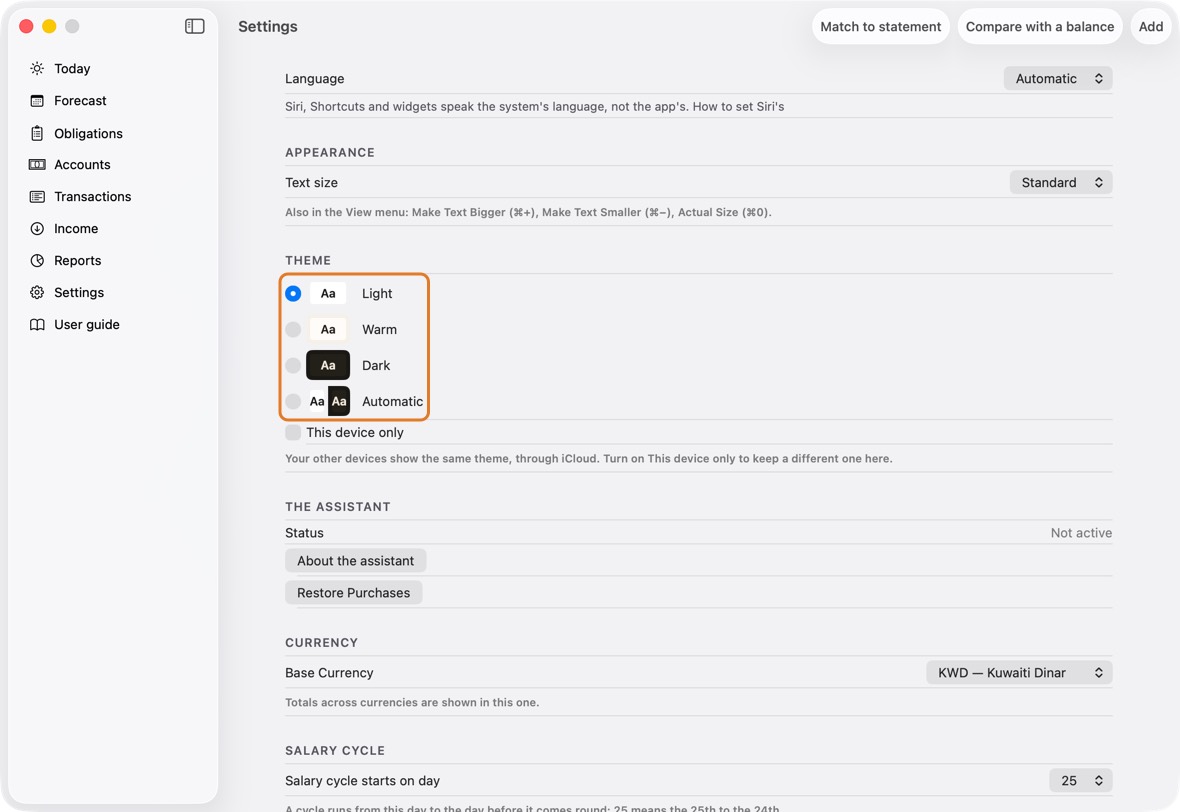
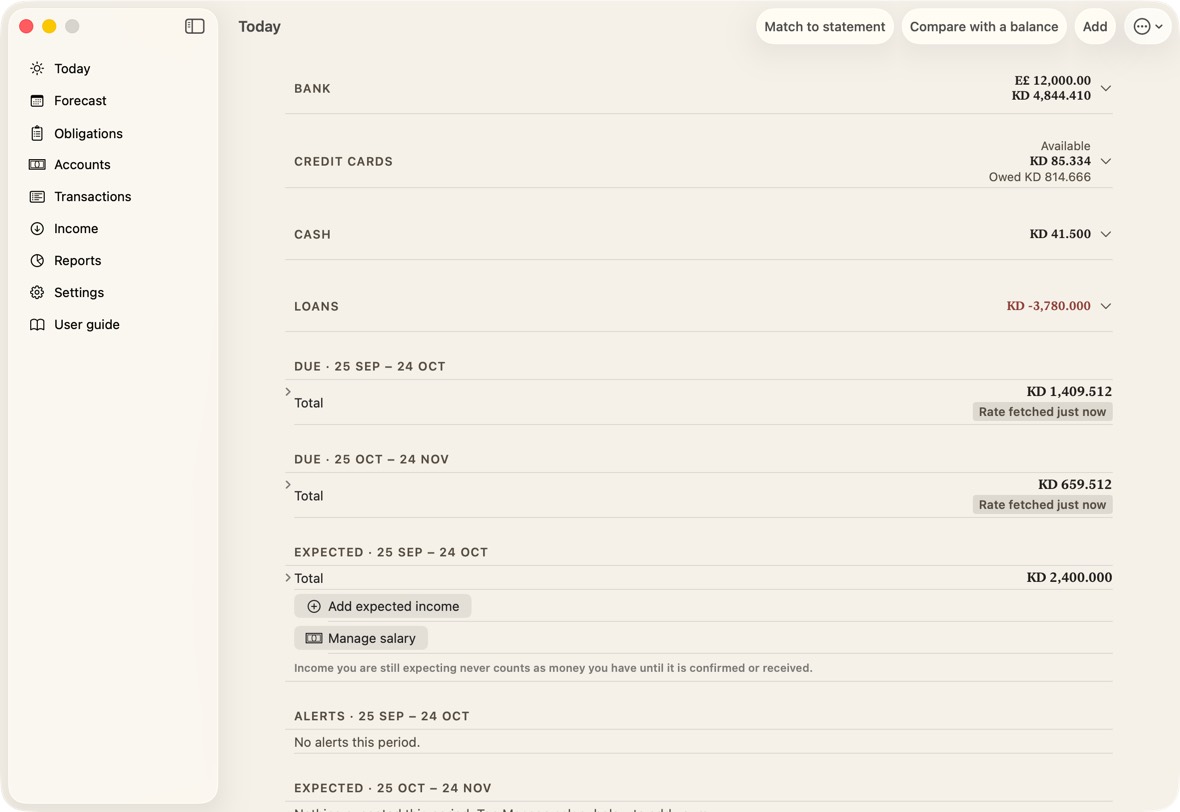
- Light is white with near-black text, the start. Warm is a parchment ground with dark text.
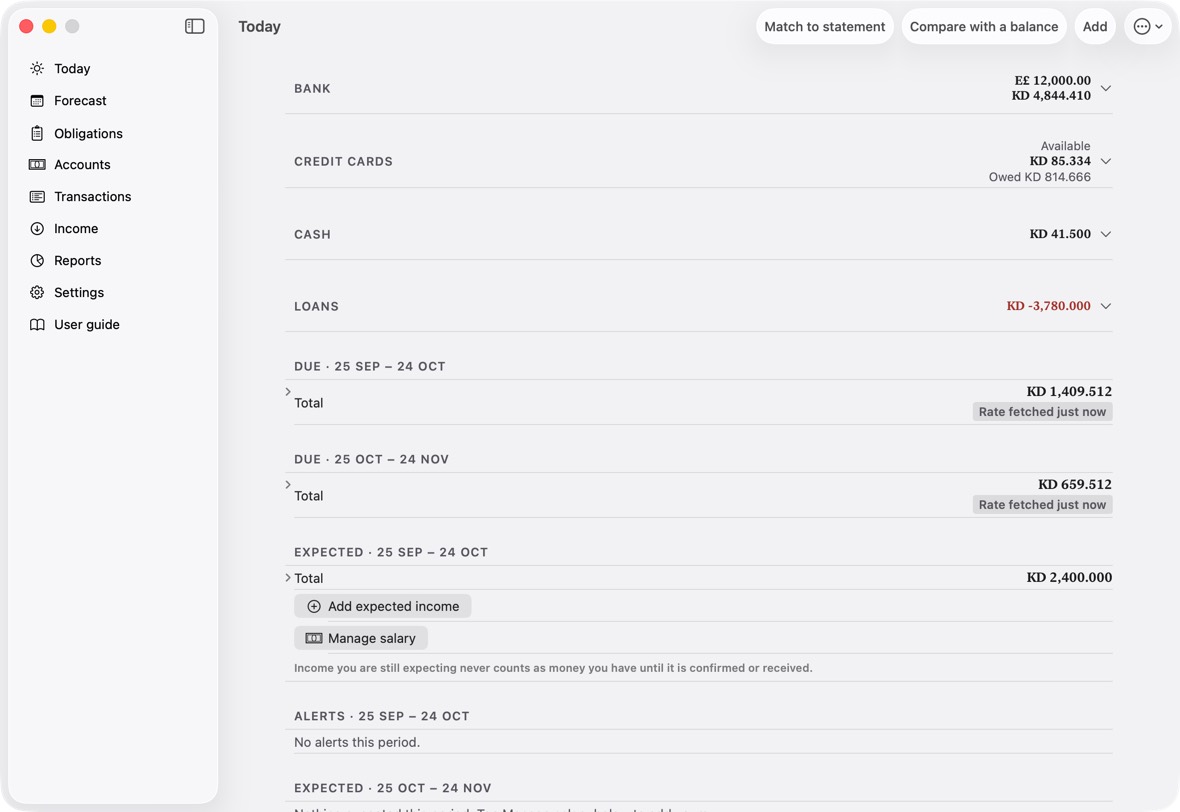
- Dark is dark always. Automatic is Light by day and Dark when the device turns dark.
- Your other devices change to the same theme, through iCloud. To keep a different one on this device, turn on This device only.
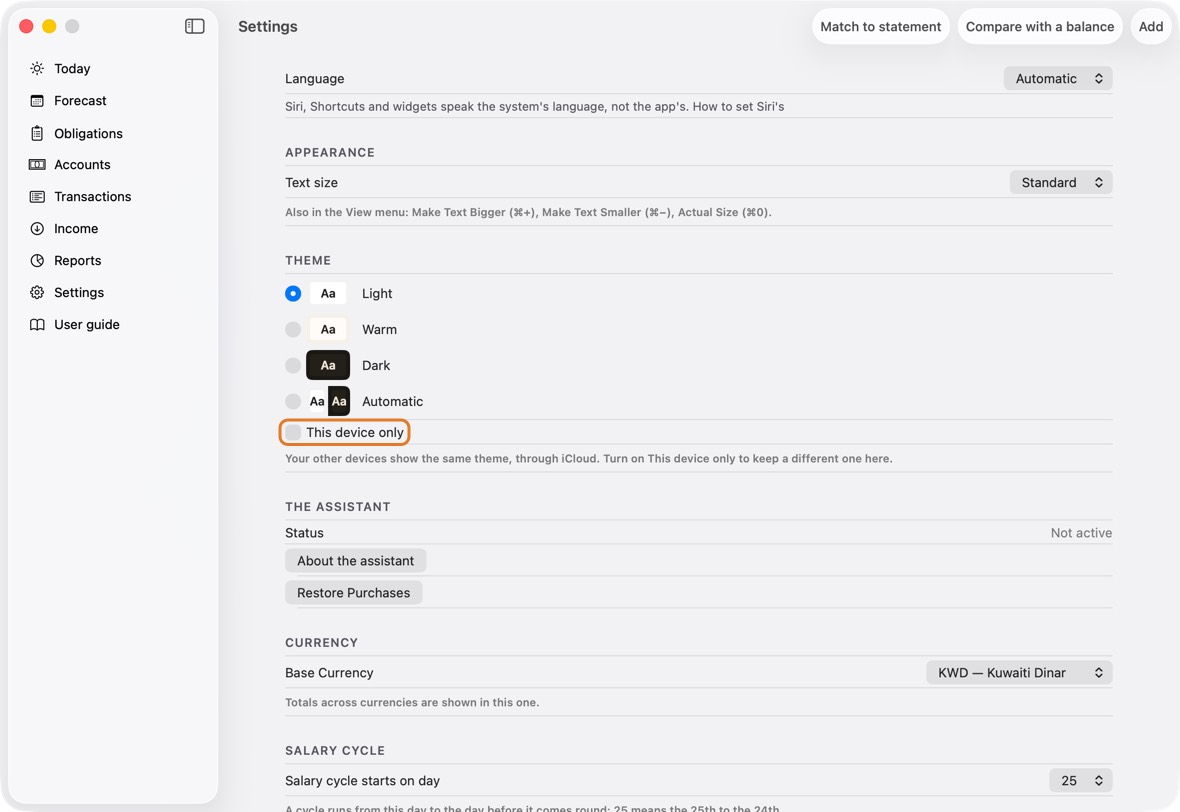
You should now see every screen in the theme you chose, on every device that follows it.
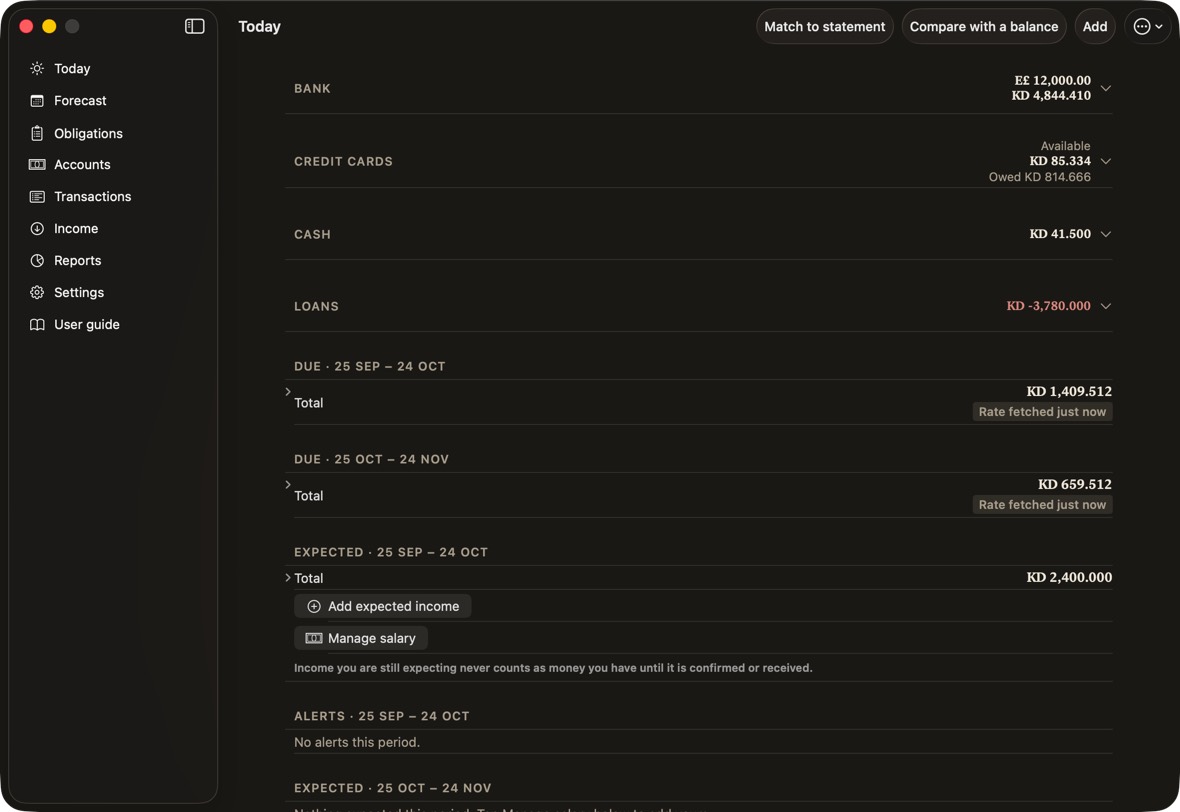
- Every theme keeps text at least 4.5 times as bright or as dark as what it sits on, so it stays readable.
Accounts and cards
Add an account
- Open Accounts and click Add, then Add account.
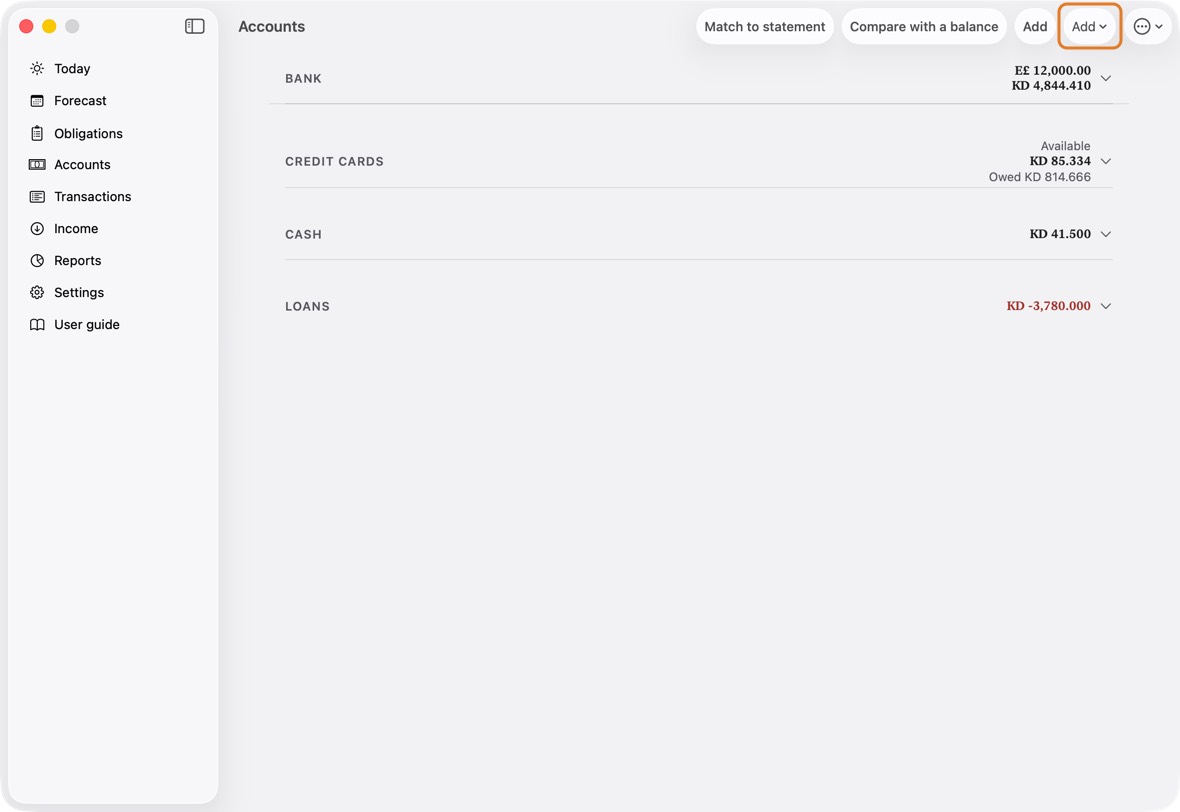
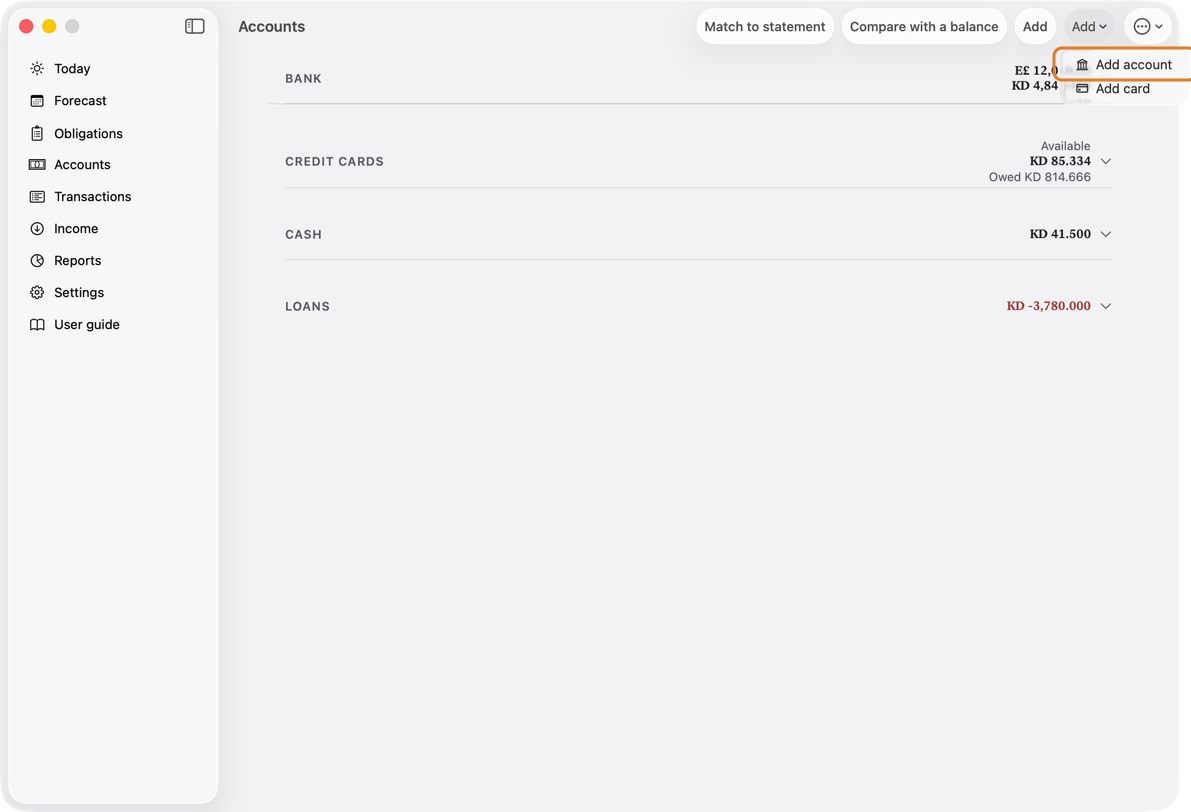
- Type its name, currency, last four digits and today's balance. Only the name must be filled.
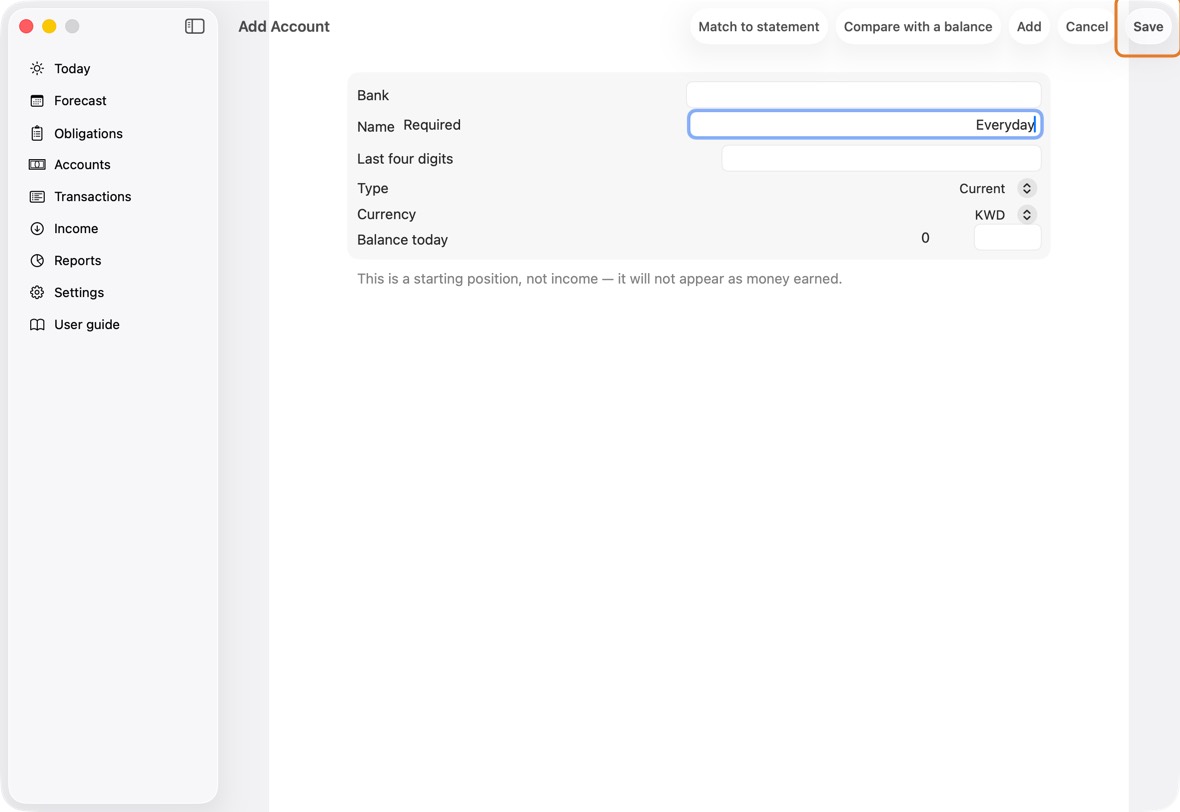
Field Must fill? What it means Example Bank No The bank the account is with. Harbour Bank Name Yes What you call the account. Everyday Last four digits No The account number's last four digits, so a statement can be matched to it. 4410 Type No Current, savings or cash in hand.
If you leave it: Current. Change it for a savings account or cash.Currency No The account's own currency.
If you leave it: Your main currency. Change it for an account in another currency.KWD Balance today No What the bank says is in it today. Everything after today is added from here.
If you leave it: 0. Type the bank's figure.1,844.410 - Click Save.
You should now see the account under Bank on Accounts, with its balance.
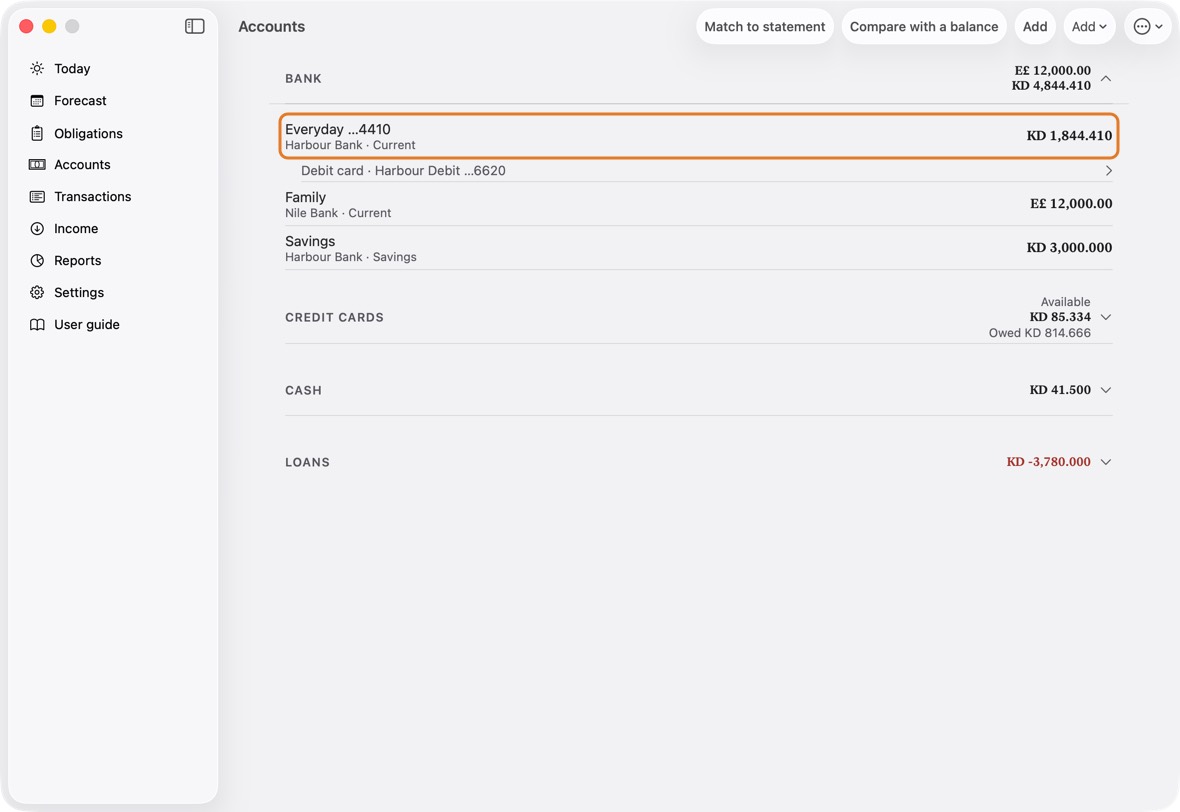
- The account's name and last four, its bank and type, and its balance.
- The group's total in each currency is beside Bank.
Add a card
- Open Accounts and click Add, then Add card.
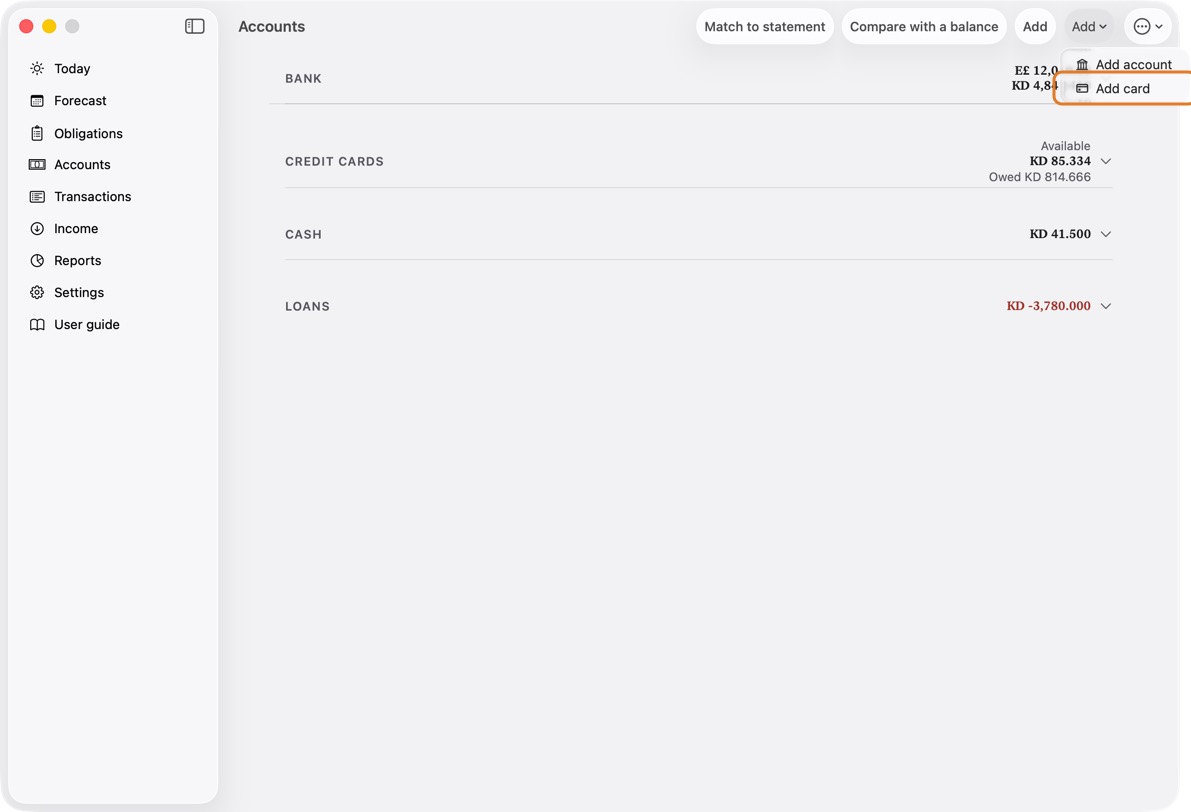
- Choose Credit or Debit. Type its name and last four digits, and choose the account that pays it. For a credit card, add its limit, what it is owed today and its days.
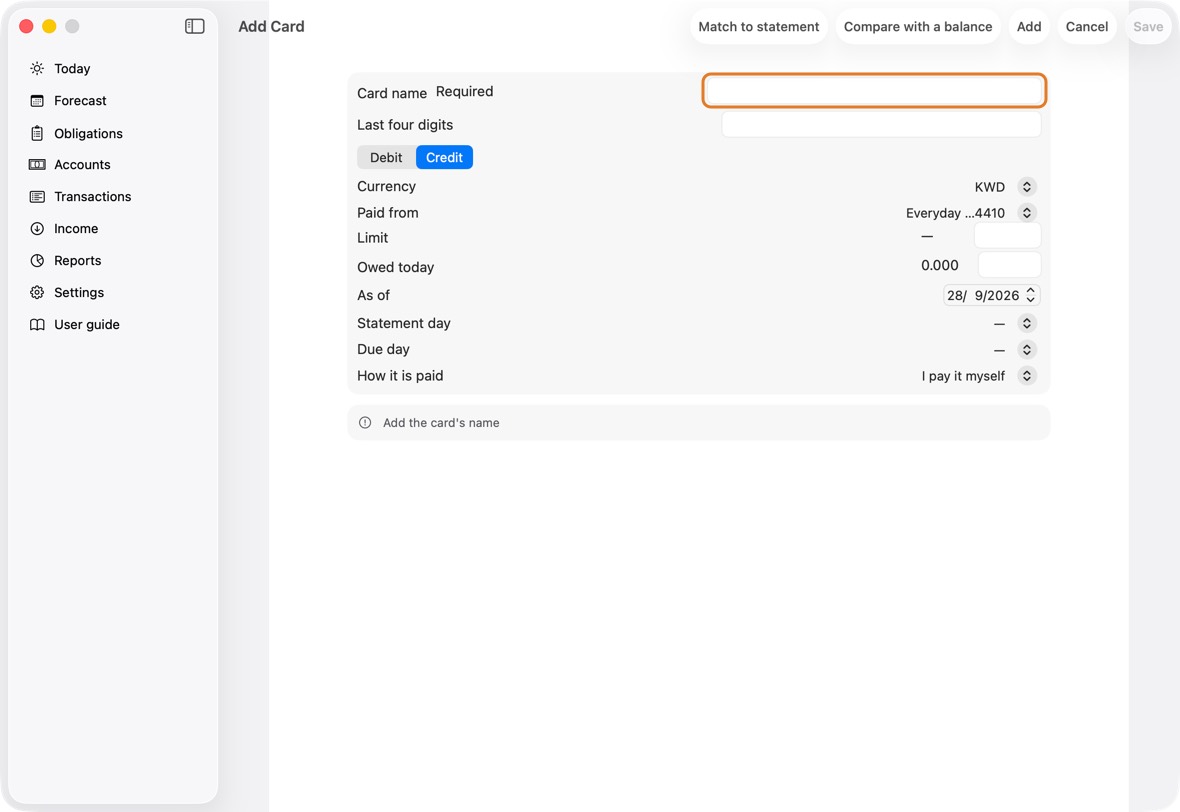
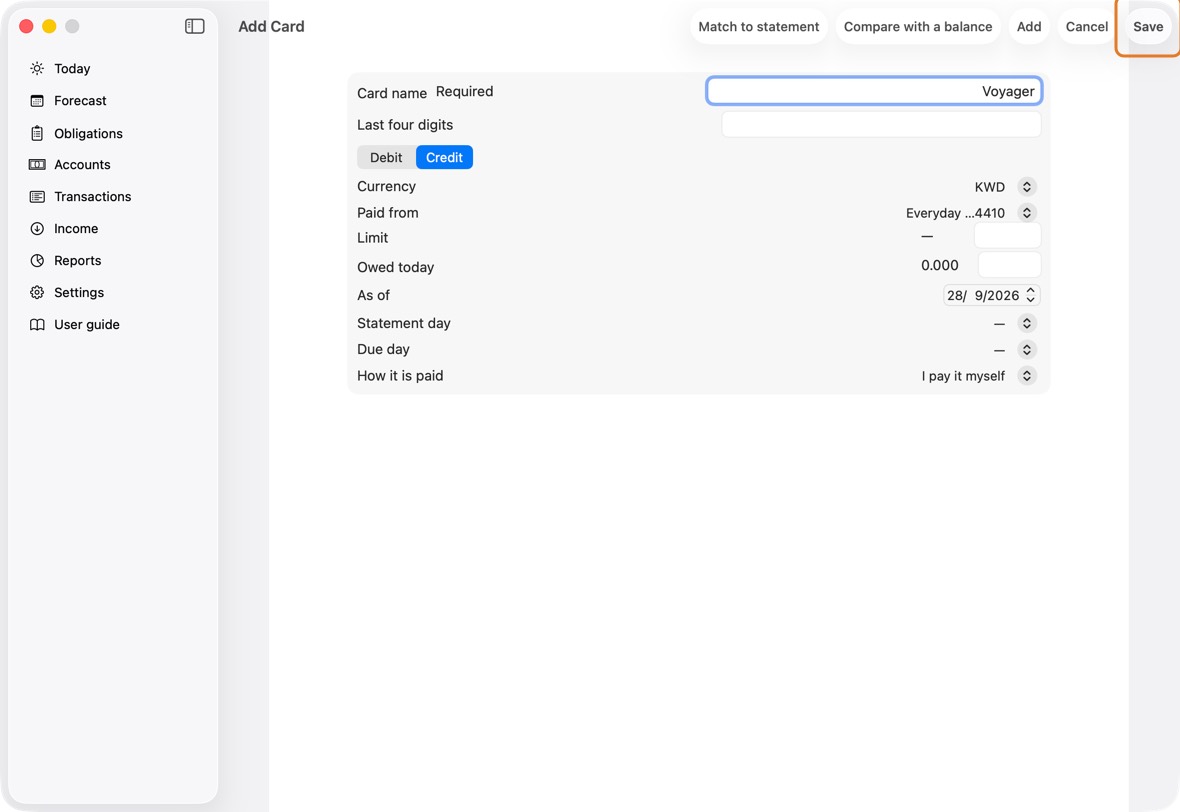
Field Must fill? What it means Example Card name Yes What you call the card. Voyager Last four digits No The card number's last four digits, so its statement can be matched to it. 3057 Credit No Credit: you pay the bank later. Debit: the money leaves the account at once.
If you leave it: Credit.Currency No The currency the card is billed in.
If you leave it: The currency of the account that pays it.Paid from No For a credit card: the account its bill is paid from.
If you leave it: The first account. Change it if the bill is paid from another.Everyday Draws on No For a debit card: the account it takes the money from. Everyday Limit No Credit cards: how much the bank lets you owe on it. 900 Owed today No Credit cards: what you owe on it on the day below. 318.740 As of No The day that figure was true.
If you leave it: Today.Statement day No The day of the month the bank prints the statement. 20 Due day No The day of the month the bill must be paid by. 5 How it is paid No In full, by yourself, or by automatic debit.
If you leave it: I pay it myself.Owed today is what the bank says you owe, and As of is the day that was true. Purchases after that day are added on top.
- Click Save.
You should now see a credit card under Credit cards, or a debit card under its account.
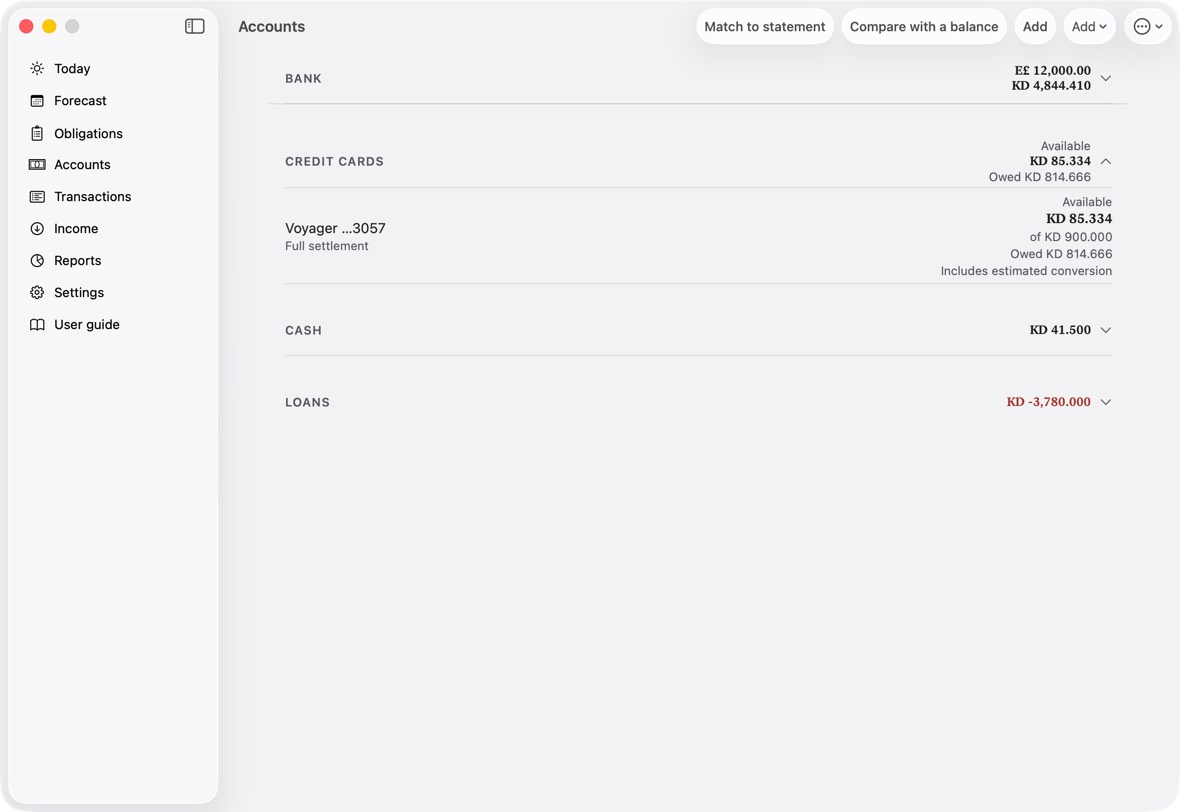
- Available: how much more you can spend on the card, out of its limit (of KD 900.000).
- Owed: what you owe the bank on it today. Below the name, how it is normally paid.
Change an account
- Open Accounts and click the account. Its transactions open; click Edit.
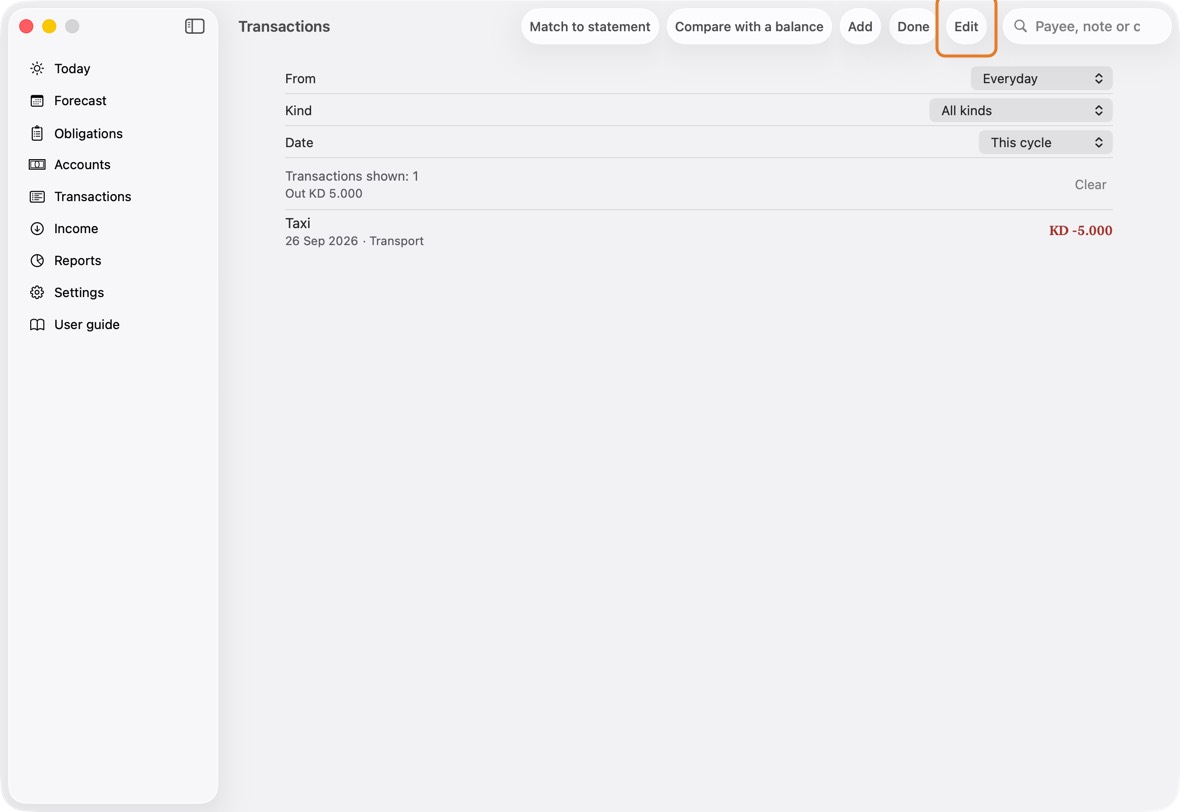
- Change its Name, its Last 4 digits, its opening balance or its date.
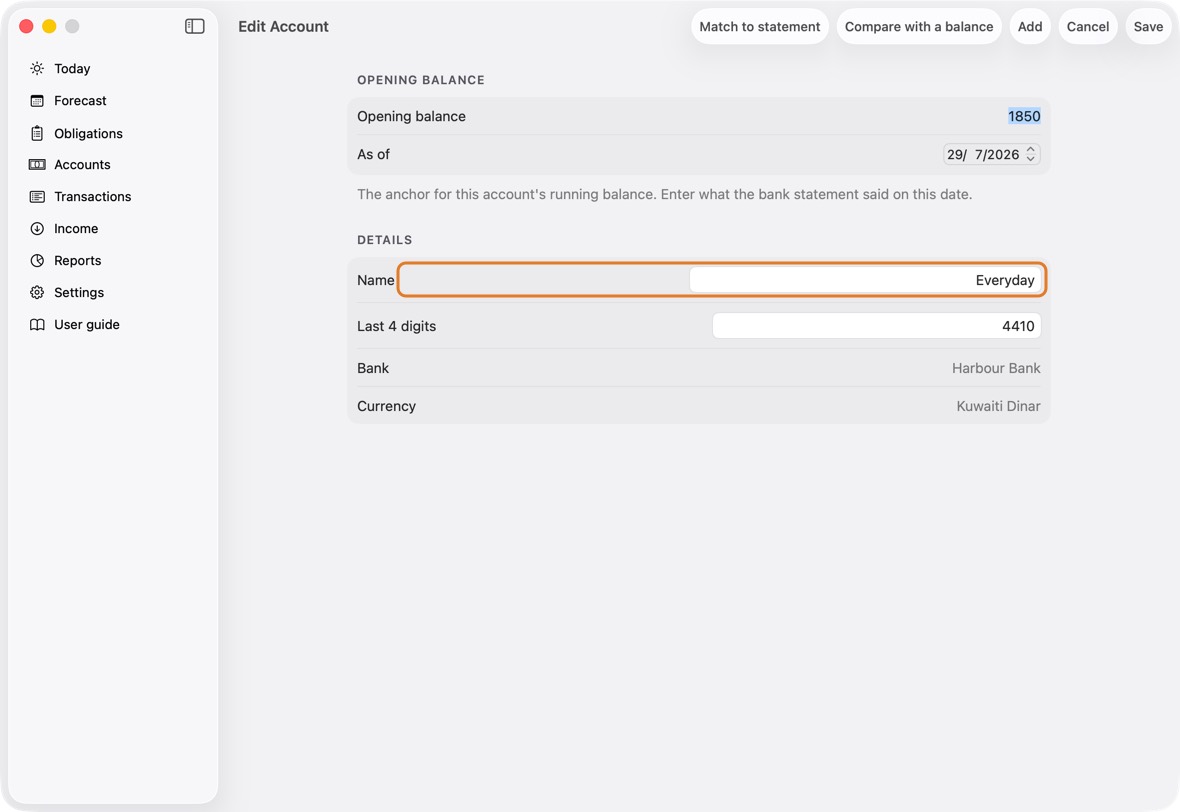
Field Must fill? What it means Example Opening balance No The opening balance: what the bank said on the date below. 1,850 As of No The day of that balance. Name Yes What you call the account. Changing it changes it everywhere. Everyday Last 4 digits No The account number's last four digits. 4410 Bank No The bank the account is with, as given when it was added. Shown, not changed here. Currency No The account's own currency. Shown, not changed here: its transactions are in it. - Click Save.
- The order of your accounts and cards, set in Settings › Ordering › Account & Group Order, is used everywhere you choose one: Add, Settle, every form, Match, Money to send, the cycles, the Advisor and Siri. The Pay with choices have their own order (see “Order the Pay with choices”). A new account goes at the end until you move it.
You should now see the new name everywhere: Today, Accounts, Pay with and Transactions.
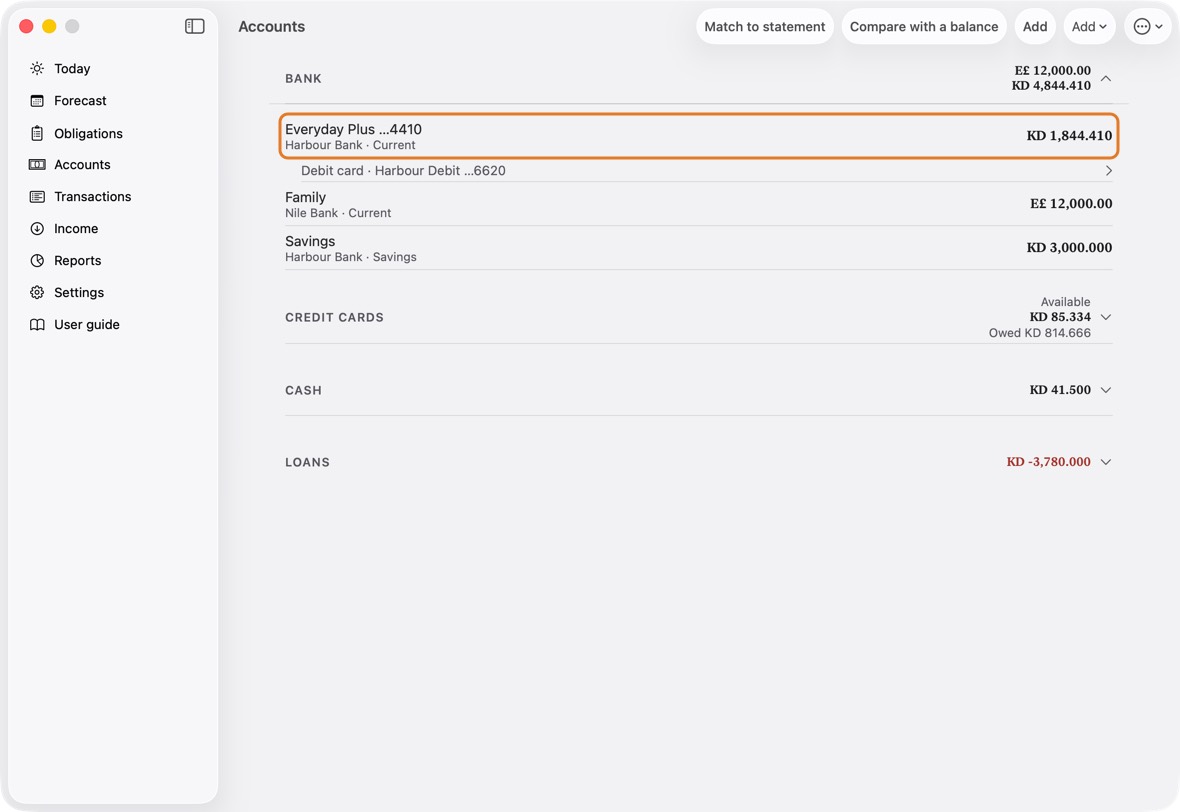
- The account under its new name, with the same balance.
Change, archive or delete a card
- Open Accounts and click the card.
- Change its Card name, Last 4 digits or Credit limit.
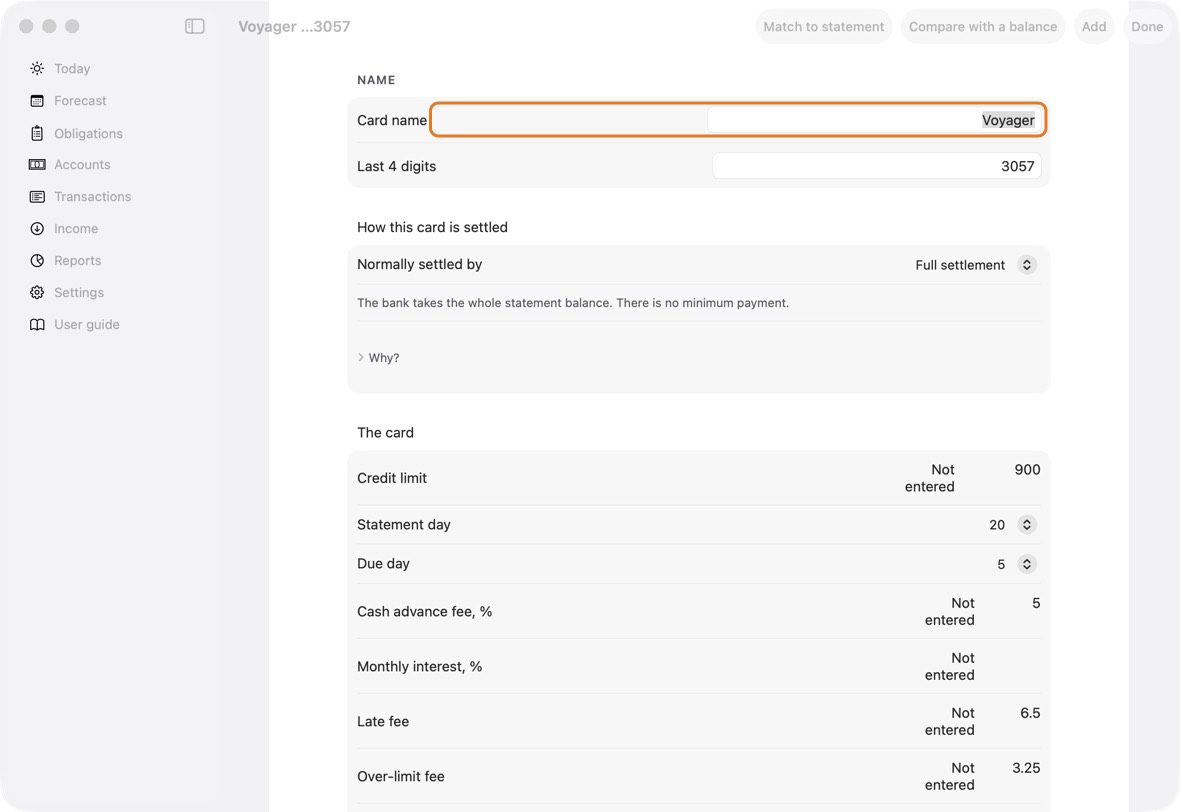
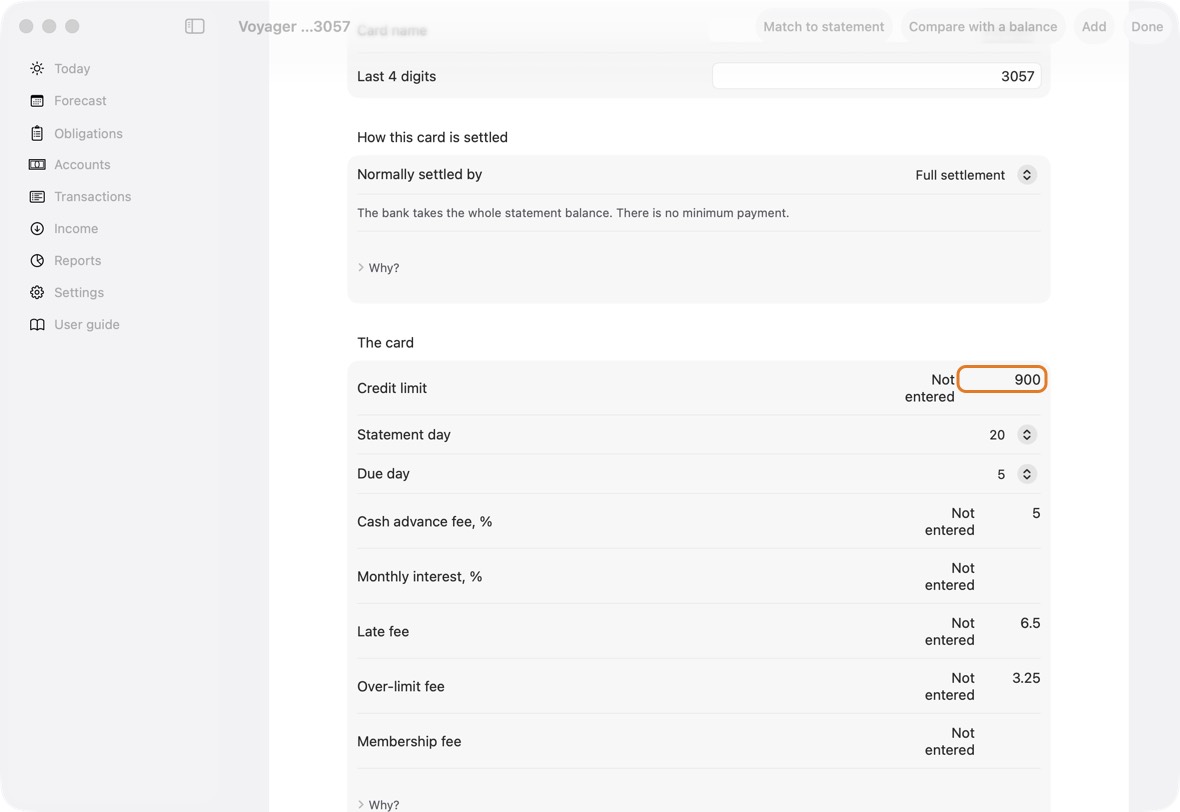
Field Must fill? What it means Example Card name Yes What you call the card. Voyager Last 4 digits No The card number's last four digits. 3057 Normally settled by No How the bill is normally paid: in full, the minimum, or a part. Credit limit No How much the bank lets you owe. 900 Statement day No The day the statement is printed. 20 Due day No The day the bill must be paid by. 5 Cash advance fee, percent No The fee for a cash withdrawal, in percent. 5 Monthly interest, percent No The interest the card charges each month, in percent of what it owes — from your statement. Card room uses it to know how much of an automatic debit only pays interest; Match's statements are used before it. Blank: room after a debit isn't counted. 2.5 Late fee No The fee if you pay late. 6.5 Over-limit fee No The fee for going over the limit. 3.25 What the bank takes No For a card the bank debits by itself: what it takes each month — the statement balance, the minimum or a fixed amount. The last debit Match finds is used before it. A fixed amount Amount the bank takes No The minimum or the fixed amount, when the bank takes one of those. 150 Membership fee No A fee the card carries each month or year, planned on the card. 5 Membership fee day No The day the membership fee is charged. 9 Settles from No The account the bill is paid from. Everyday - If the bank takes the payment by itself each month: set Normally settled by to Bank auto-debit, then What the bank takes — the statement balance, the minimum or a fixed amount, with its amount — and the Due day. The forecast then plans the debit on that day every month. A yearly or monthly Membership fee goes here too, with its day. When the bank takes a fixed amount or the minimum, enter the card's Monthly interest, % from your statement too: card room then knows how much of each debit only pays interest.
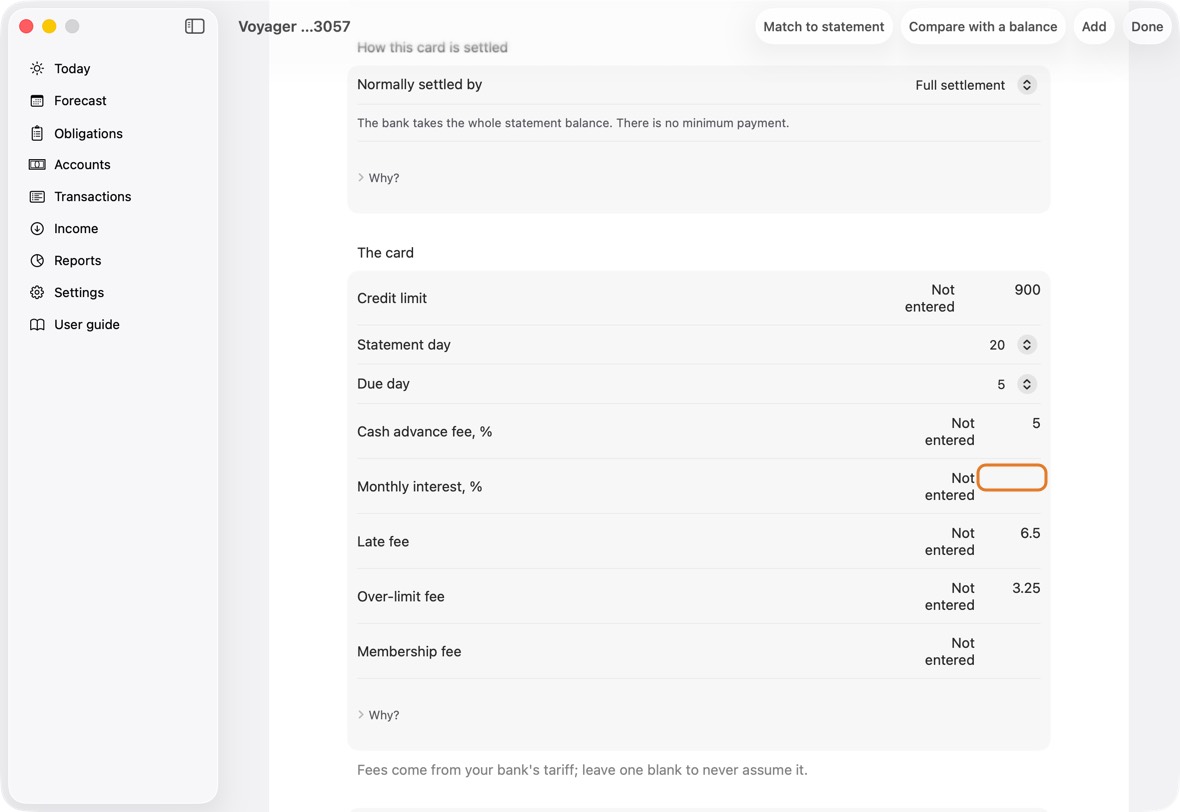
- A card you no longer use: click Archive this card. Its history stays.
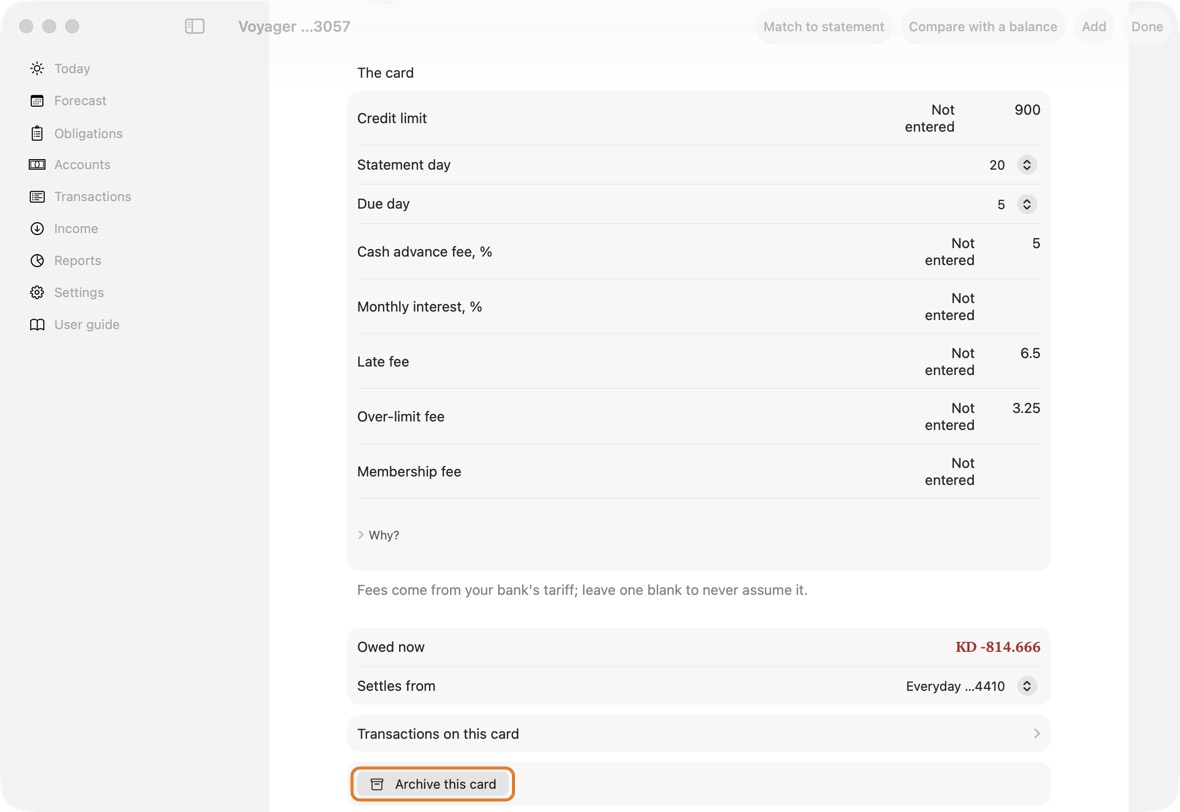
- A card added by mistake, with nothing on it: click Delete this card.
You should now see the card changed, or gone from Accounts.
- The card with its new name or limit; an archived card is no longer listed.
What a card's figures mean
- On Accounts, each card shows Available: how much more you can spend on it.
- Below it, Owed is what you owe the bank on it today.
- Available is never counted as money you have. It is only room on the card.
You should now see the same owed figure as your bank, once your card is matched to its statement.
- Owed is what you owe today; Available is room left on the card, never money you have.
A debit card
- A debit card takes money straight from its account. On Accounts, open the account's group: the card is listed under it.
- To add one, click ⋯, then Add a debit card.
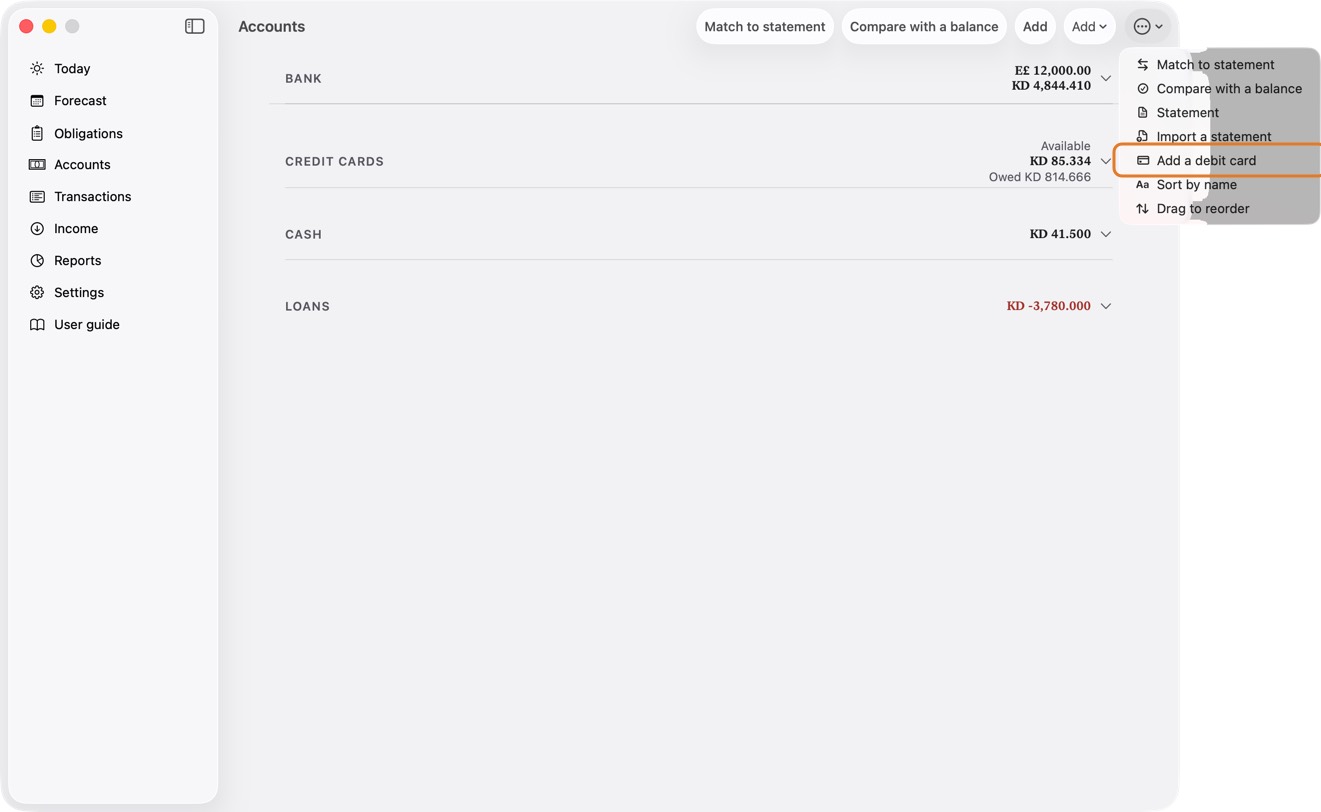
- Type its Card name and Last 4 digits, choose the account it Draws on, and click Save.
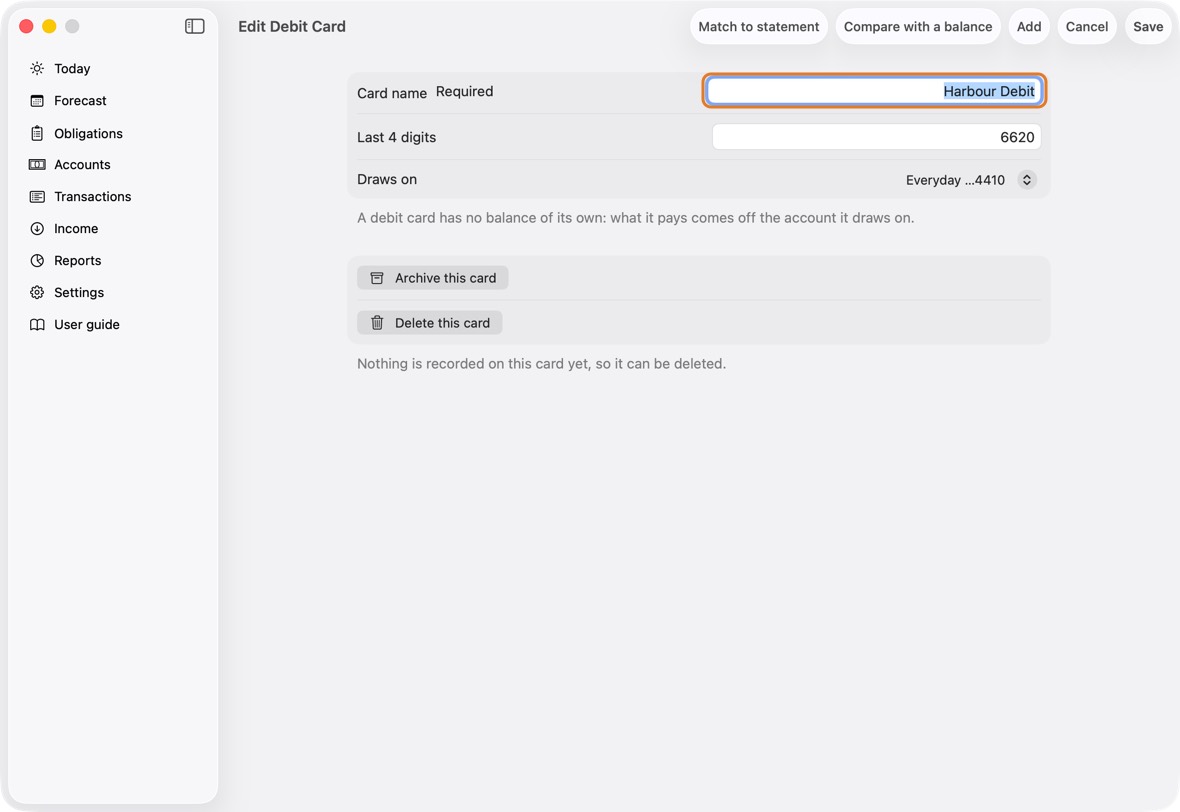
Field Must fill? What it means Example Card name Yes What you call the card. Harbour Debit Last 4 digits No The card number's last four digits: four digits, or leave empty. 6620 Draws on Yes The account the money comes from when you pay with it.
If you leave it: Your first bank account. Change it to the account the card belongs to.Everyday - To change one, click it under its account, change what you need and click Save. A card you no longer use: click Archive this card.
You should now see the card under its account, and under Pay with when you record a purchase. It has no balance of its own: what it pays comes off its account.
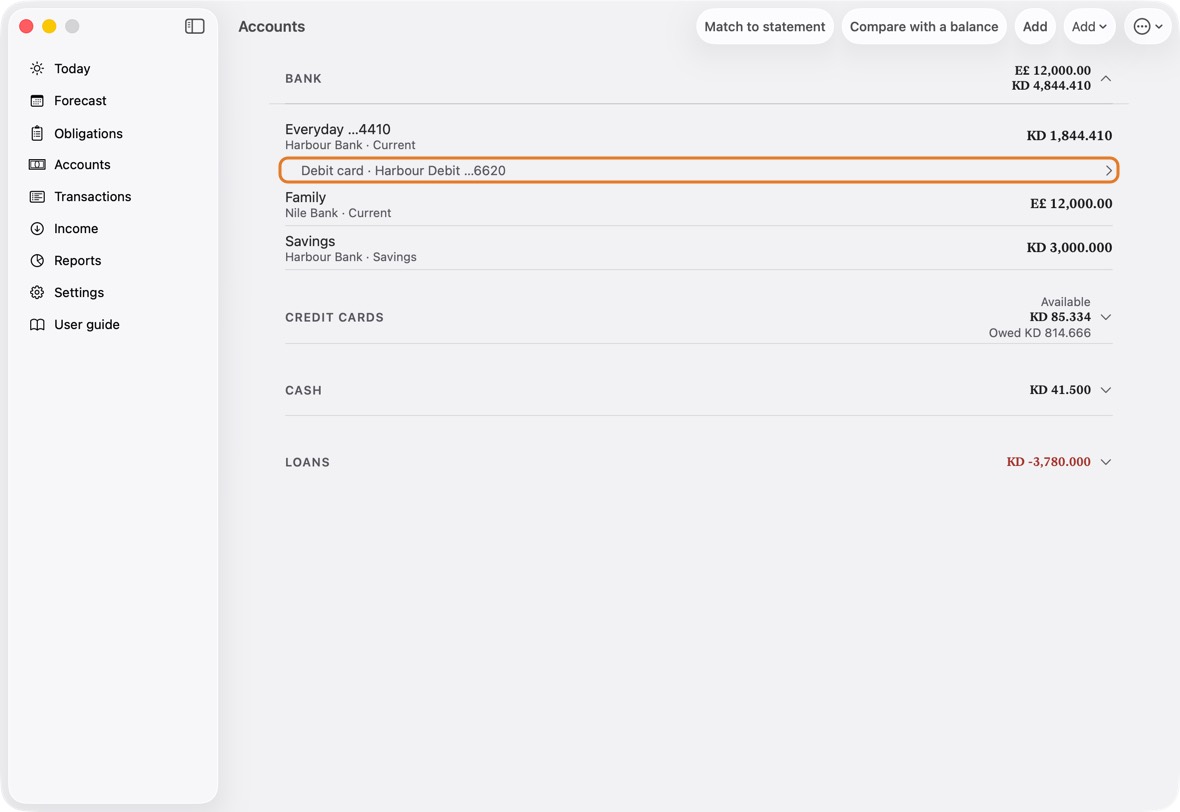
- Debit card · its name and last four, under the account it draws on. It has no figure of its own.
Make a statement to share or print
- Open Accounts, click ⋯, then Statement.
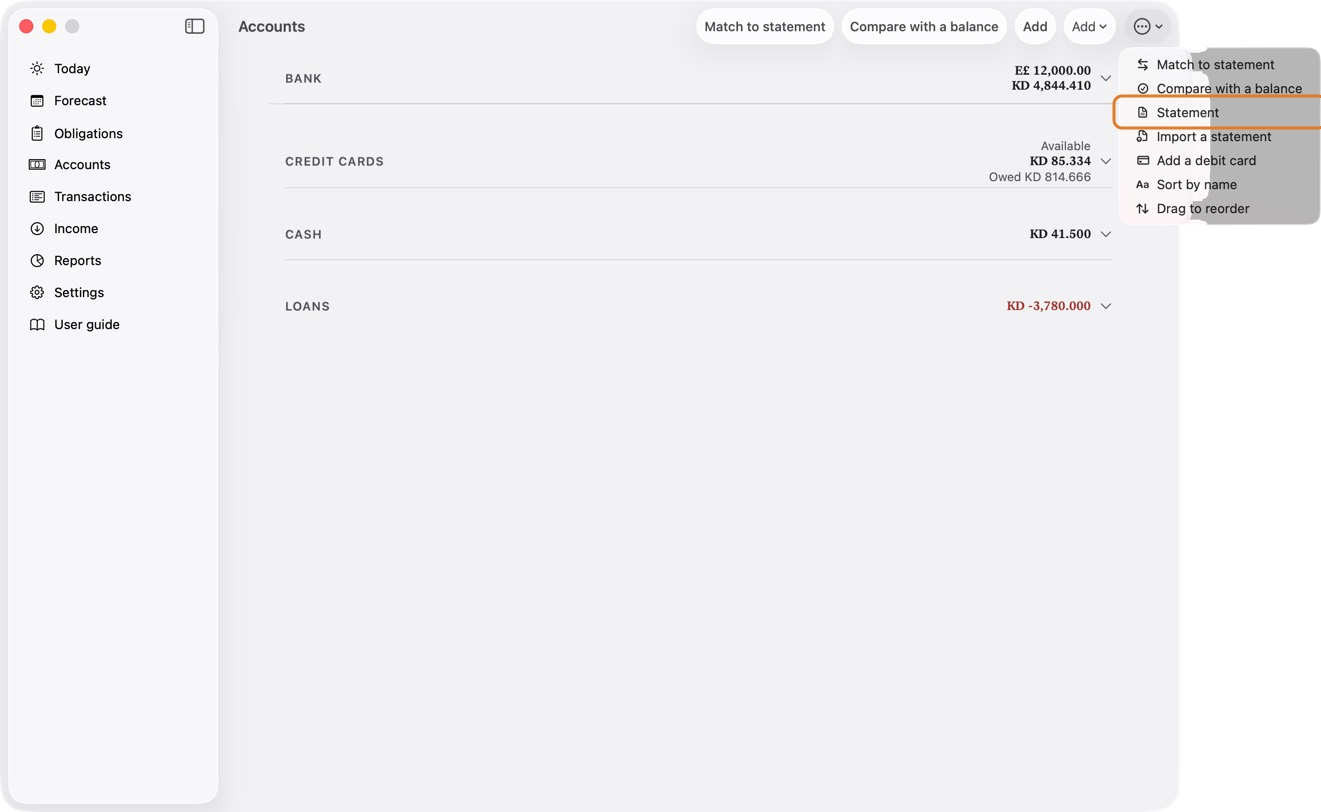
- Choose the Account or card and the Period, then click Prepare PDF or Prepare CSV.
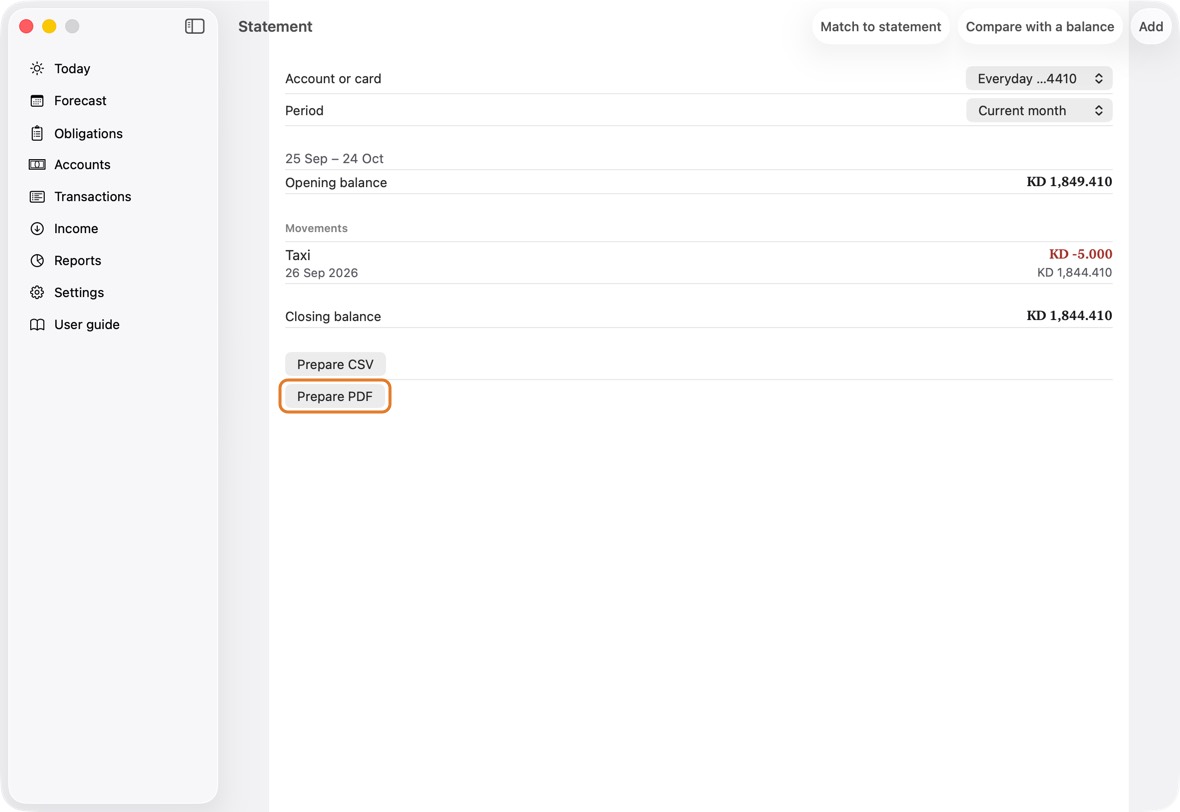
- Click Share PDF or Share CSV to send it, save it in a folder or print it.
You should now see the opening balance, each movement and the closing balance for the period, ready to share.
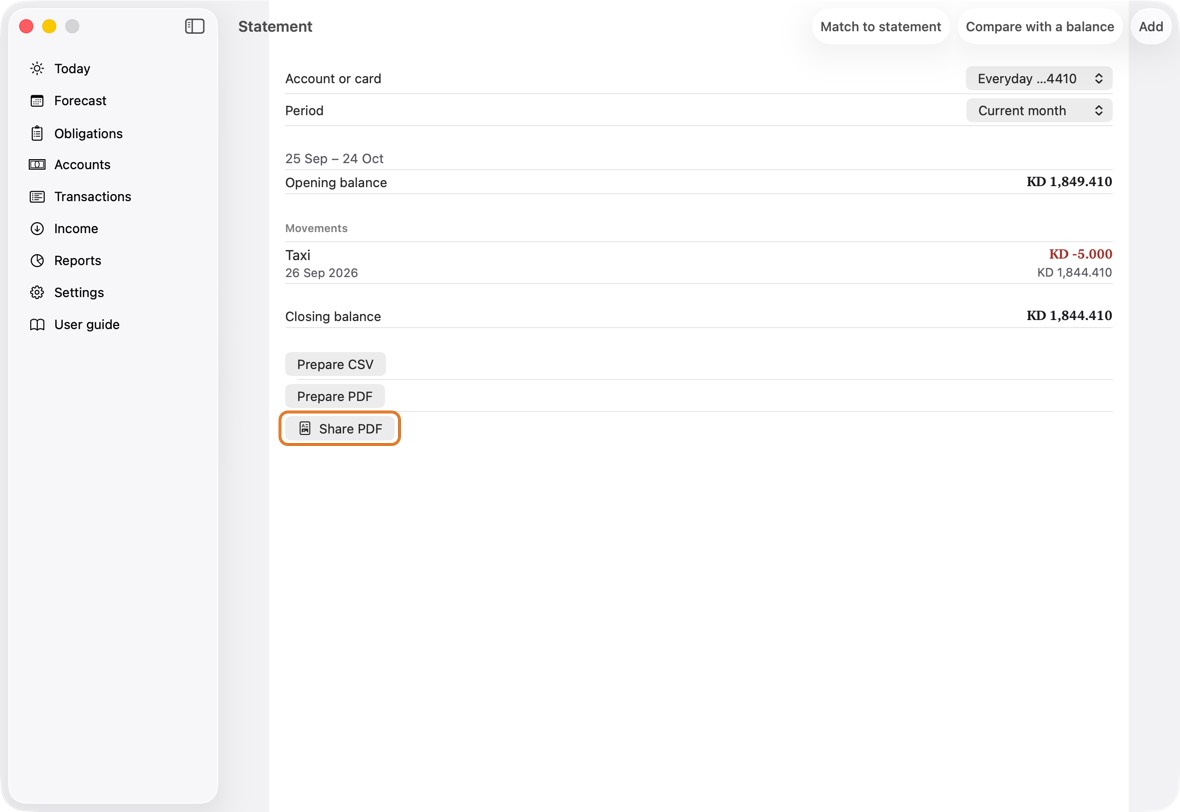
- The statement is the app's own record for the account or card: opening balance, each movement and closing balance, for the period you choose.
Put accounts, cards and payees in your order
- Open Settings. Under Ordering, click Account & Group Order, and drag each account or card to its place.
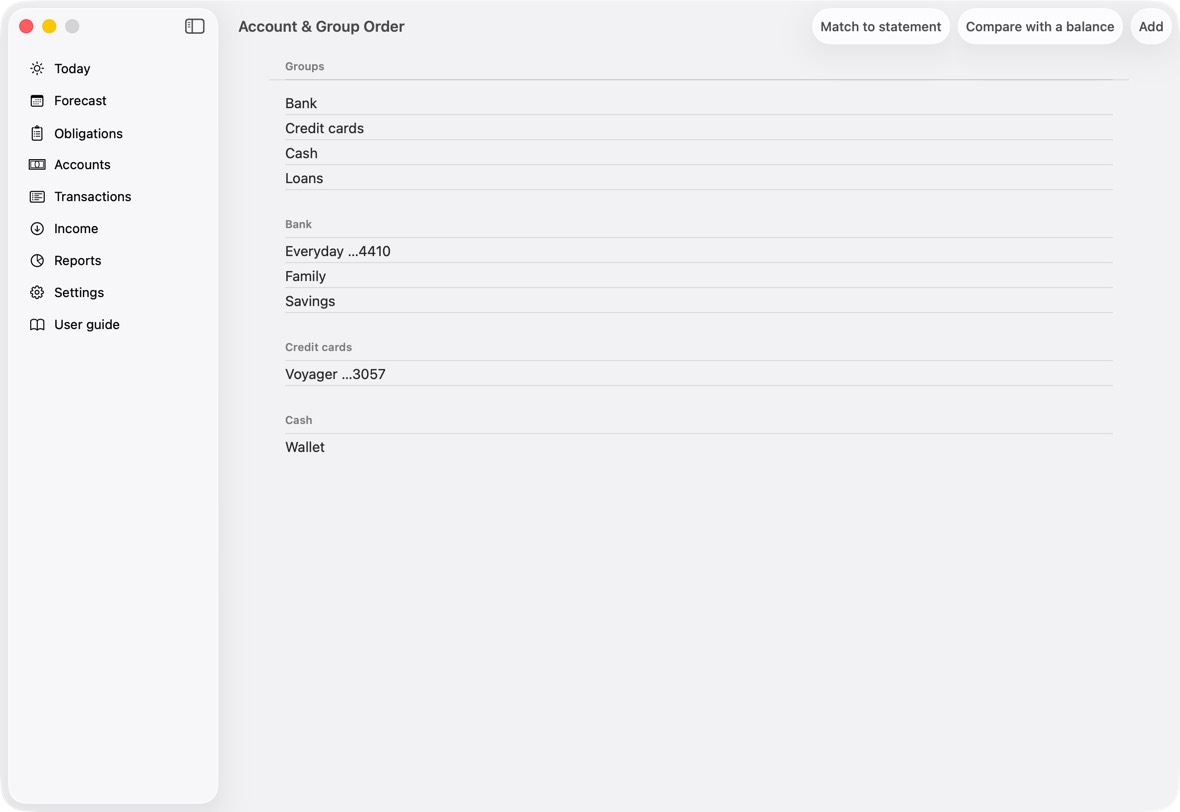
- Payees the same way, in Beneficiary Order.
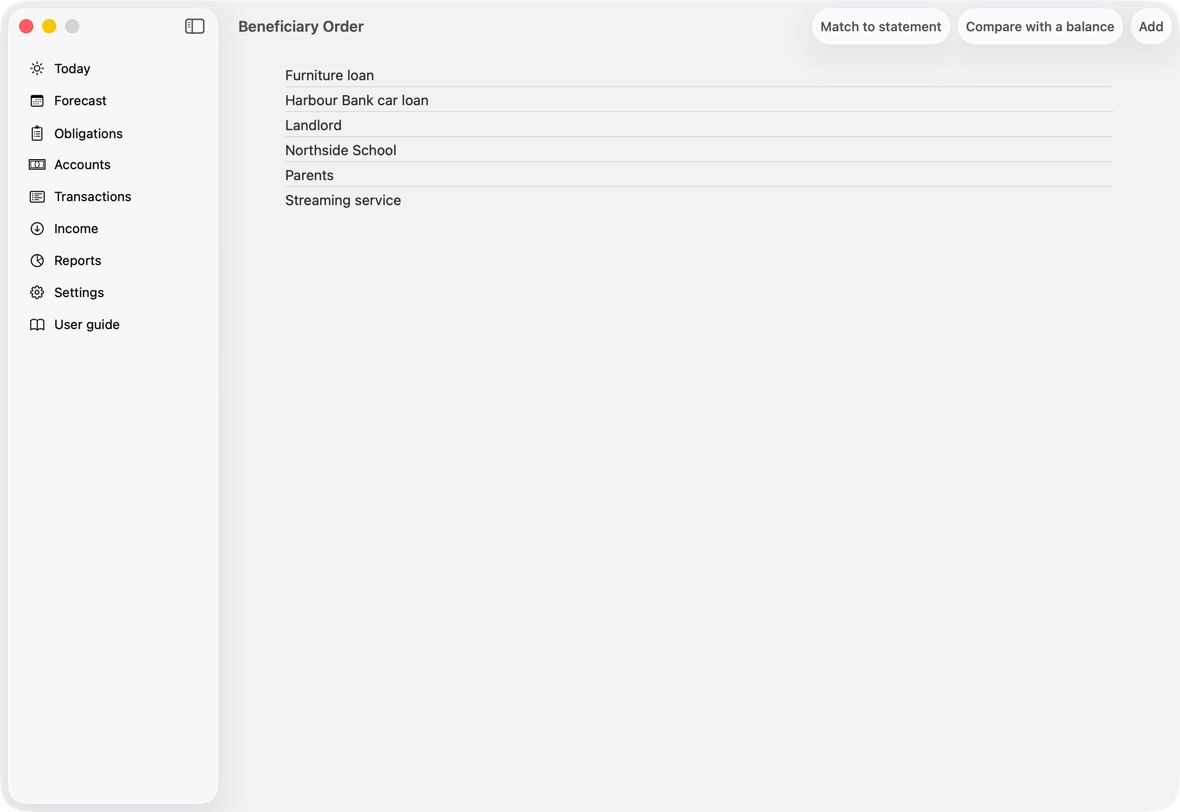
- Or on Accounts, click ⋯: Sort by name, or Drag to reorder. On Today, ⋯ has Sort accounts by name and Drag to reorder accounts.
You should now see your order on Accounts and Today, and in every list where you choose an account or a card.
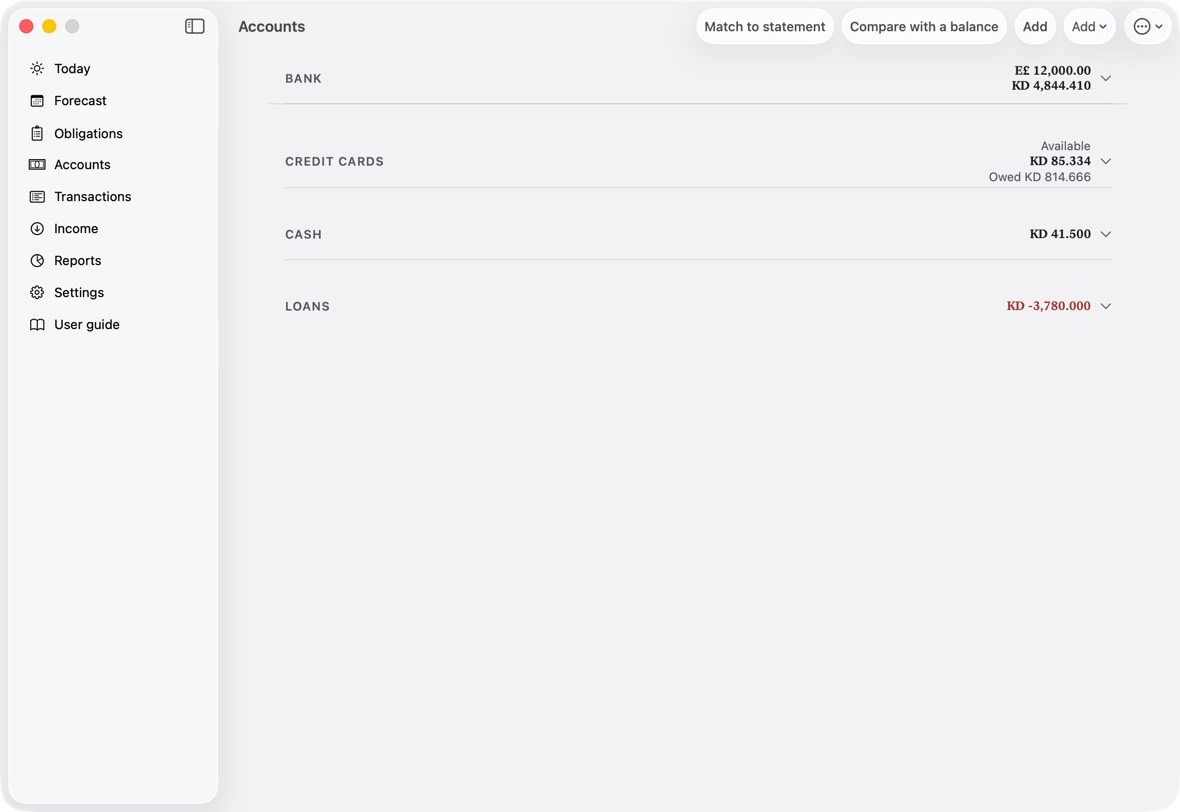
- Each drag is saved as you make it. A new account goes at the end of your order until you move it.
Order the Pay with choices
- Open Settings. Under Ordering, click Pay with order.
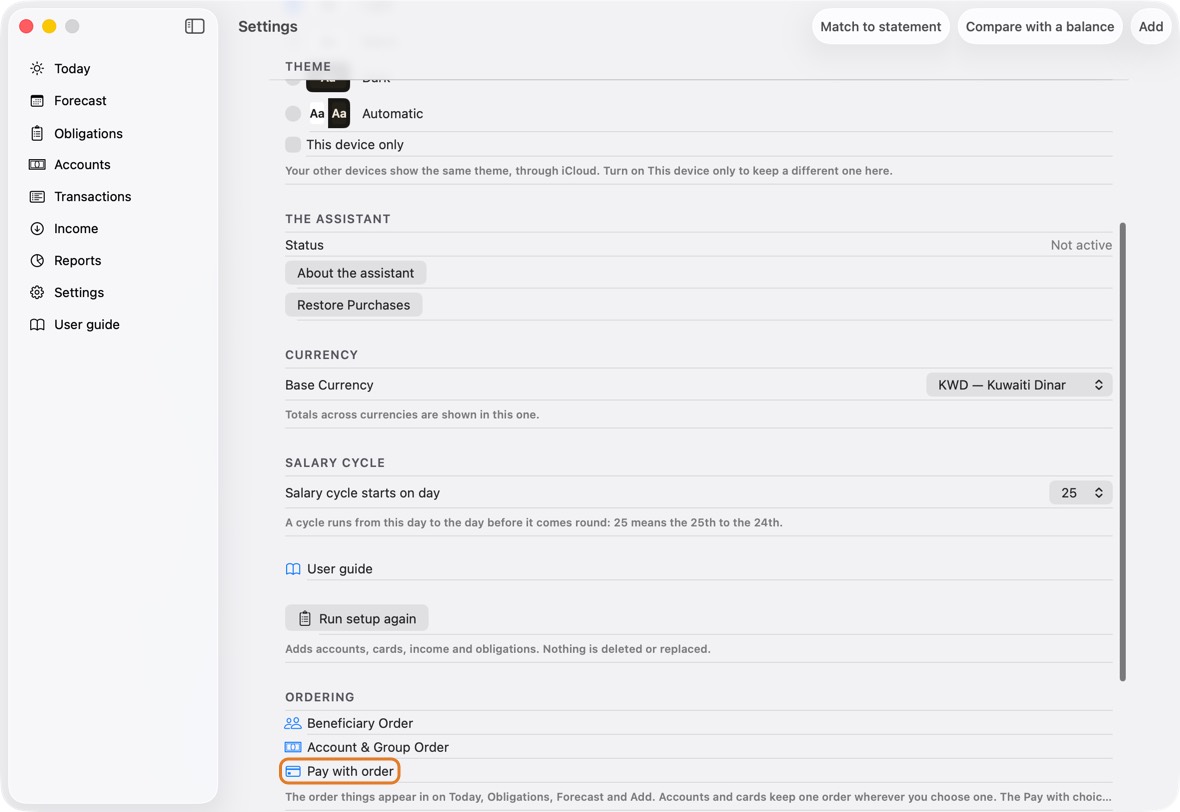
- Drag each account's way to pay, each card and the cash to its place. Cards first, if you pay by card most.
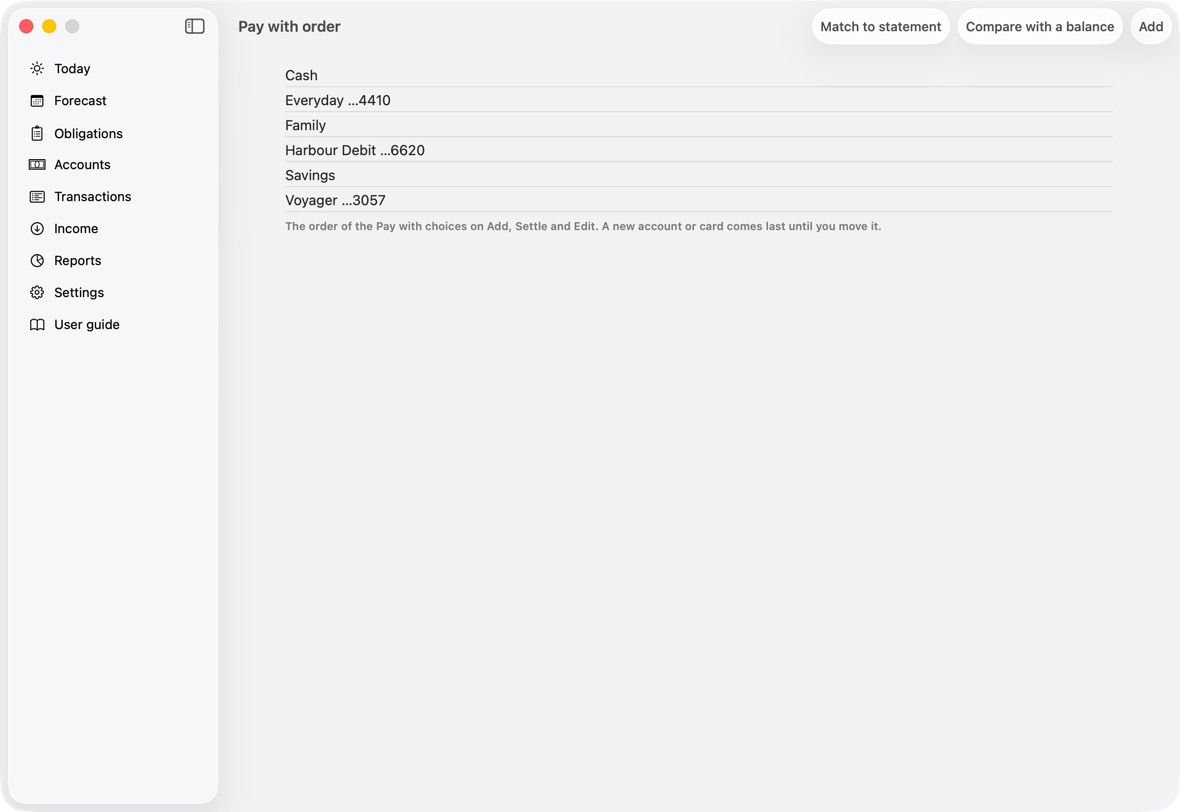
You should now see the Pay with choices on Add, Settle and Edit in your order.
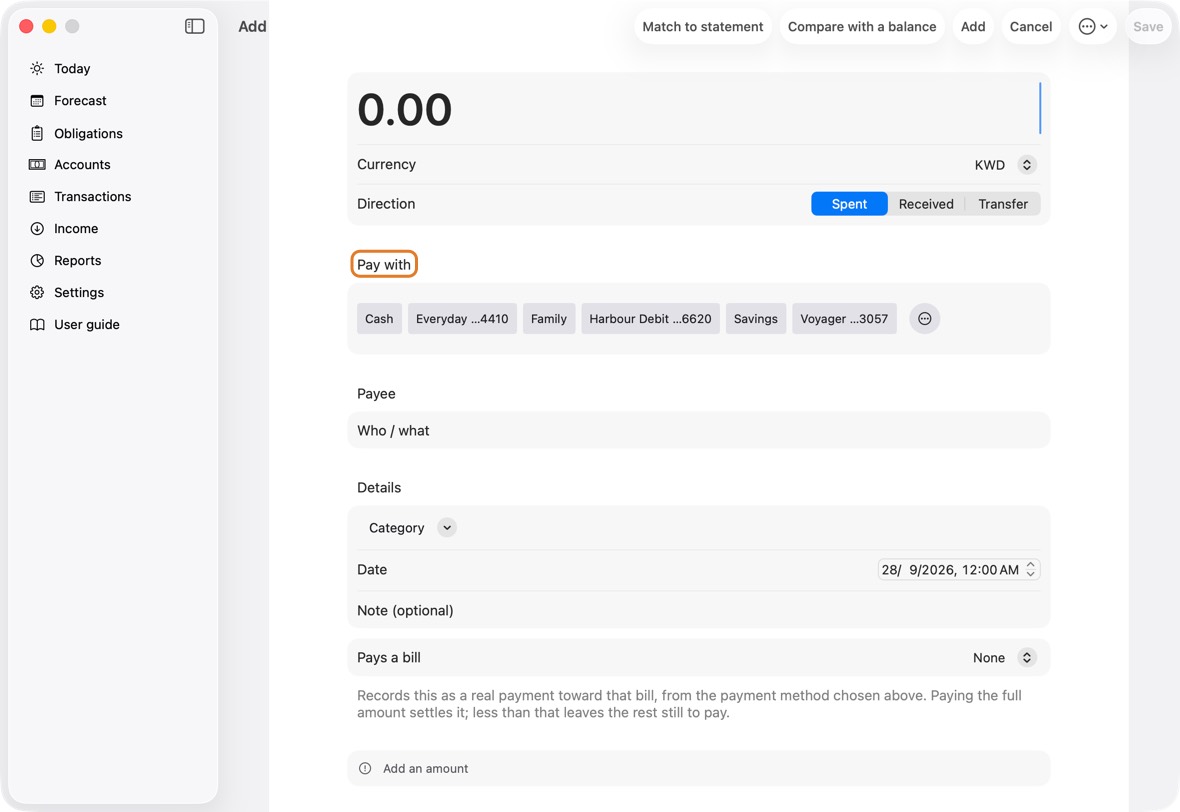
- This order is the Pay with choices' own: the accounts' order on Accounts and in the pickers stays as it is.
- A new account or card comes last until you move it.
Archive a card you no longer use
- Open Accounts and click the card.
- At the bottom, click Archive this card, then Archive.
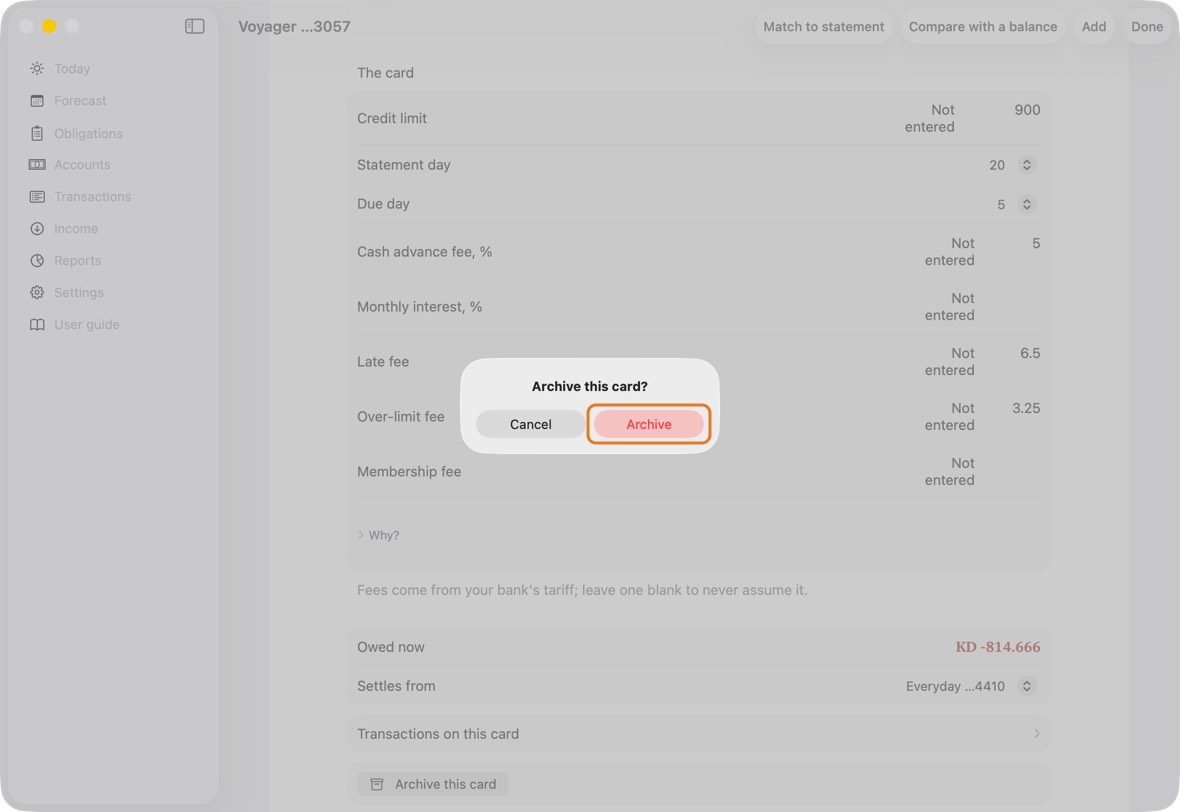
You should now see the card gone from Accounts and from every list of cards. Its past transactions stay.
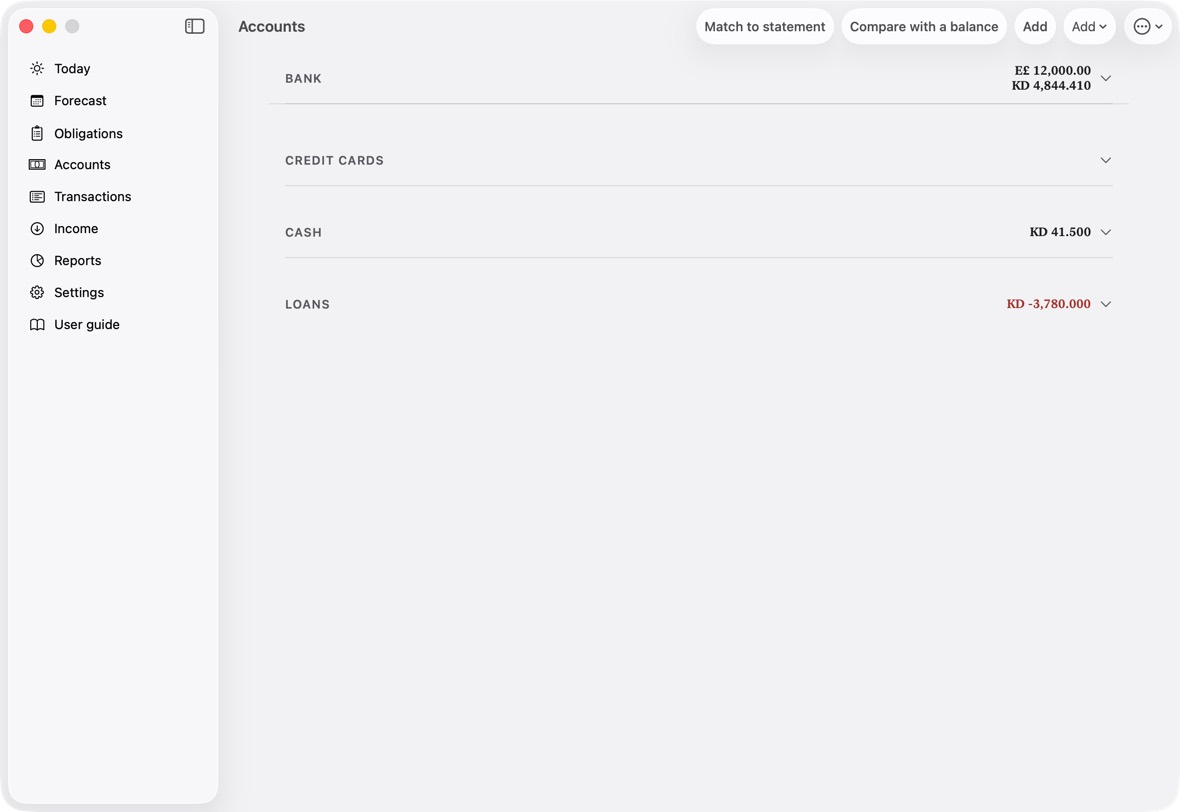
- A card with nothing recorded on it can be deleted instead, with Delete this card.
Recording money
Record an expense, an income or a transfer
- On Today, click the + button, or Add at the top.
- Type the amount. Choose Spent, Received or Transfer.
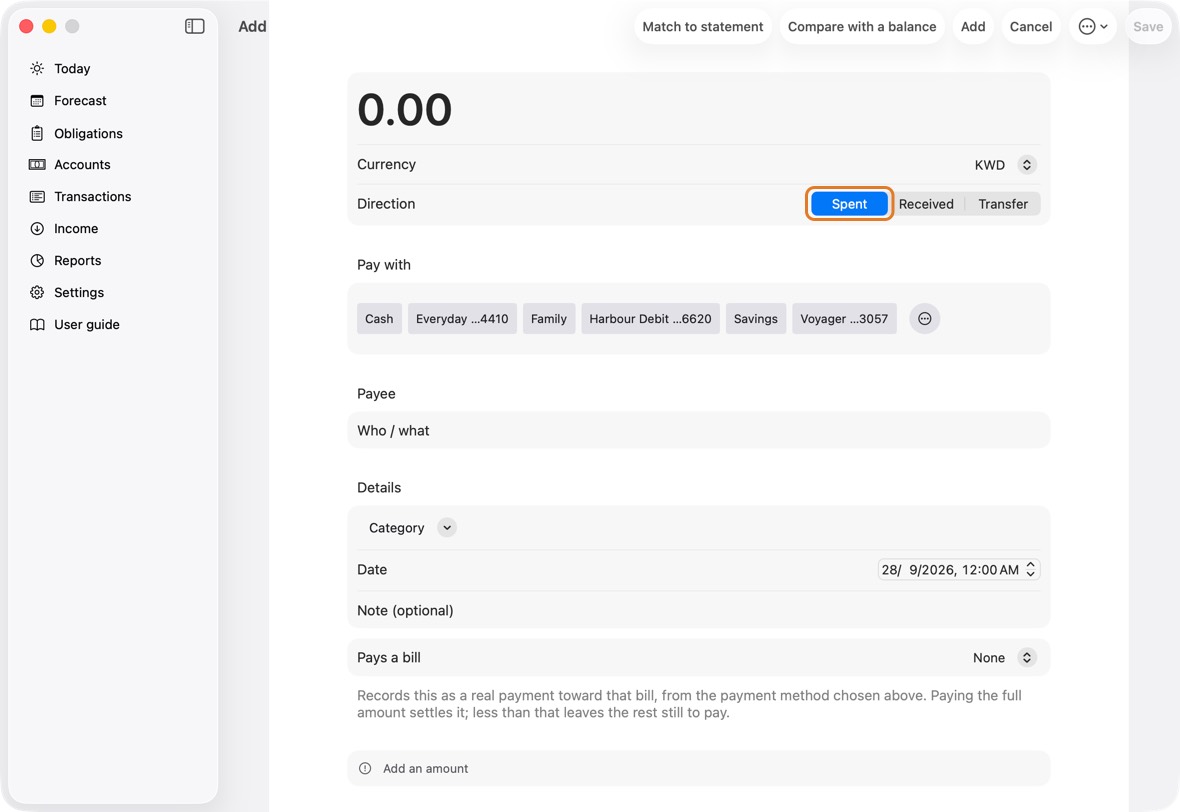
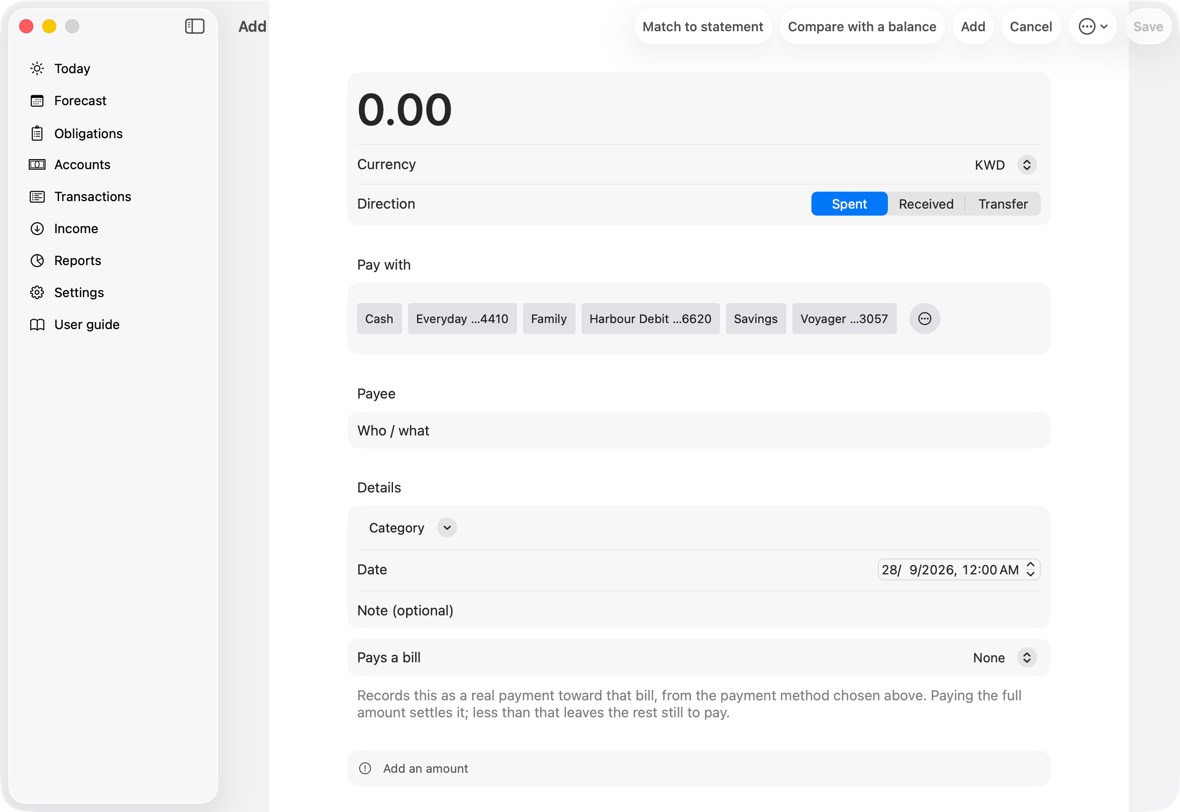
Field Must fill? What it means Example Amount Yes How much. 12.500 Currency No The currency of that amount.
If you leave it: KWD.Direction No Spent, Received, or Transfer between your own accounts.
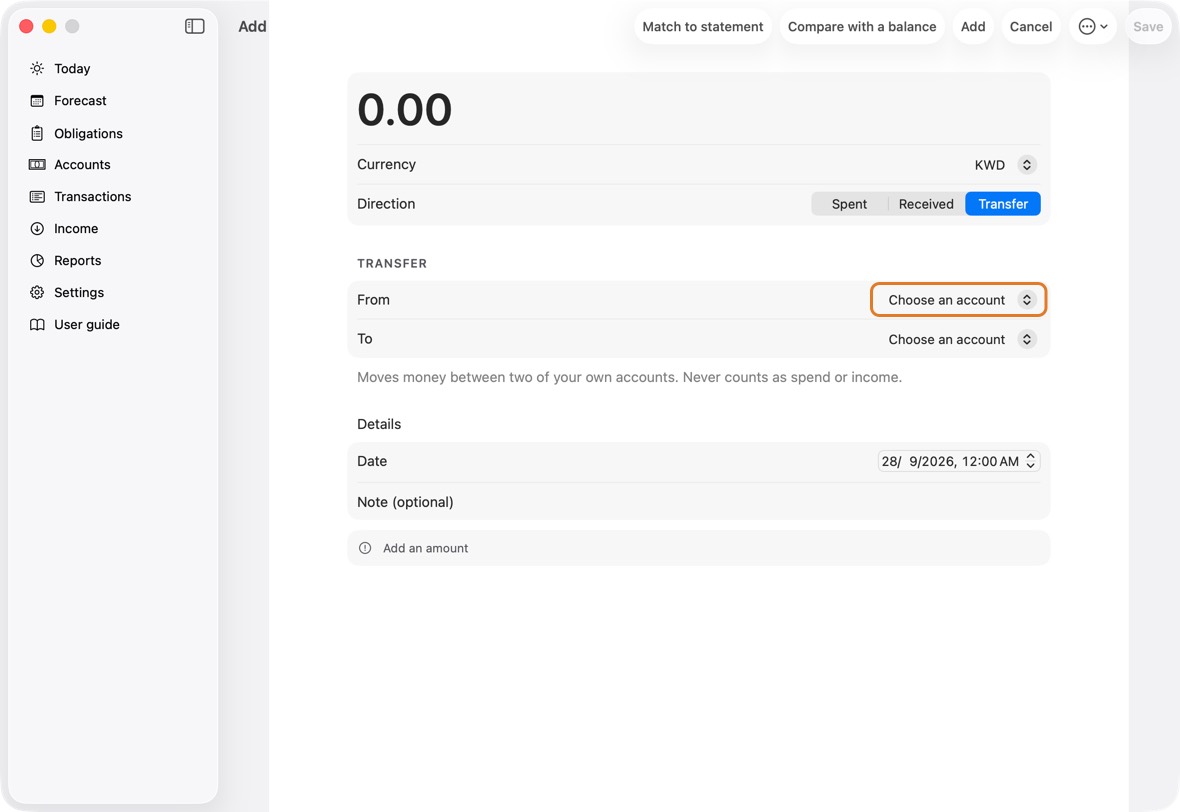
If you leave it: Spent.From Only if it is a transfer Transfers: the account the money leaves. Everyday To Only if it is a transfer Transfers: the account it arrives in. Savings Arrives Only if the two accounts' currencies differ Transfers between currencies: what arrived on the other side. 12,000 Pay with Only if it pays a bill, or no account is in that currency The card or account you paid with.
If you leave it: The one you last used for this payee.Voyager …3057 Payee Only if it is spent or received Who you paid, or who paid you. Corner Grocer Category No What kind of spending it is.
If you leave it: Filled in from the payee.Groceries Date No When.
If you leave it: Now.Note No Anything you want to remember. Pays a bill No Spent only: the obligation this payment pays.
If you leave it: None. - For spending, choose what you paid with under Pay with, and who it was for. For a transfer, choose From and To.
- Click Save.
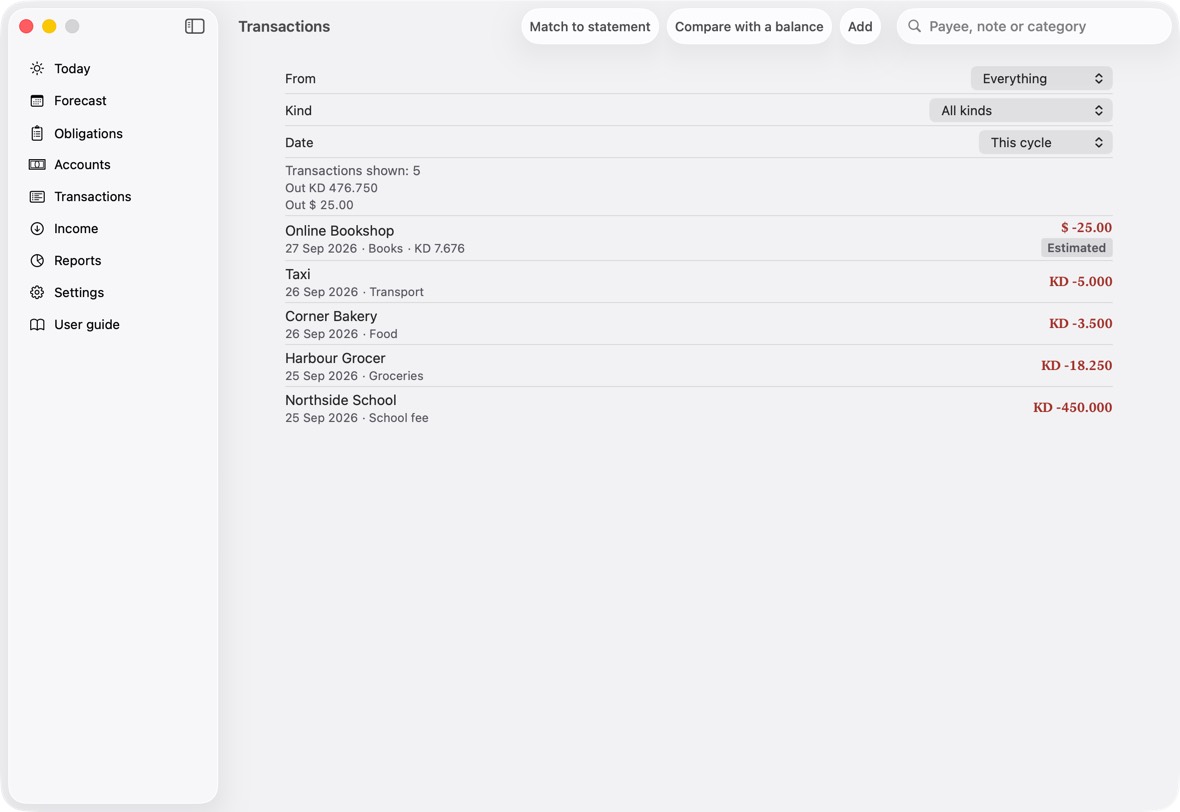
You should now see the balance of the account or card change on Today.
- The account's or card's figure at the top of Today has moved by the amount.
- Add New Category…, at the end of the Category menu, adds one of your own.
- After cash taken from a card that charges a fee, Add the fee? offers to record it: Add Fee, or Skip.
- Paying a bill with another card than its plan expects, Update the plan? asks whether its later payments use that card too: Update, or Keep as is.
An expense in another currency
- Add the expense and choose its currency. A section about the foreign currency appears.
- If you know what your bank charged, choose I know the amount charged and type it.
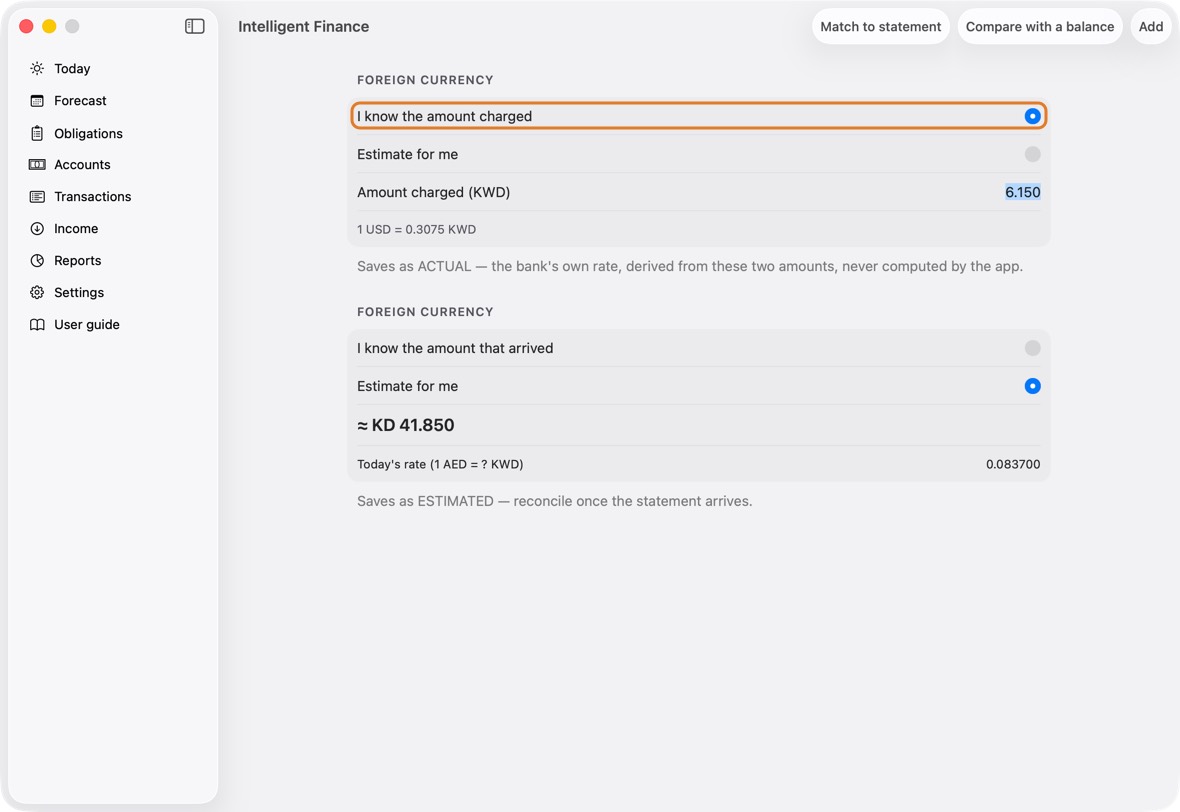
Field Must fill? What it means Example I know the amount charged No Whether you know what your bank took in your own currency.
If you leave it: I know the amount charged.Amount charged (…) Only if you know the amount charged What the bank took, in the account's currency. 6.150 Today's rate (1 … = ? …) Only if you choose Estimate for me, on Add The rate the estimate uses.
If you leave it: Today's rate, when the app has one.0.307 Charged is the bank's own figure and is final. An Estimate uses today's rate until Match to statement replaces it with the bank's.
- If you don't know yet, choose Estimate for me. The app uses today's rate.
- Click Save.
You should now see the expense in your own currency. An estimate is marked Estimated until the statement shows the real figure.
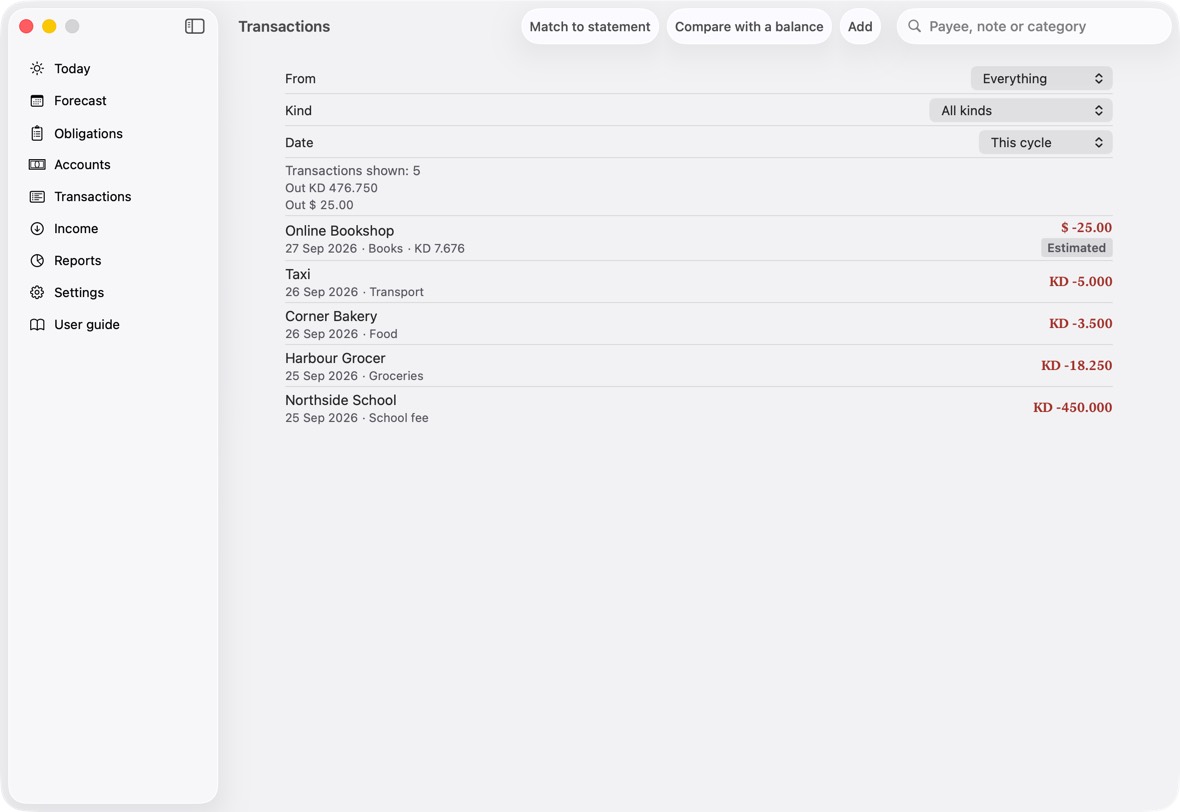
- The row shows the amount in your currency; an estimate is marked Estimated until Match replaces it.
- When the bank's figure comes for an estimated one, Post adjustment for the difference instead keeps the estimate and records the difference on its own, on Adjustment: type the amount charged and click Post.
Match to statement replaces an estimate with the bank's figure.
Change or delete a transaction
- Open Transactions and click the transaction.
- Change what is wrong and click Save.
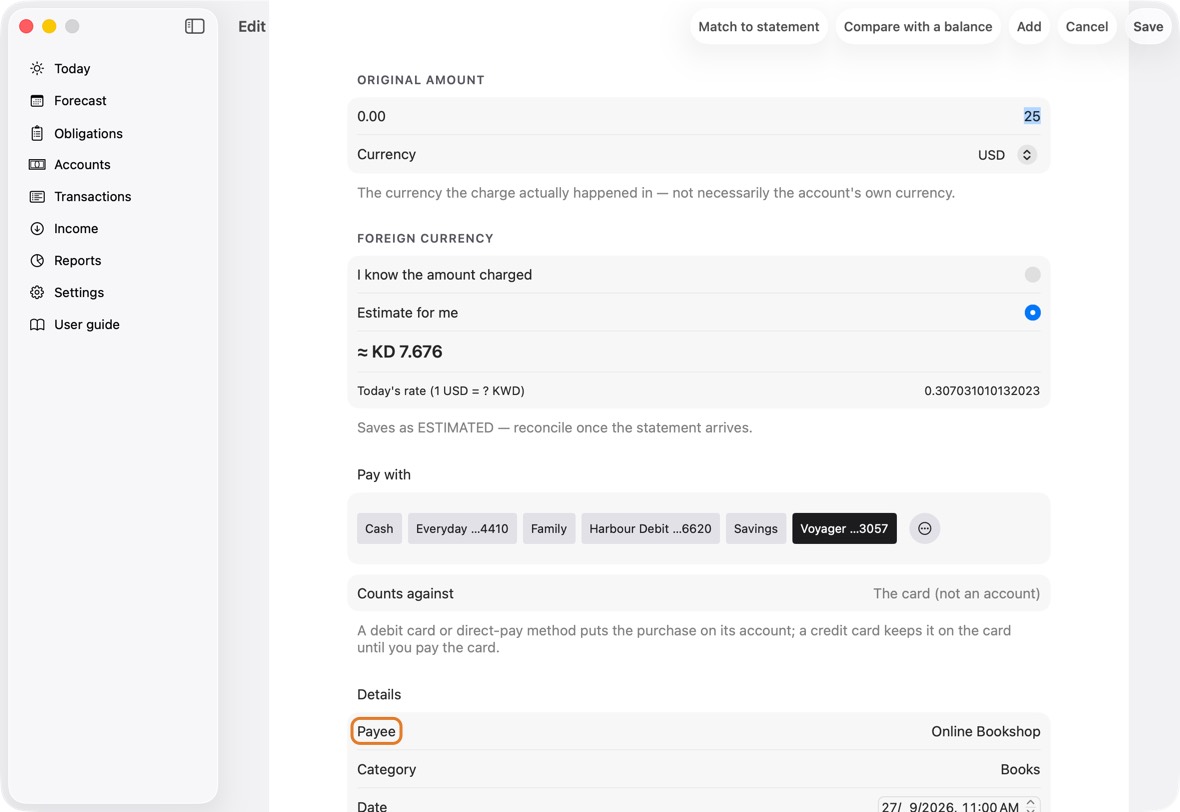
Field Must fill? What it means Example Amount Yes How much, in its own currency. 12.500 Currency No The currency of that amount. Actual amount charged No Adjustment only: what the bank actually charged for an estimate. 6.150 Pay with No The card or account you paid with. Payee Only if it is spent or received Who you paid, or who paid you. Corner Grocer Category No What kind of spending it is. Groceries Date No When. Note No Anything you want to remember. - To remove it, click Delete this transaction and confirm.
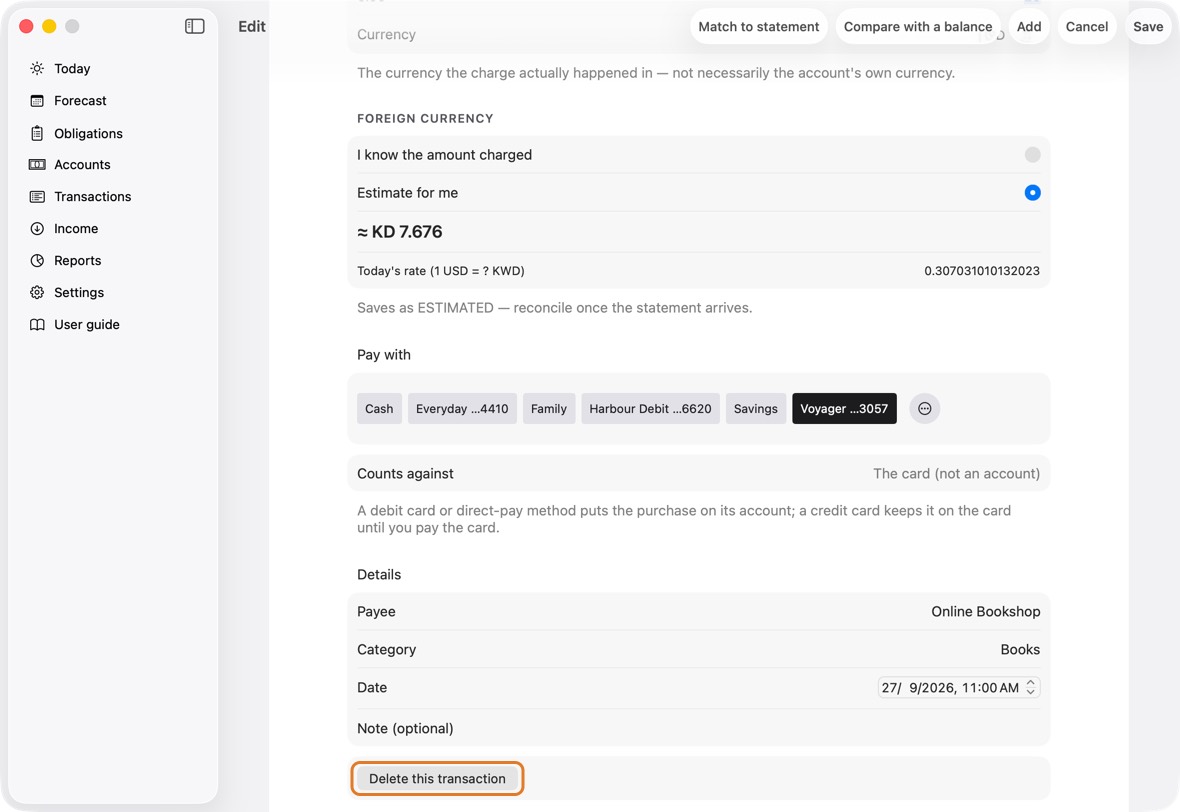
You should now see the list and the balances without it, or with your change.
- The list without it, or with your change, and the totals at the top with it.
Change a transfer
- Open Transactions and click the transfer. With every account shown, a transfer is one row: from → to, with both amounts when the two accounts' currencies differ.
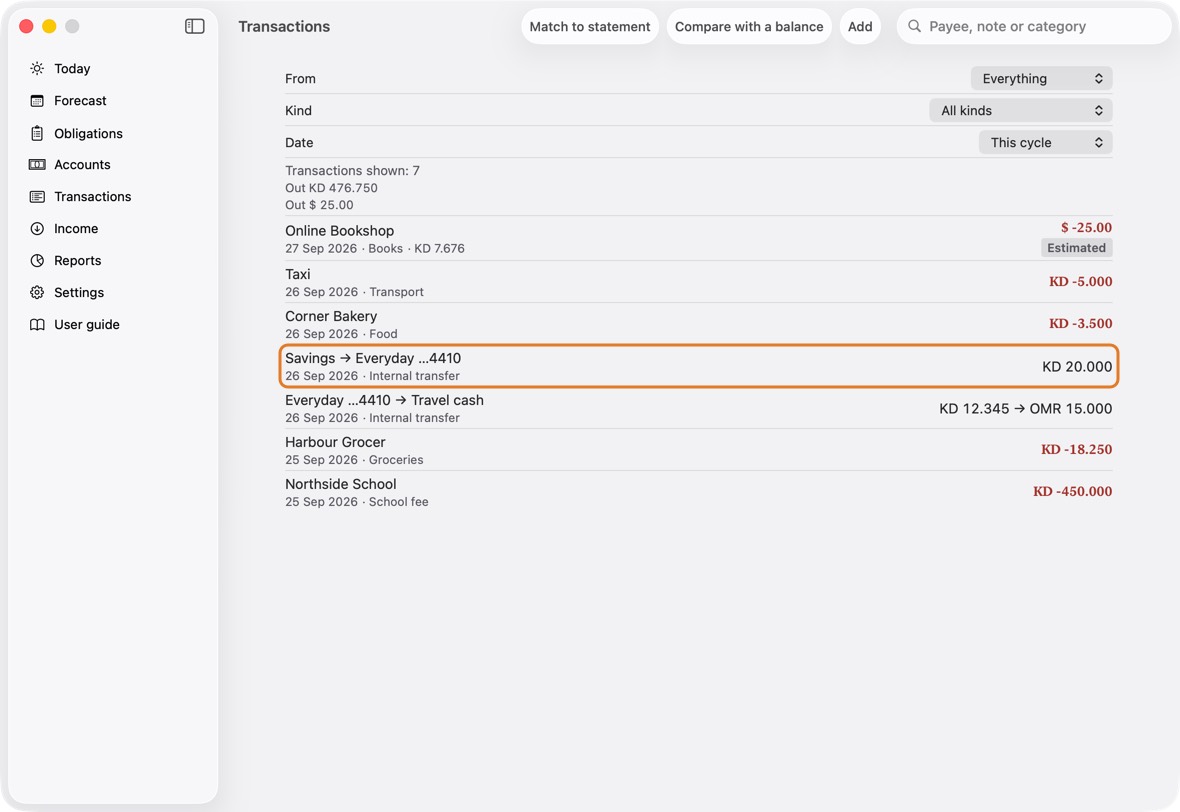
- Change From, To, Sent or Received, and click Save. Both sides change together; the account changes only through From and To.
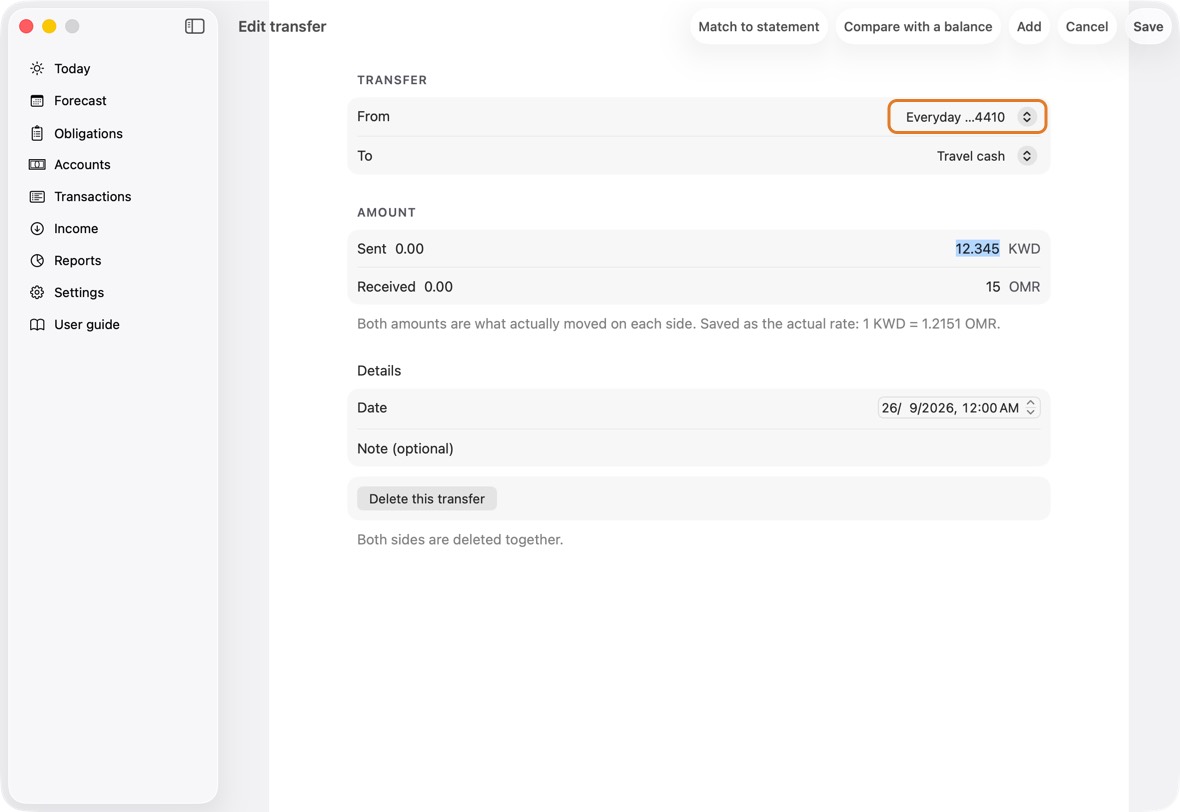
Field Must fill? What it means Example From Yes The account the money left. Everyday To Yes The account it arrived in. Travel cash Sent Yes What left From, in its currency. 12.345 Received Only if the two accounts' currencies differ What arrived in To, in its currency. The rate the two make is kept as the actual rate. 15.000 Date No When. Both sides have the same day. Note No Anything you want to remember. - To remove it, click Delete this transfer and confirm. Both sides go.
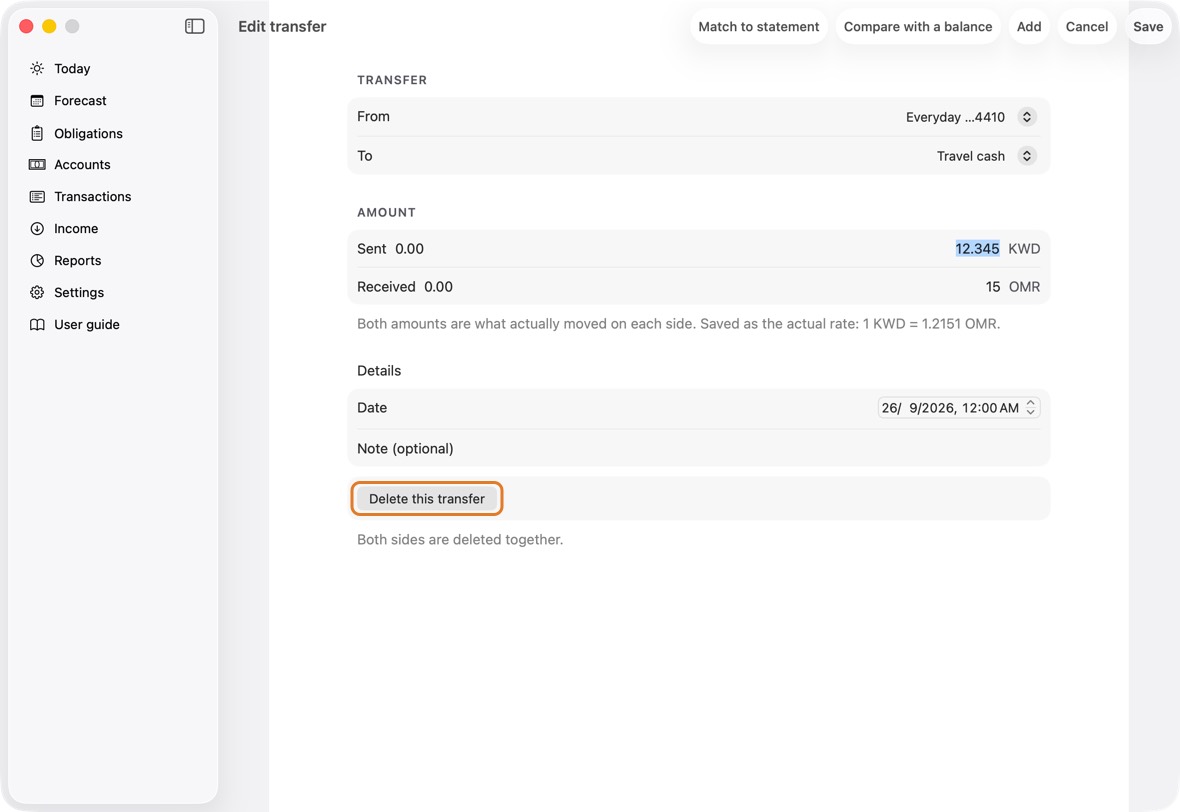
You should now see the transfer as one row with your change, and each account with its own side.
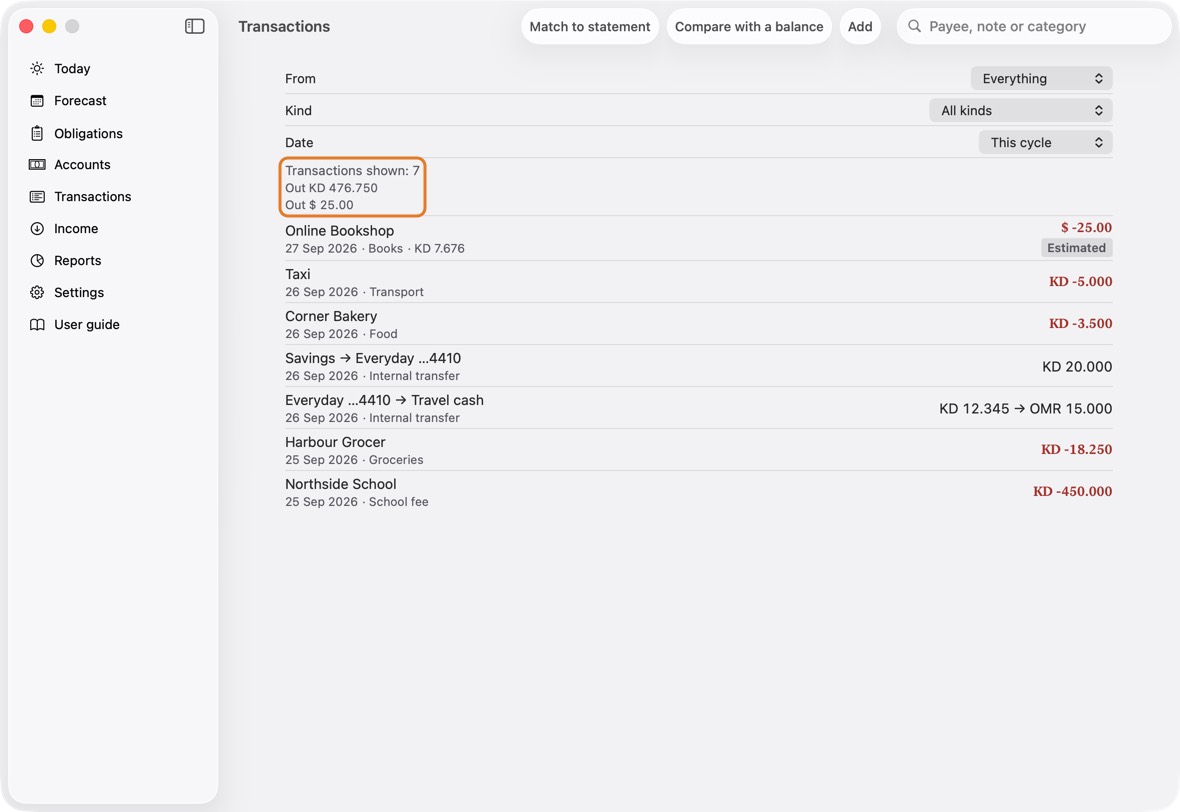
- One row for the whole transfer; across two currencies, what was sent → what arrived.
See one period's transactions
- Open Transactions.
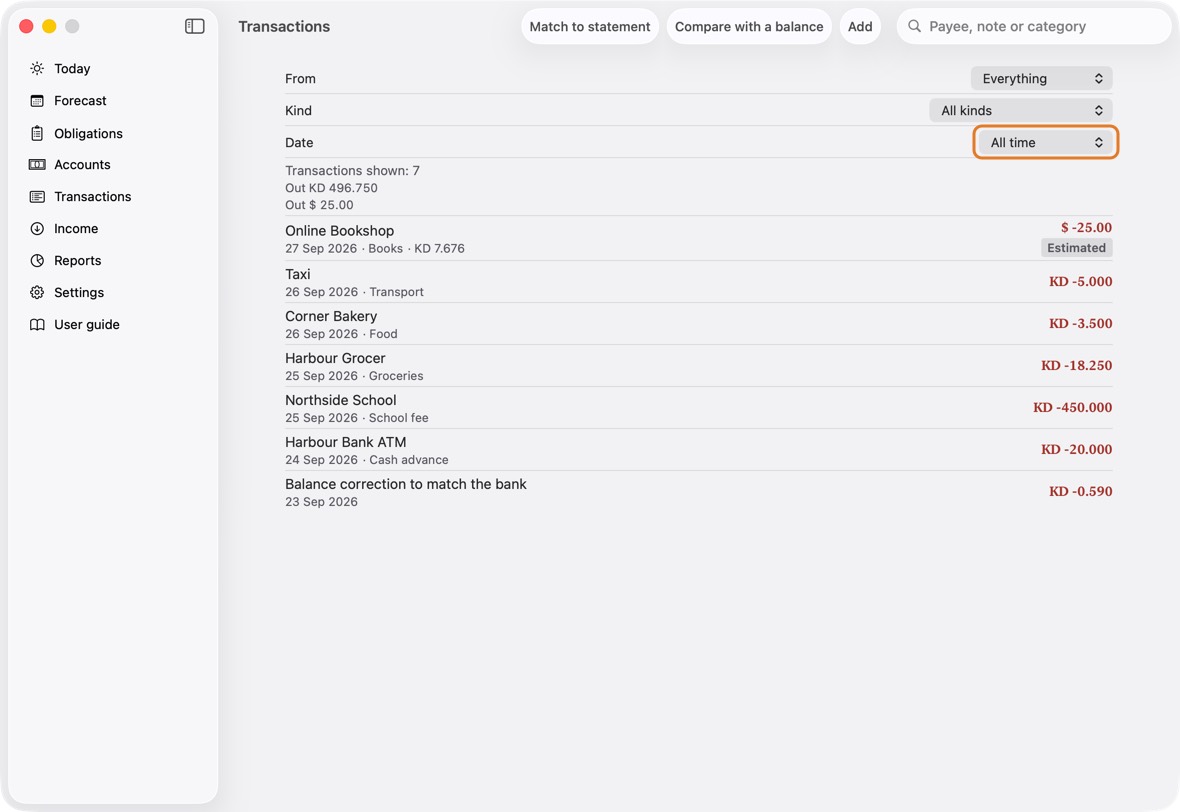
- Click Date and choose a period, such as This cycle or Last month.
- Click Clear to see everything again.
You should now see only that period's transactions, with their count and totals.
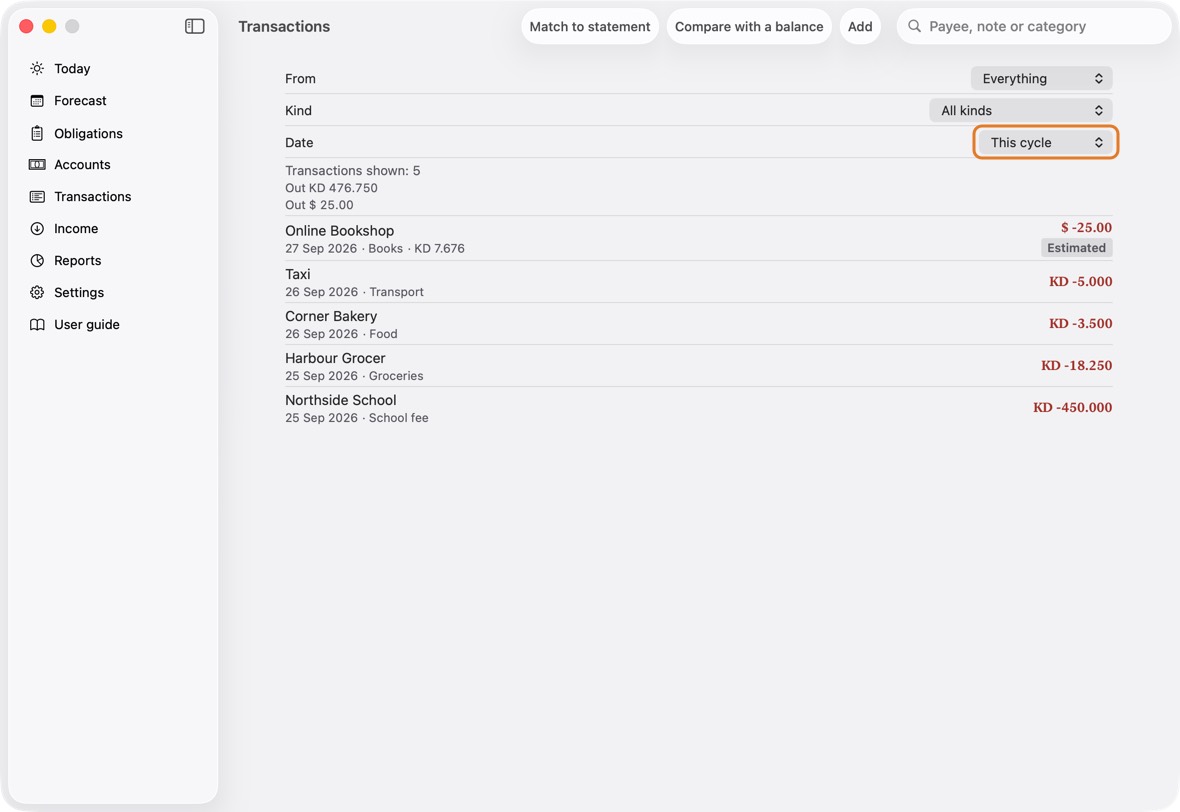
- Transactions shown counts what the filters leave; below it, the total out (and in).
- Each row: who or what, the date and category, and the amount.
Scan a receipt, or type it in words
- Open Add. Click its ⋯ menu.
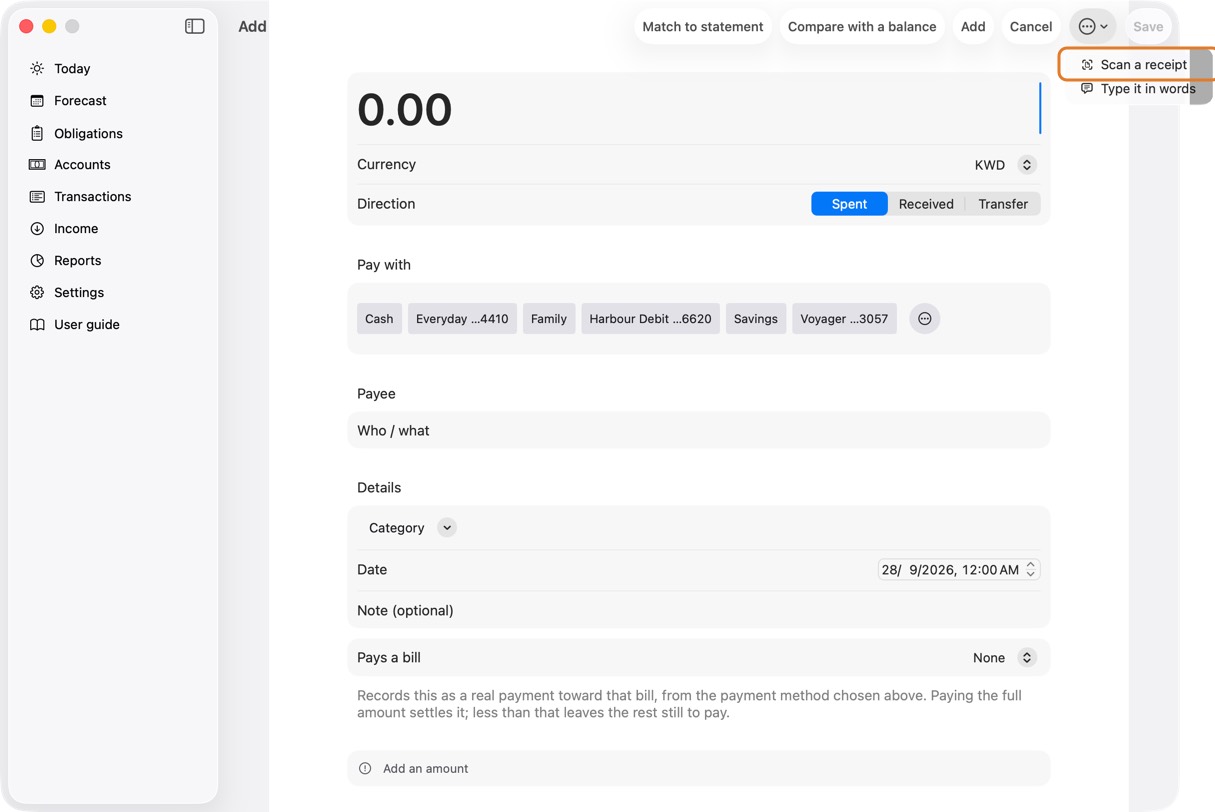
- Click Scan a receipt and take a photo, or click Type it in words and write, for example, "taxi 5 cash".
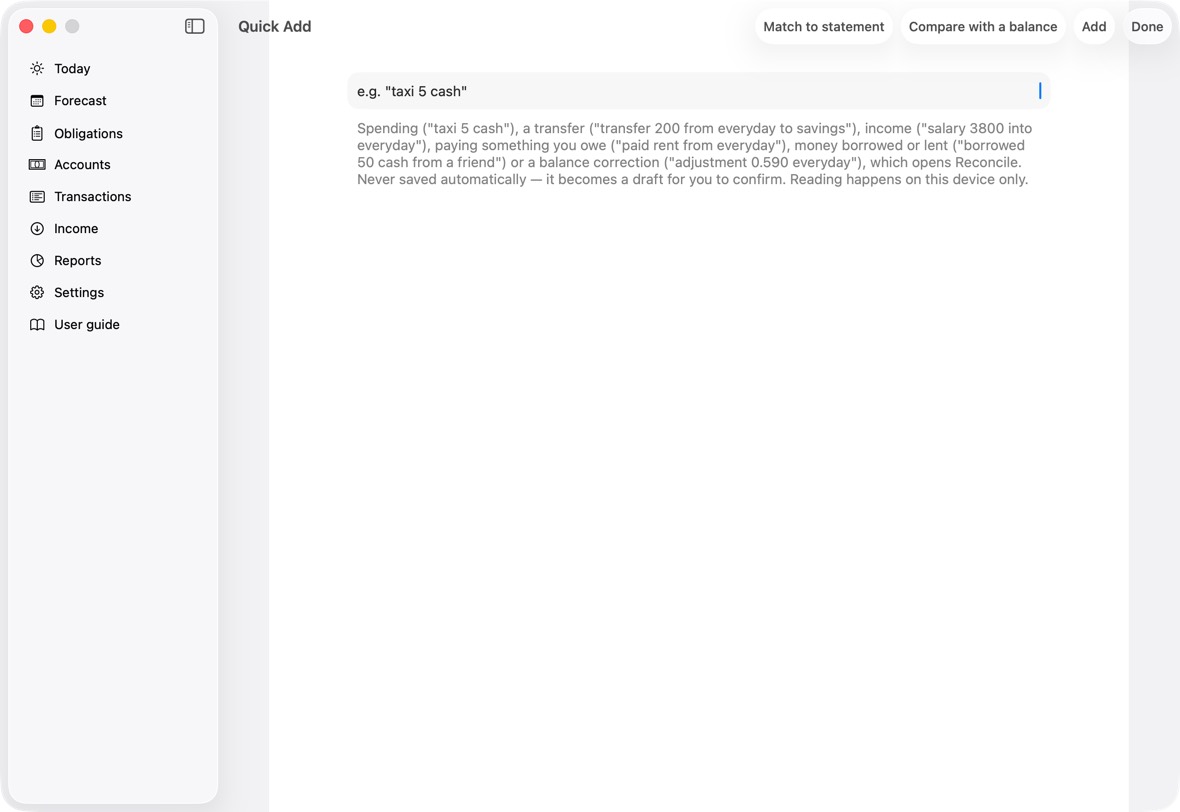
- Check what the app filled in, then save it.
You should now see the expense recorded, as if you had typed it in.
- The new row in Transactions, as if you had typed it.
- Scan Receipt offers Take Photo…, Choose from Photos… and Choose Files (PDF)…. What it reads opens on Confirm Purchase for you to check.
These two appear only on an iPhone that runs Apple Intelligence.
Your salary and its planned deductions
- Open Salary (under Income).
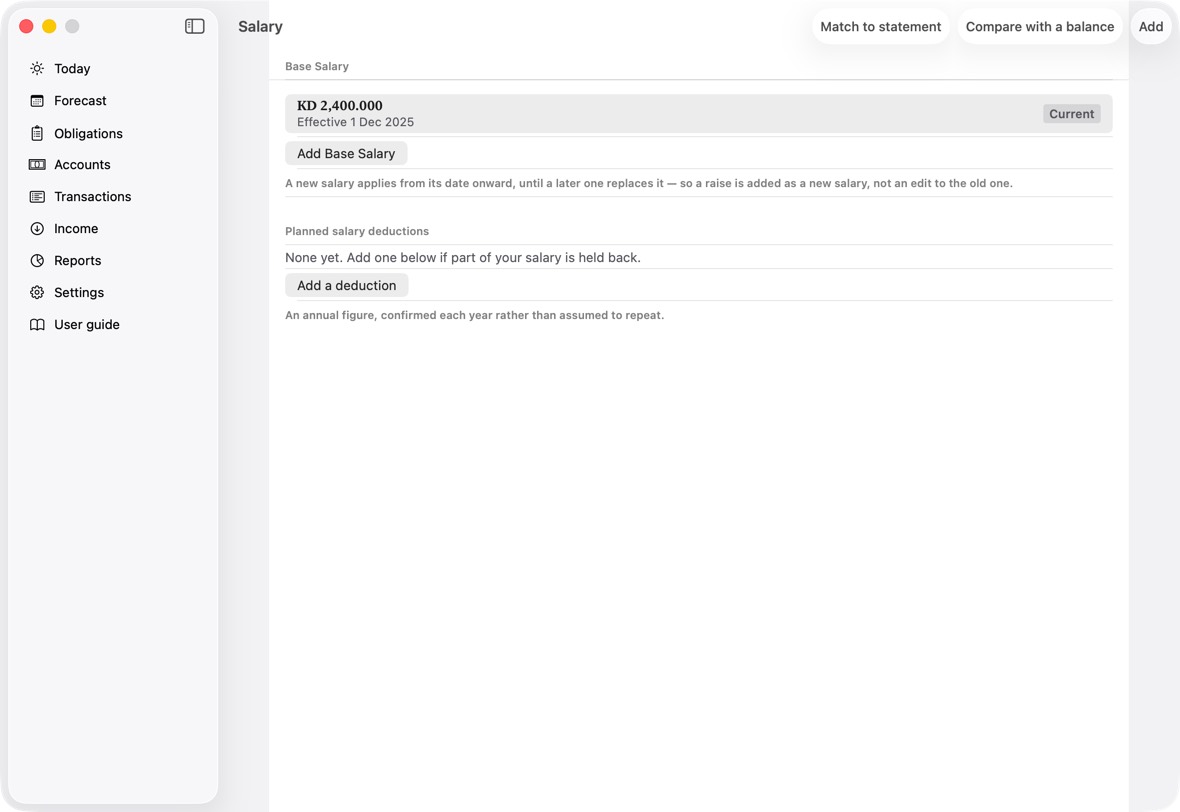
- Click Add Base Salary, type the Base amount and the date it starts, and click Save.
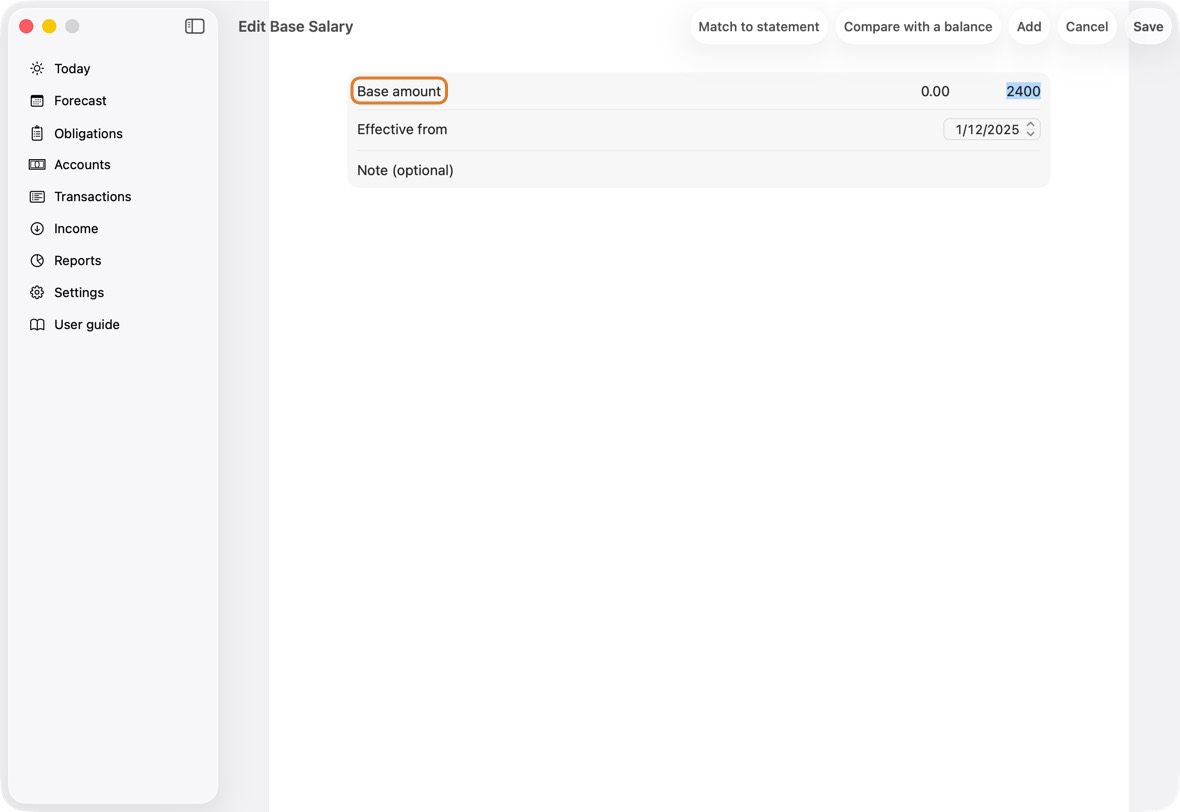
Field Must fill? What it means Example Base amount Yes Your salary before deductions. 1,500 Effective from No The date this salary starts.
If you leave it: Today.Note No Anything you want to remember.
You should now see the expected salary on Today, less the deductions in their months.
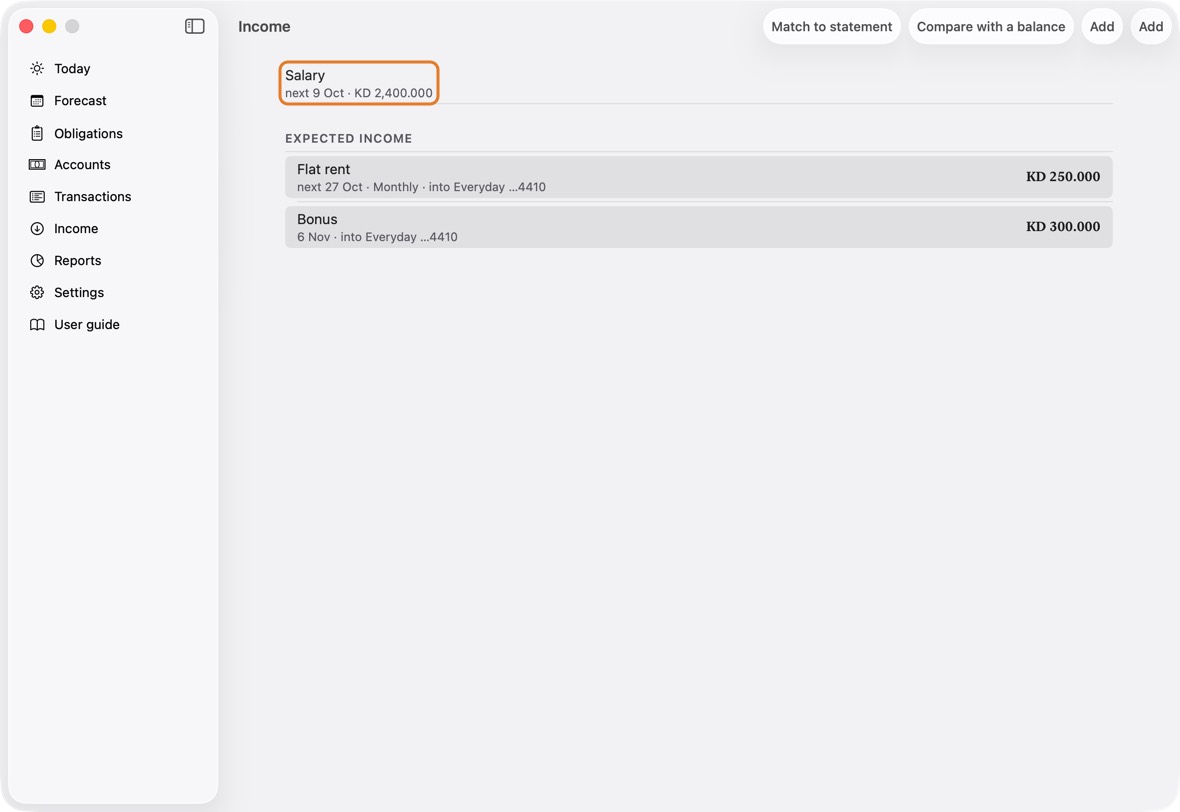
- The base salary and the date it starts, and each planned deduction with its months.
- Planned deductions, such as medical insurance, have their own task: Add a planned salary deduction.
Add a planned salary deduction
- Open Salary (under Income). On Today you can also click Manage salary, under Expected.
- Under Planned salary deductions, click Add a deduction.
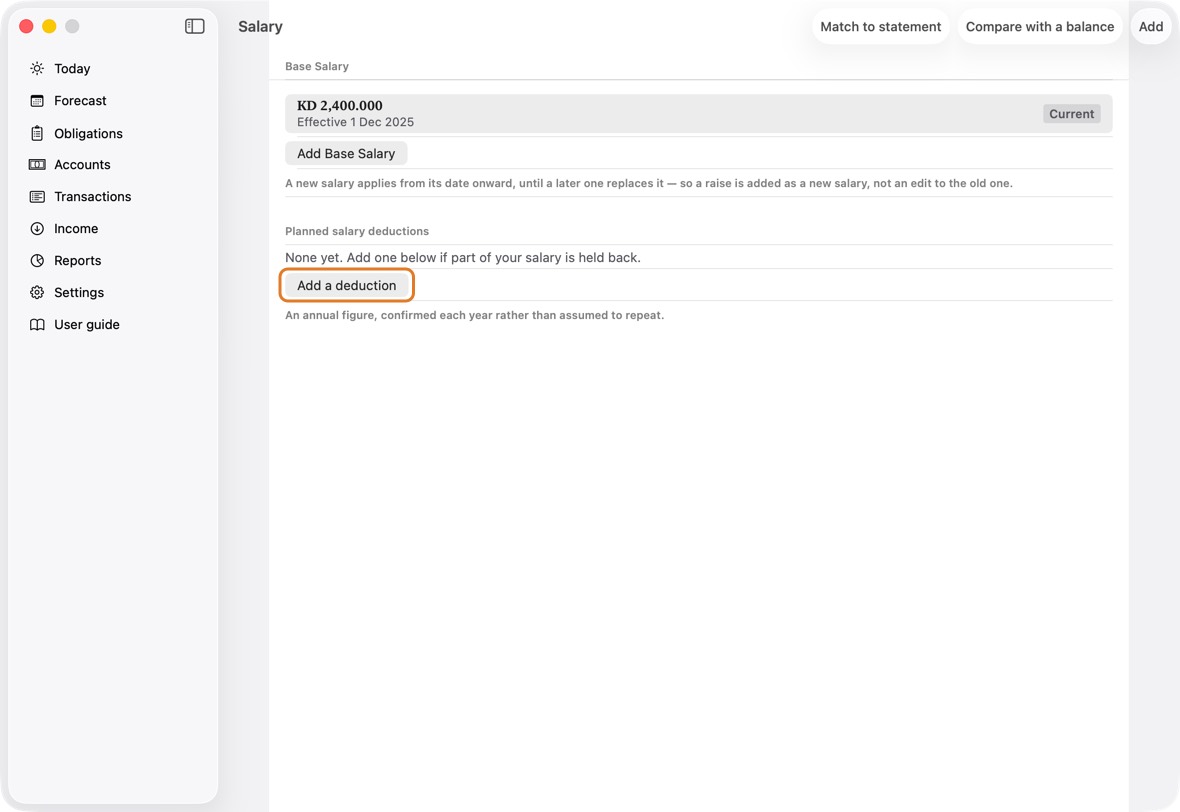
- Type the Year and the Amount, set the months with From and To, and click Save.
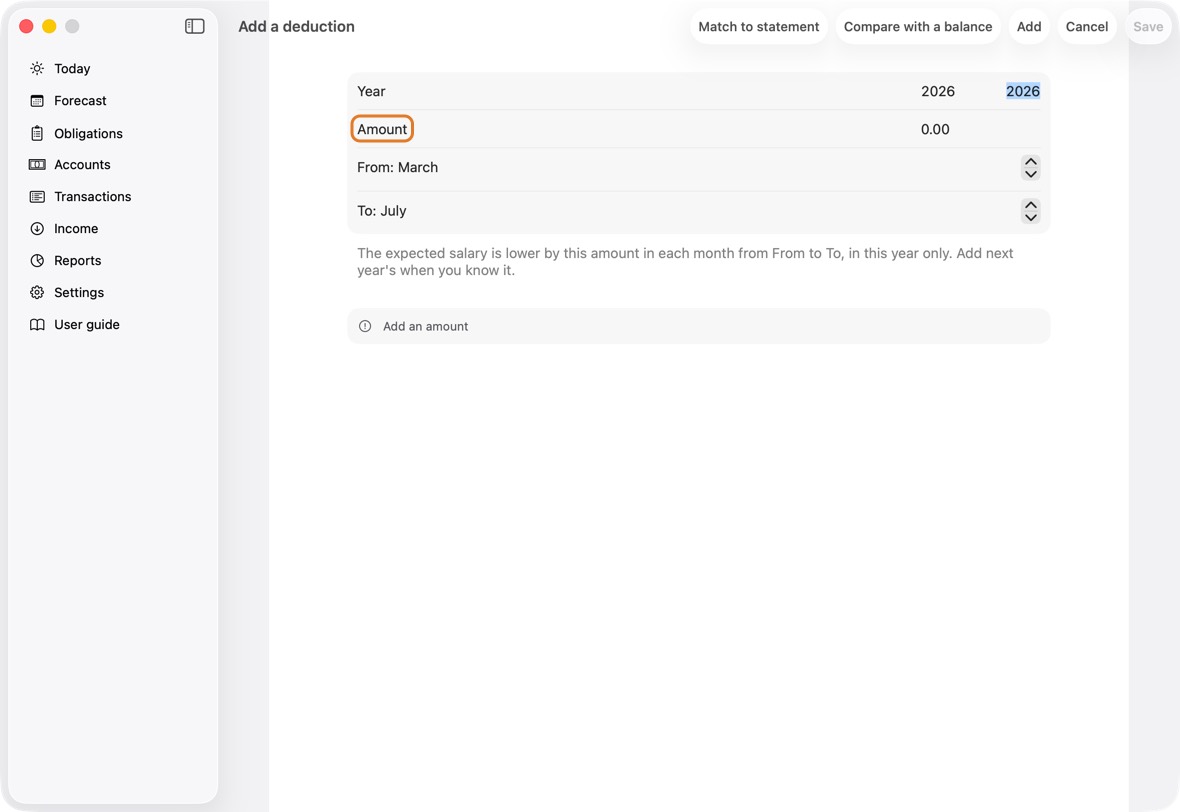
Field Must fill? What it means Example Year Yes Deductions: the year it applies to.
If you leave it: This year.2026 Amount Yes Deductions: how much is taken each month. 25 From: … No Deductions: the first month it is taken.
If you leave it: March.To: … No Deductions: the last month it is taken.
If you leave it: July.
You should now see the deduction under Planned salary deductions, with its year, amount and months. The expected salary on Today is lower in those months.
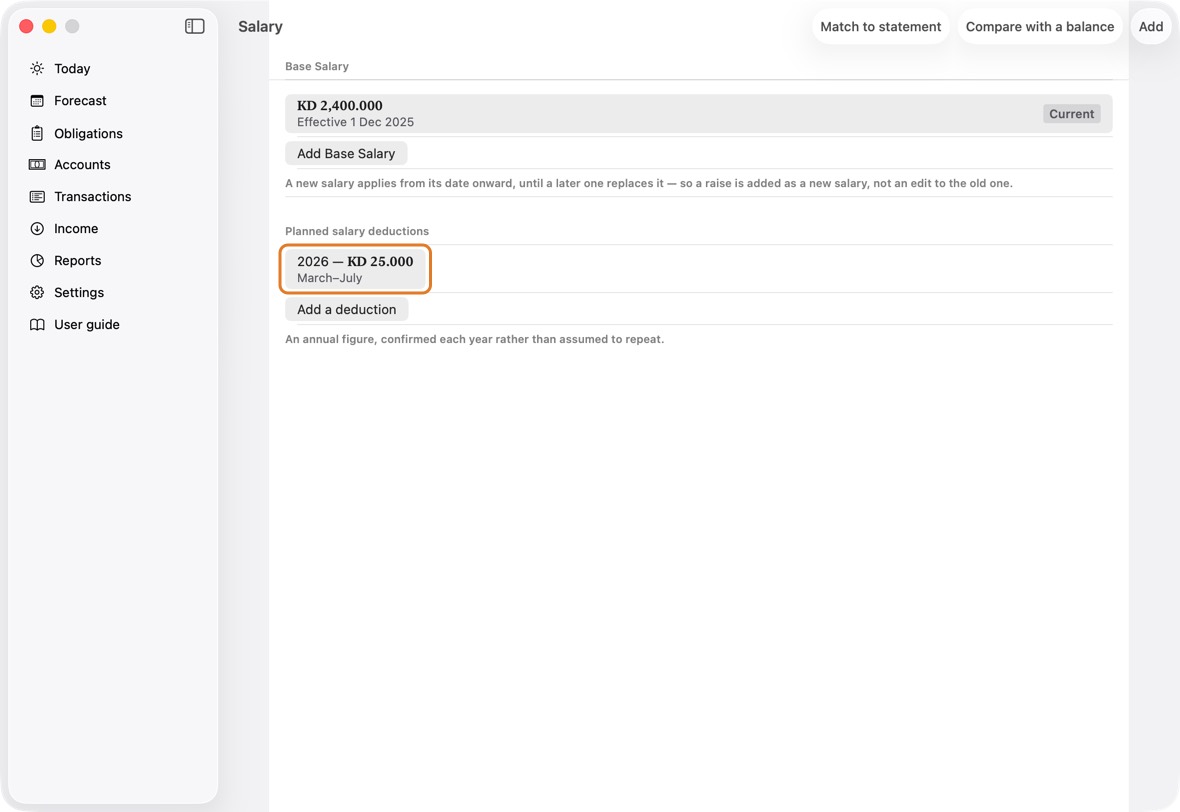
- A planned deduction is part of the salary held back for some months, such as medical insurance. It lowers the expected salary by its amount in each month from From to To.
- It is for one year only. Next year's is added when you know it, so an old figure is never assumed to repeat.
Add expected income (once or repeating)
- Open Income and click Add, or click Add expected income under Expected on Today.
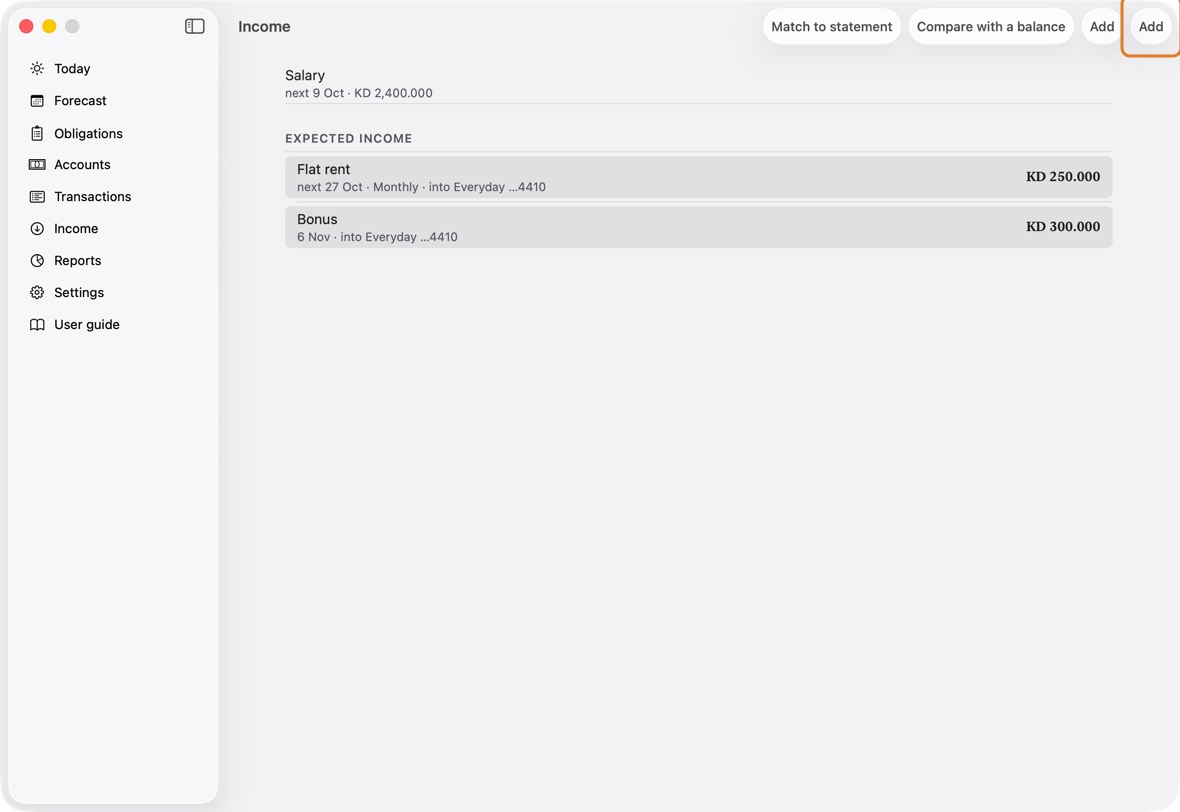
- Fill in What is it, Amount, Expected on and Into, the account or cash it arrives in. For rent from a flat you let out: Flat rent, 250, the 1st of next month, your current account.
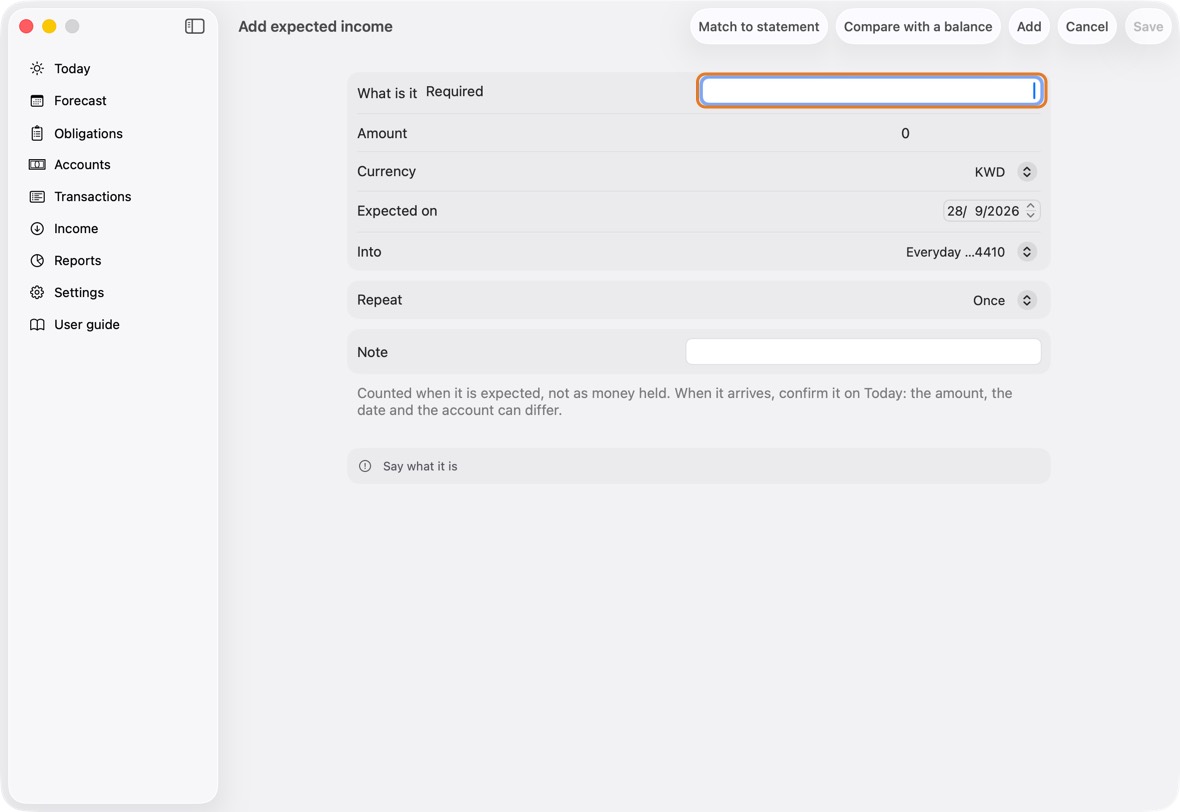
Field Must fill? What it means Example What is it Yes Any name you choose. Flat rent Amount Yes What is expected each time. 250 Currency No The money it comes in. KWD Expected on No The date of the first, or only, one.
If you leave it: Today.Into Yes The account or cash it arrives in.
If you leave it: The first account in that currency.Everyday Repeat No Once, Monthly, Quarterly or Yearly.
If you leave it: Once.Ends No Whether a repeating income stops. End date Only if it repeats and stops The last date. It is built to its end; one with no end, a year ahead. Note No Anything to remember. - Set Repeat — Once, Monthly, Quarterly or Yearly — and, if it stops, Ends and its date. Then click Save.
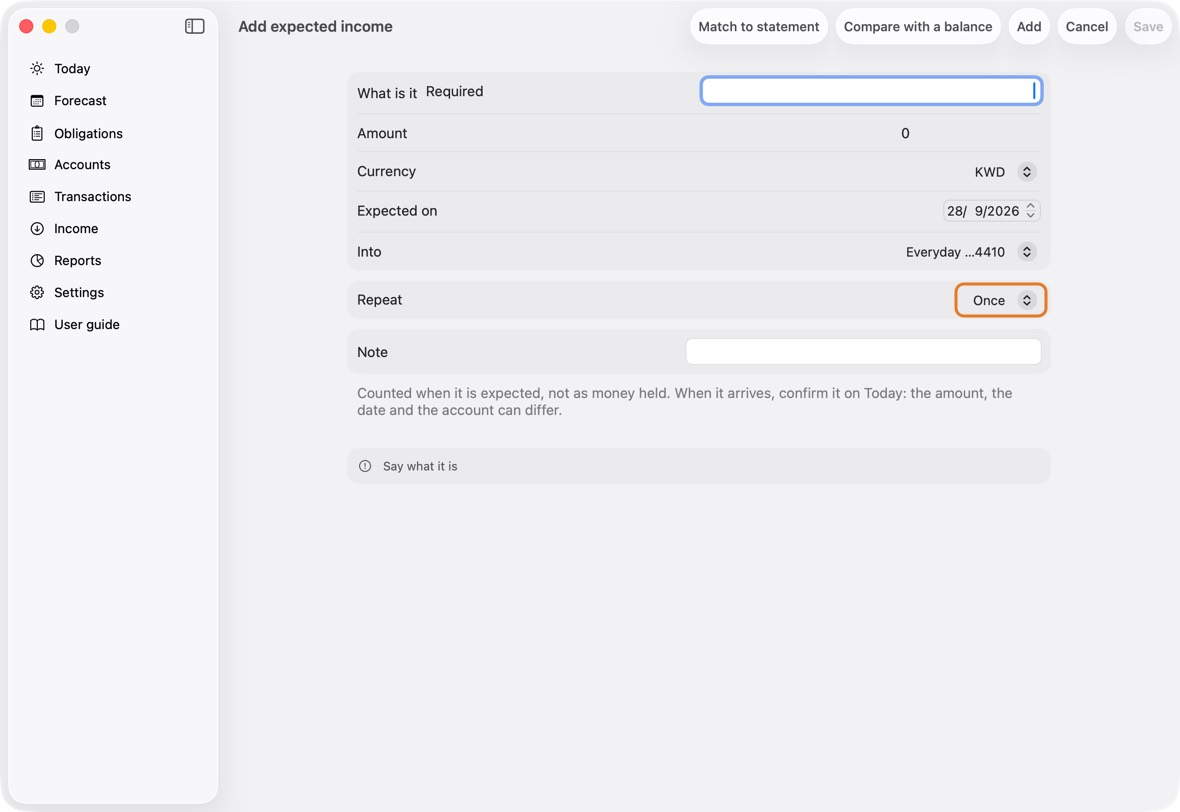
- To change or delete it later, click it in Income: choose This one only or This and the following ones. One already received never changes.
You should now see it in Income with its next date, and in Today's Expected in its cycle. When it arrives, confirm it there: the amount, the date and Into can differ.
- Each income by its name, its next date, how often it comes and the account it arrives in; the salary first.
Change an expected income
- Click the income on Today, under Expected, or in Income. It opens; nothing is confirmed by the click.
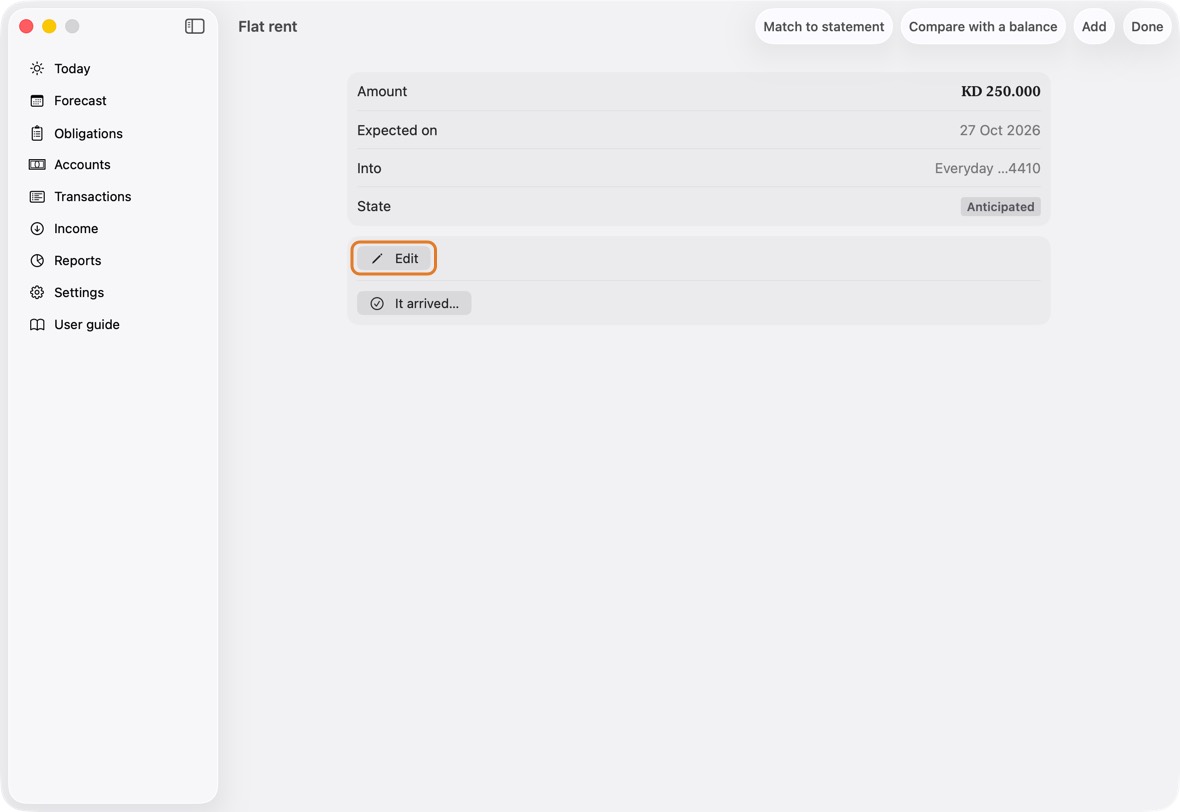
- Click Edit, change what you need — the amount, Expected on, or Into, the account it will arrive in — and click Save. On a repeating one, choose This one only or This and the following ones.
- When the money has arrived, open it again and click It arrived…, then It arrived: the amount, the date and Into can differ.
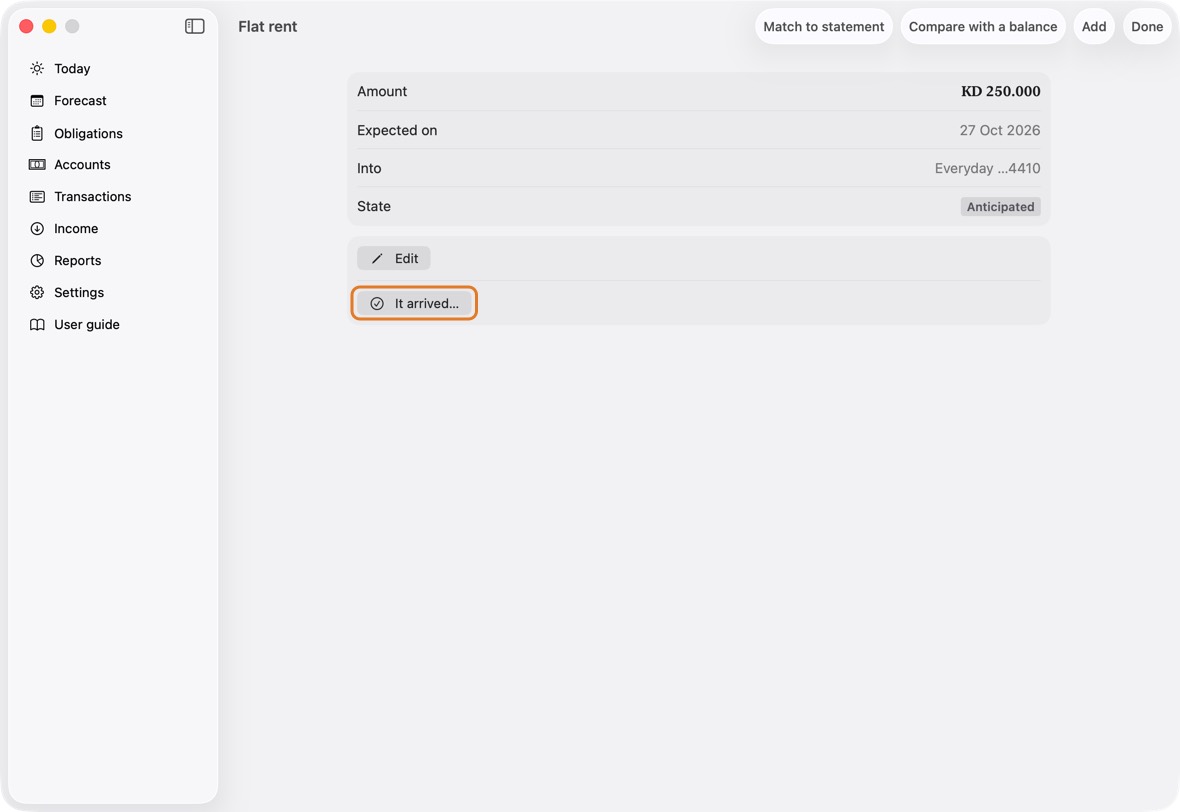
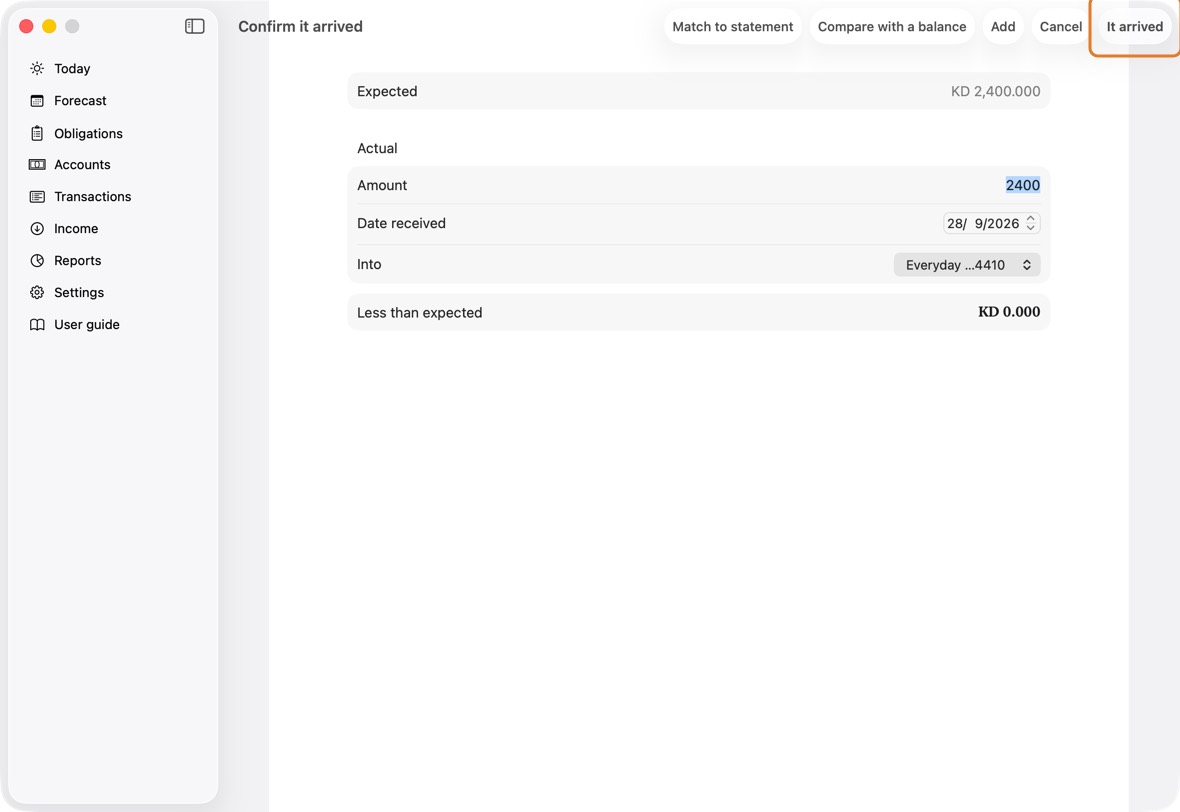
You should now see the income with its new details, still expected until you say it arrived.
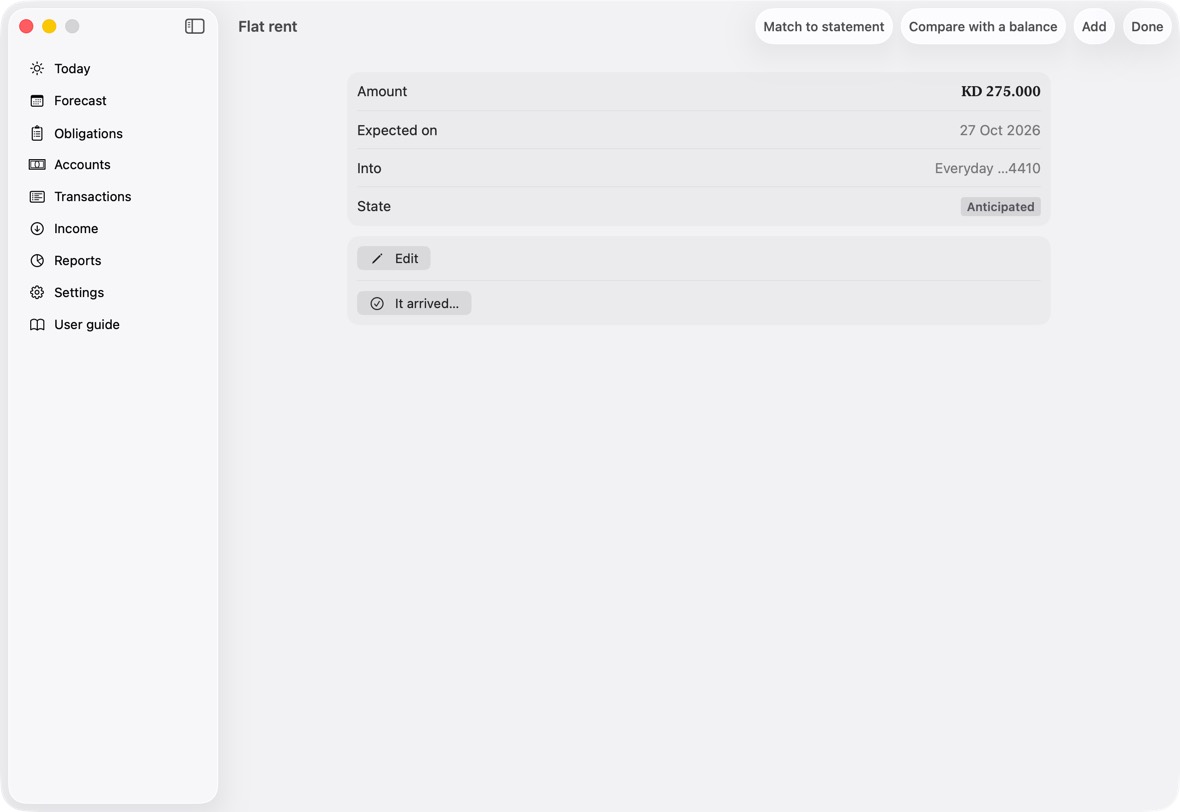
- Its amount, date and account, its state, and the two actions: Edit and It arrived….
Take back an income recorded by mistake
- Open the income: on Today it is listed under Expected as arrived; in Income, under Received.
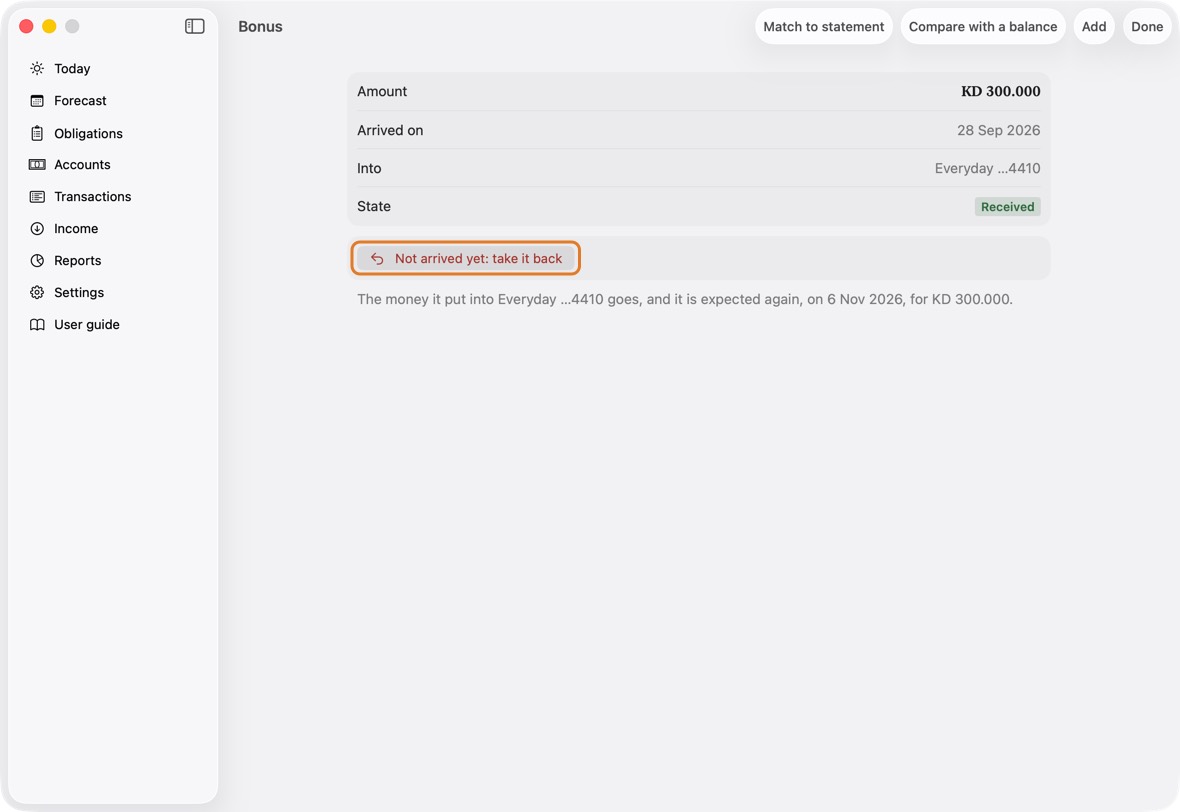
- Click Not arrived yet: take it back, and confirm.
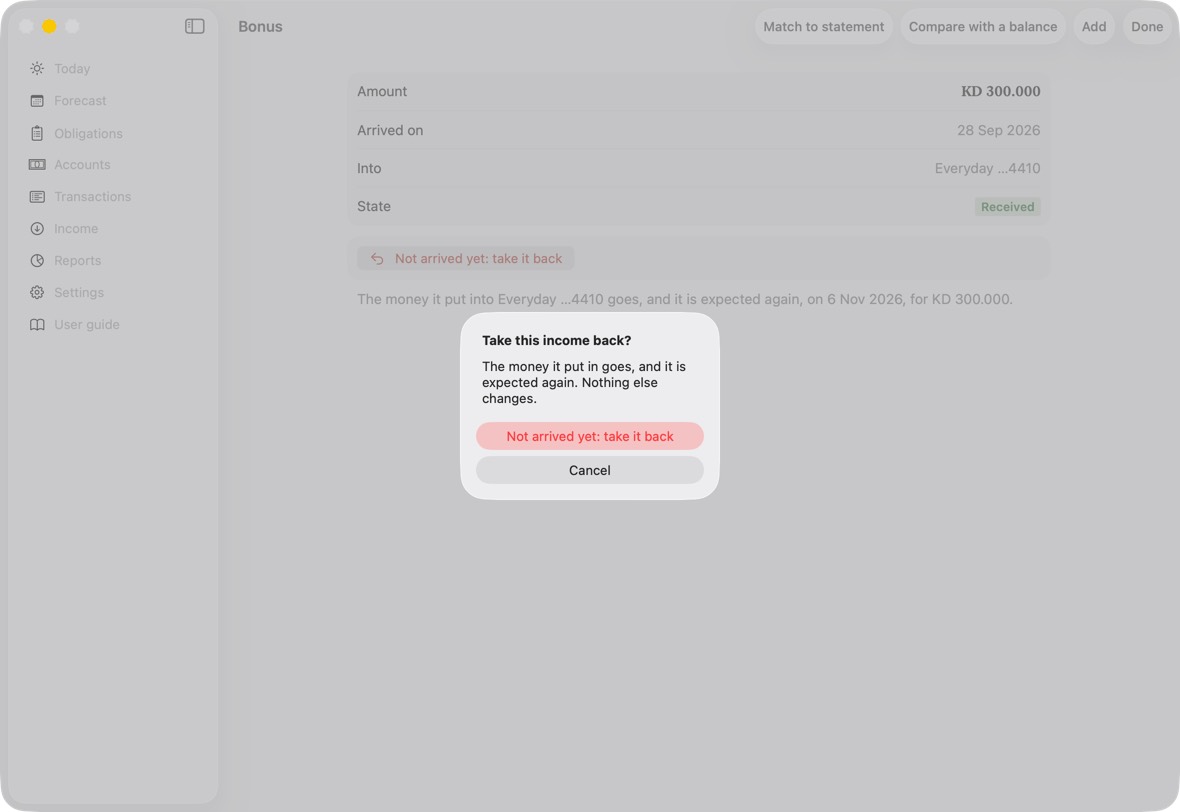
- If you tried to delete its transaction first, the message has an Open the income button that brings you straight here.
You should now see it expected again, on its date and for its amount, and the account no longer showing money that didn't arrive.
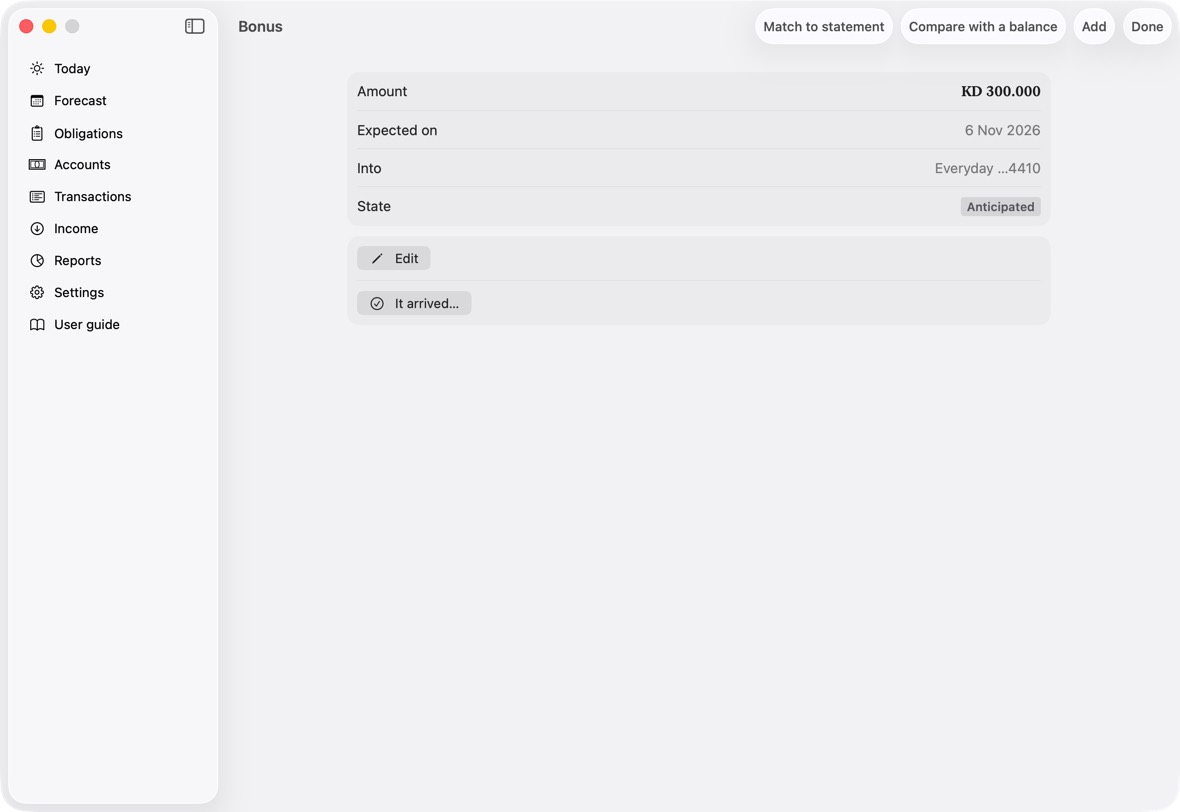
- Expected again, with its two actions; the account it was going into is kept.
Obligations
Add an obligation
- Open Obligations and click Add.
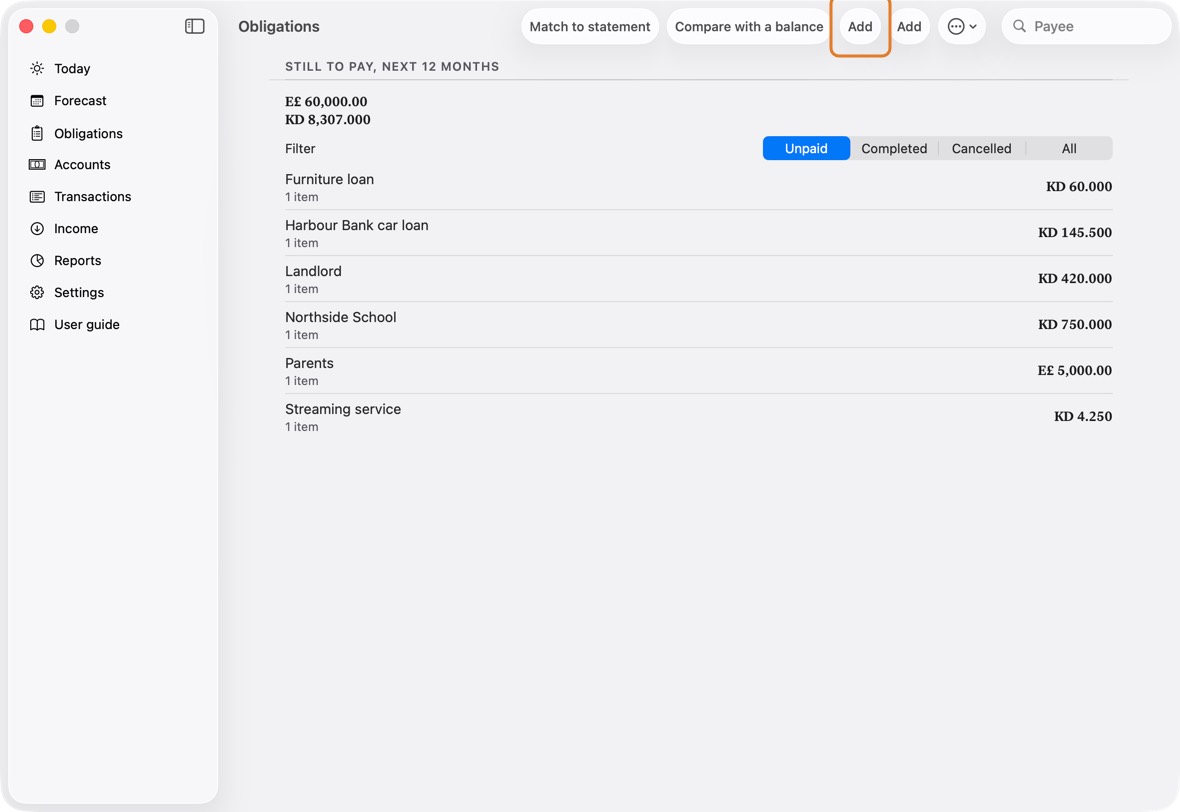
- Type who it is for under Beneficiary, the amount and the Due date.
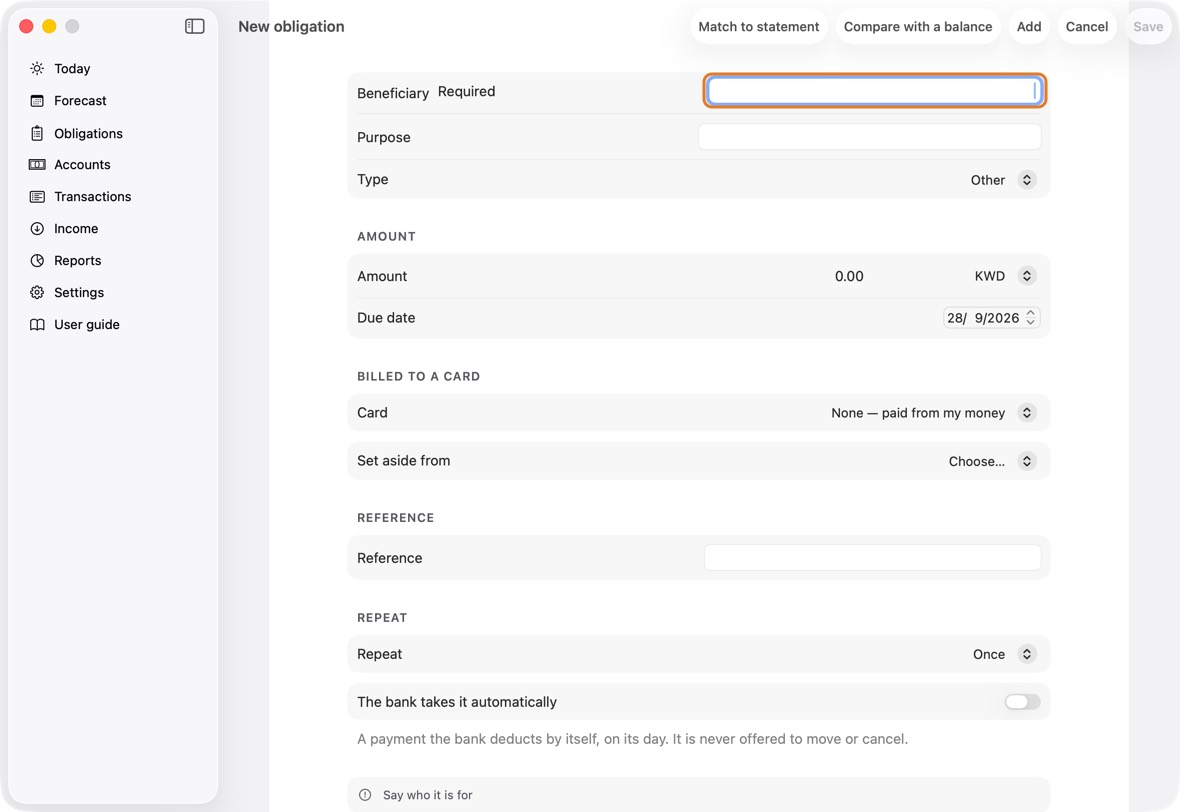
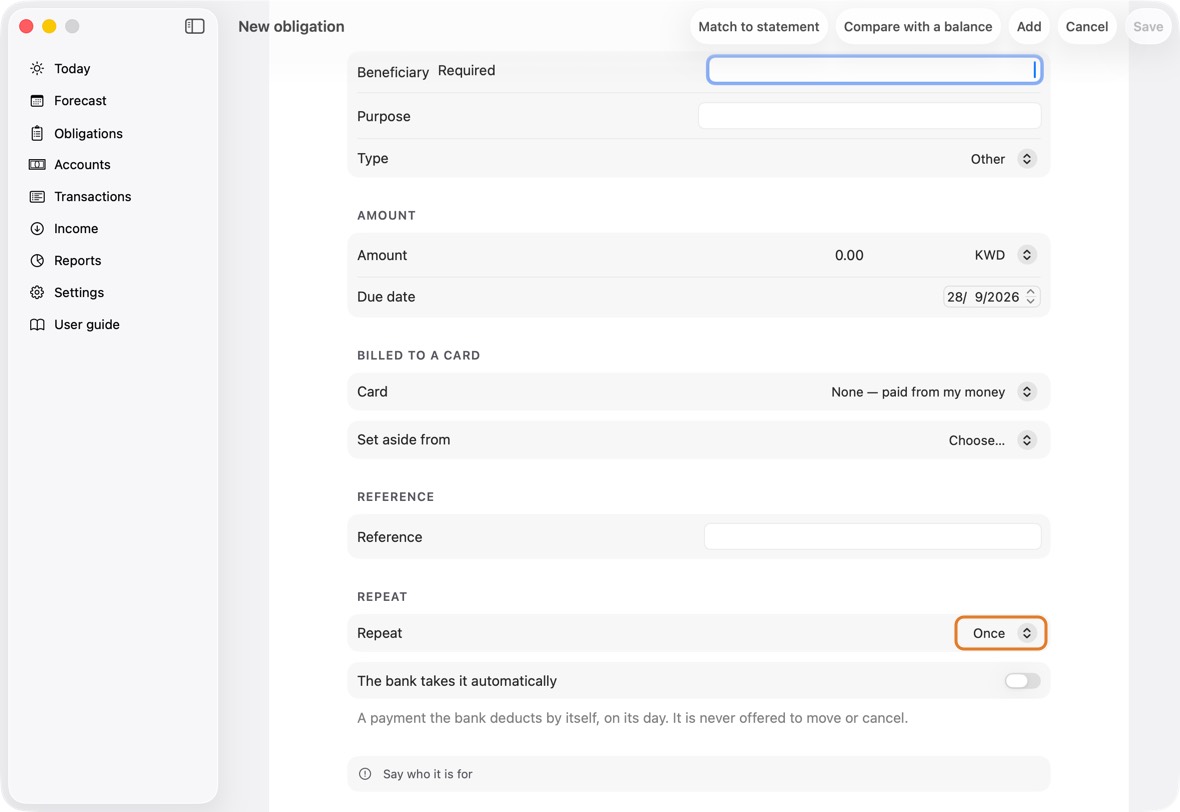
Field Must fill? What it means Example Beneficiary Yes Who you pay. Landlord Purpose No What it is for. Rent Type No The kind of payment.
If you leave it: Other.Amount Yes How much, and in which currency. 420 Due date No When it is due.
If you leave it: Today.Card No Only if paid by card: the card it is billed to.
If you leave it: None — paid from your money.Voyager …3057 Set aside from Only if no card is chosen The account its money is kept aside in — or Decide when paying, for a payment you make with whichever card or account has room at the time. Must be chosen when no card is.
If you leave it: Nothing: you choose. Accounts in its currency come first, then the others, then Decide when paying.Everyday Reference No A number to quote when you pay. A-1042 Repeat No Once, or how often it comes back.
If you leave it: Once.Ends No Turn on if the repeats stop on a date.
If you leave it: Off.End date Only if Ends is on The last date it is paid. Never propose moving this No The advisor never suggests moving it.
If you leave it: Off.The bank takes it automatically Only if no card is chosen, and it isn't a cheque For a payment the bank deducts by itself on its day — a standing order, a direct debit. The Advisor lists it as fixed and never offers to move or cancel it. A cheque is always fixed, so it isn't asked. Billed to a card means the card's bill pays it, later. Set aside from is the account whose money is held for it until you pay; it shows only when no card is chosen.
- Under Repeat, choose Once or how often it comes back.
- Under Set aside from, choose the account the money will come from — or Decide when paying, if you pay it each time with whichever card has room.
- Click Save.
You should now see it in Obligations, and on Today when it is due.
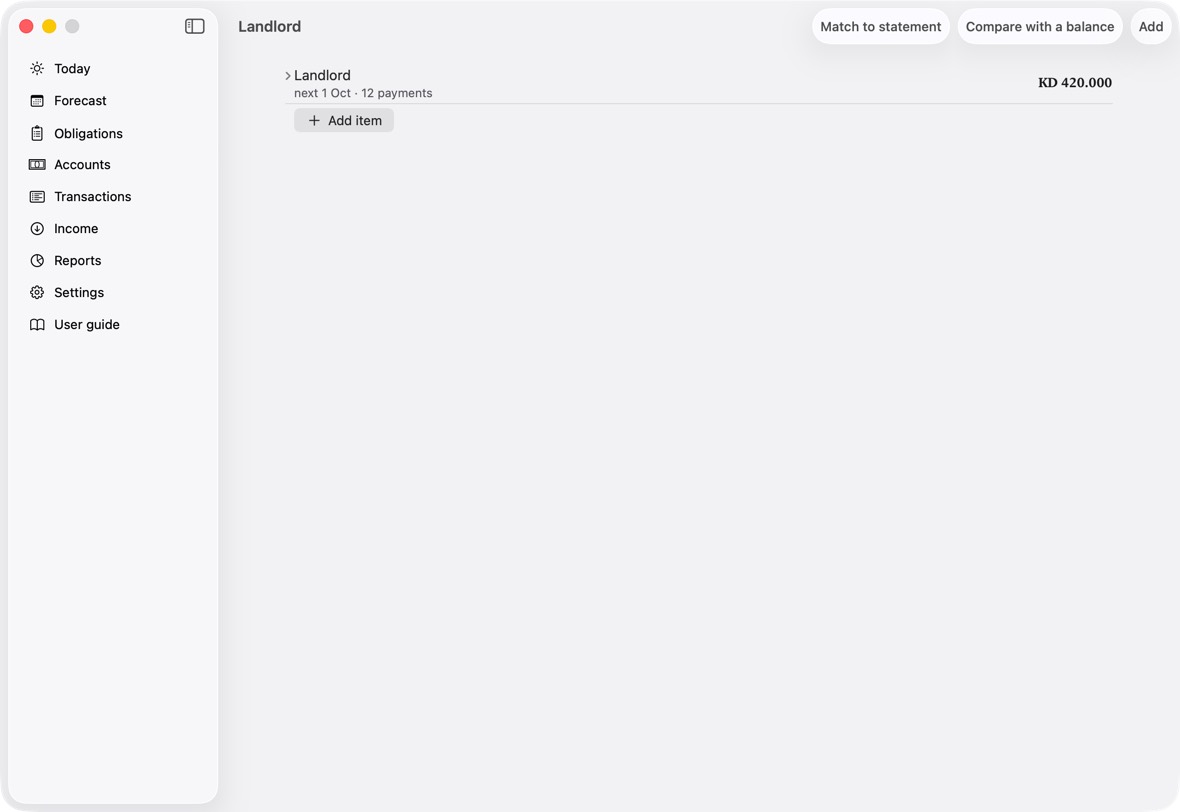
- The payee's item: the next date and how many payments there are, and the amount.
- Open it to see each payment, with Scheduled or Overdue, and Settle….
Pay an obligation, in full or in part
- On Today, or in Obligations, click Settle… beside it.
- Check the Amount. Change it to pay only part.
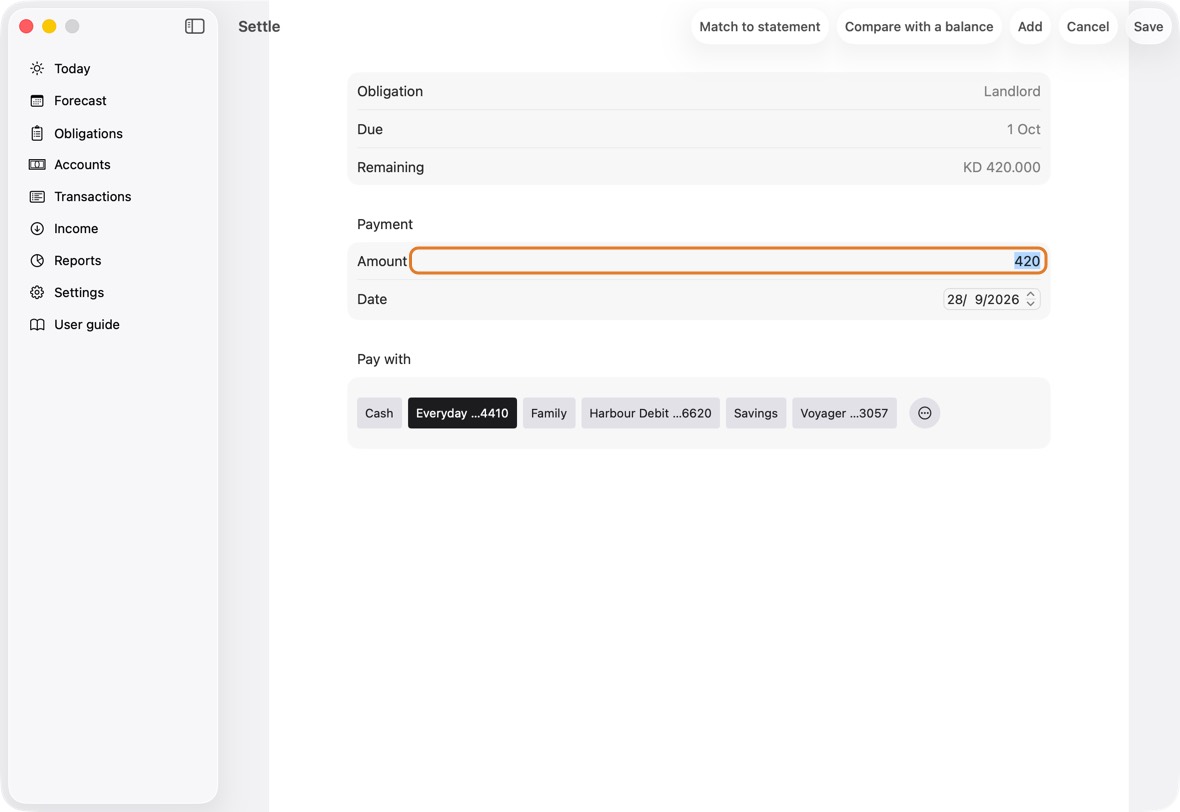
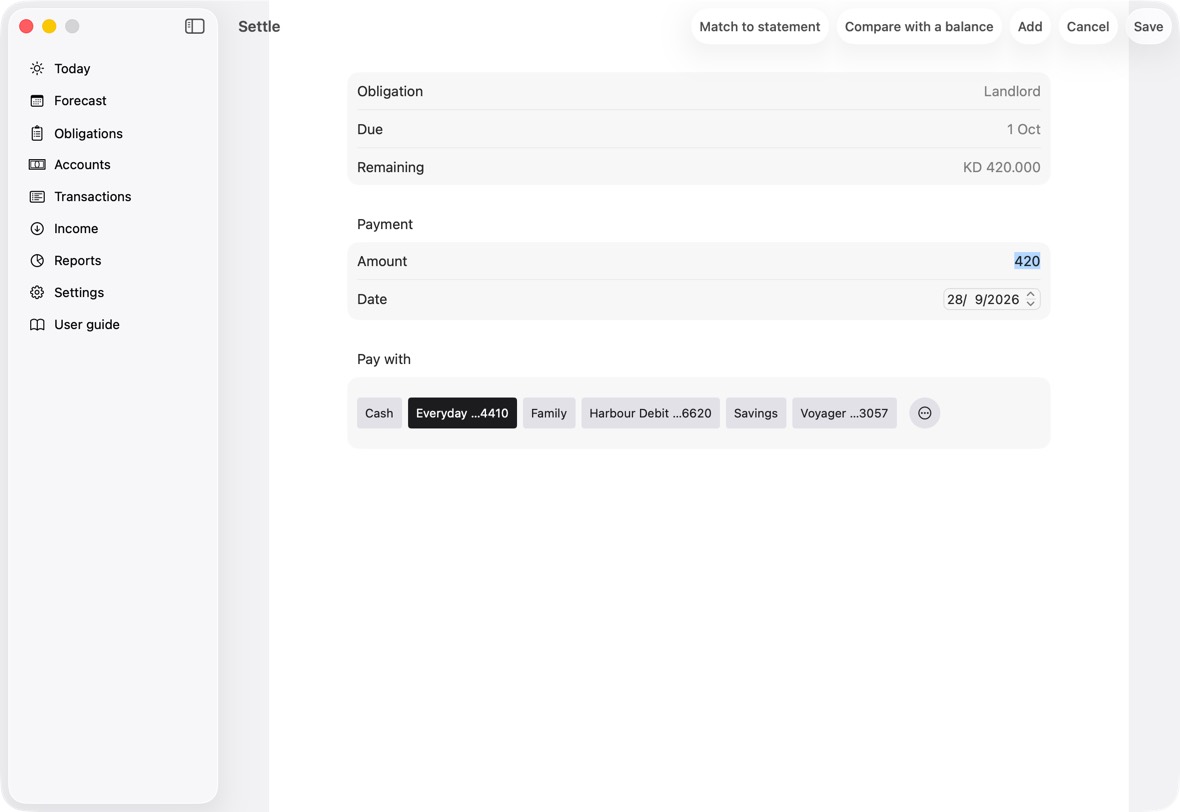
Field Must fill? What it means Example Amount Yes What you paid now. Less than due pays part of it.
If you leave it: What is still due.420 Date No When you paid.
If you leave it: Today.Pay with Yes The card or account it was paid with.
If you leave it: The card it is billed to, or its account.If the rest isn't paid Only if you pay part of it Part payments: what happens to what is left.
If you leave it: Carry forward.Reason Only if you write the rest off Why you write the rest off. Waived by the landlord - Choose what you paid with under Pay with.
- For part of it, under If the rest isn't paid, choose Carry forward, Write off, or Add the rest to the next payment.
- Click Save, then Confirm.
You should now see it paid, or "Part paid" with what is left.
- The payment now Settled, or Part paid with what is left.
Cancel one payment
- On Today, click the payment in Due.
- Click Cancel this payment….
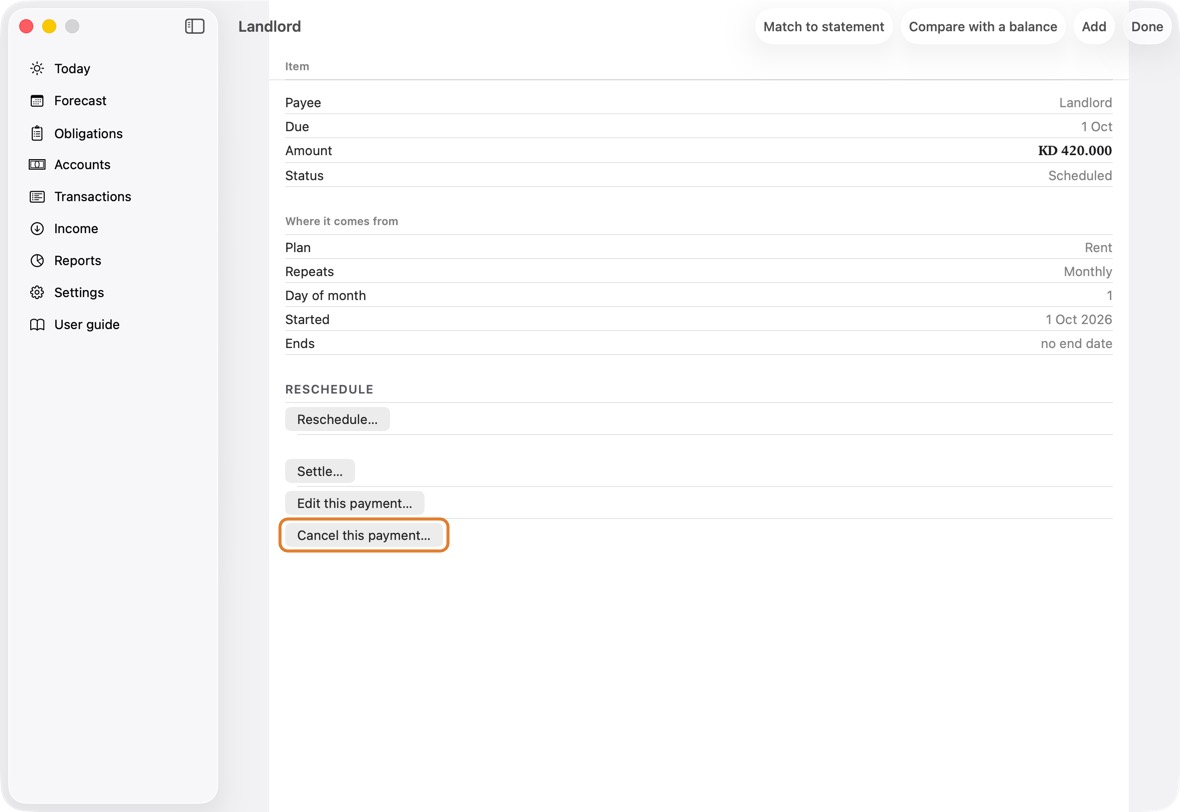
- Type why, then click Cancel it.
You should now see that payment cancelled. The ones after it are not touched.
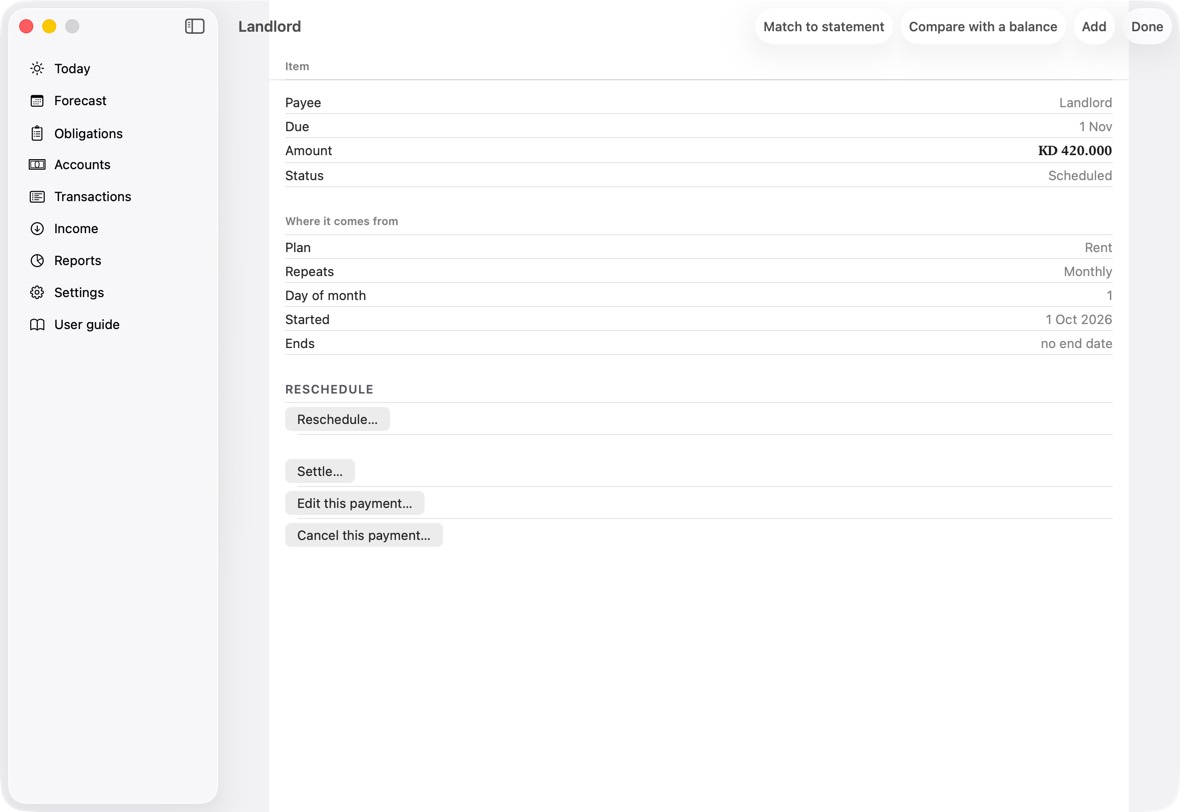
- The payment marked cancelled, with the reason you gave; the others unchanged.
Change the amount of a repeating payment
- Open the obligation and click Edit this payment….
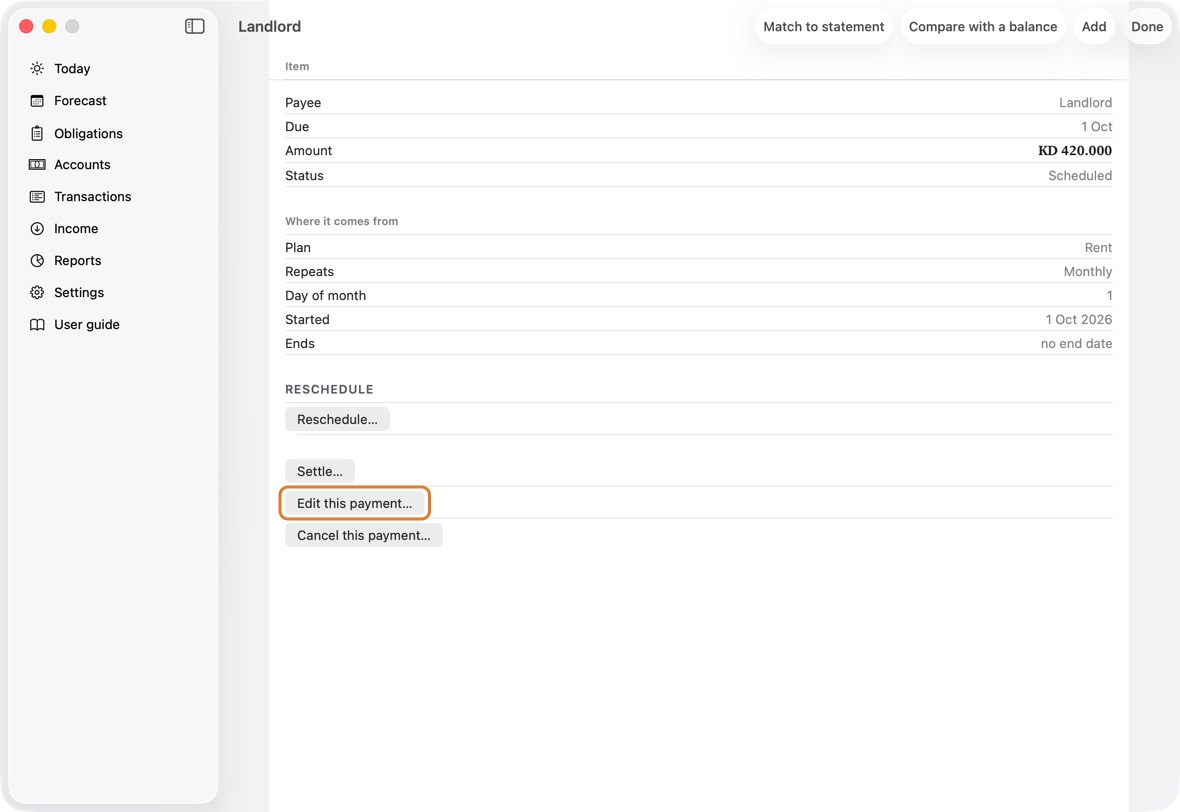
- Type the new amount and click Save.
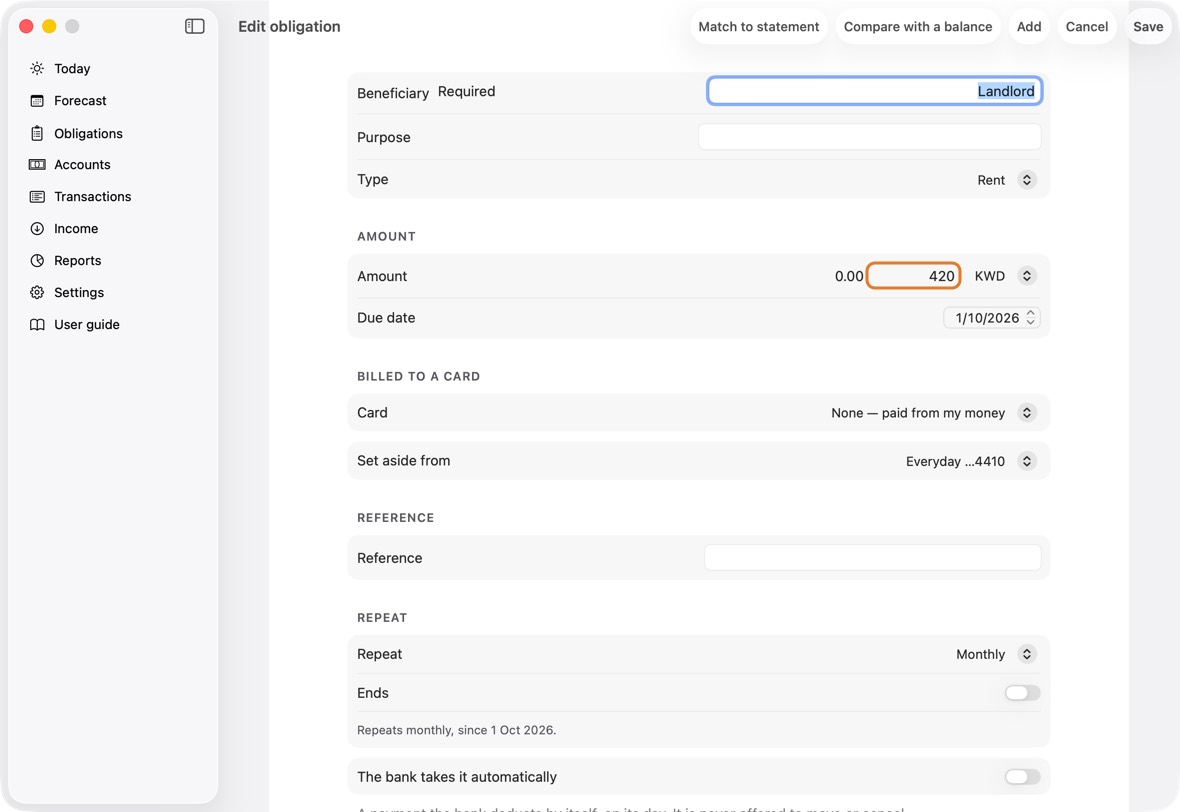
- Choose This payment only, or This and the following ones.
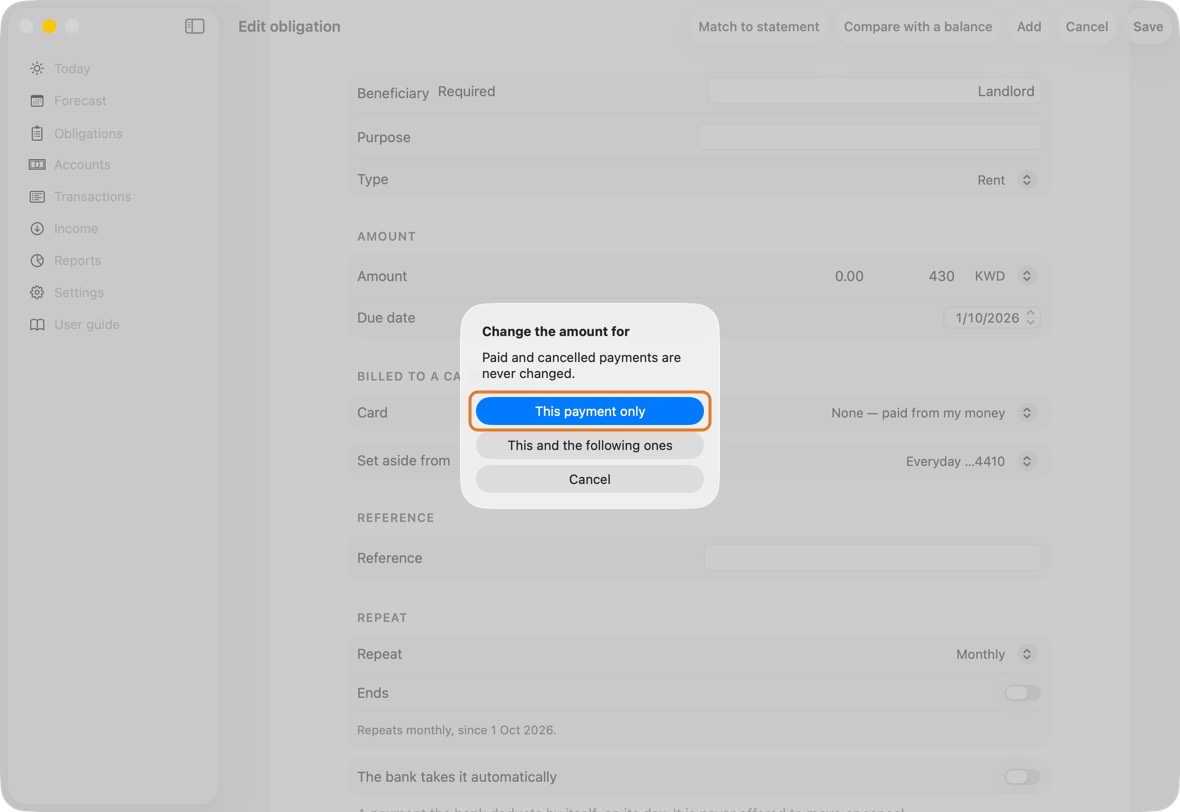
You should now see the new amount where you chose. Paid and cancelled payments never change.
- The new amount on the payments you chose; paid and cancelled ones unchanged.
Move a payment to another date
- Open the payment: in Obligations, click the payee, then the payment. From Today or the Forecast, click it.
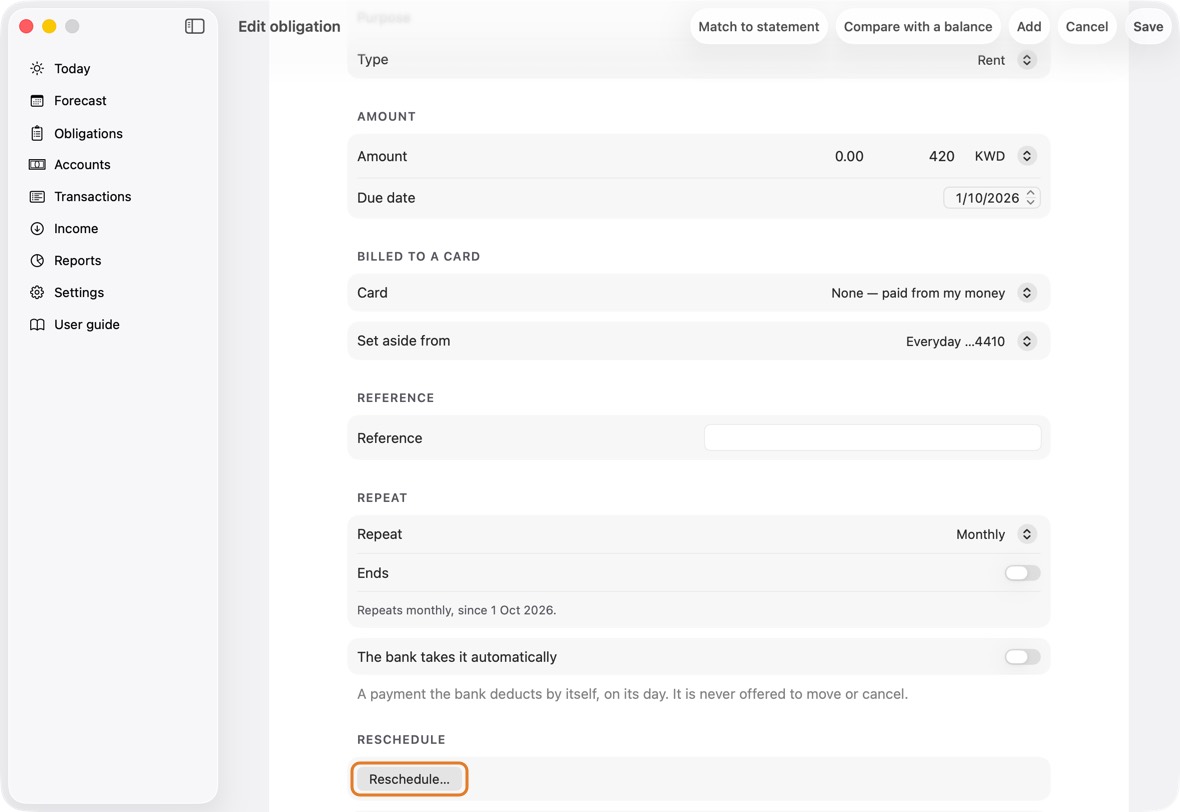
- Under Reschedule, click Reschedule…. Choose the date in Move to, add a reason if you like, and click Save.
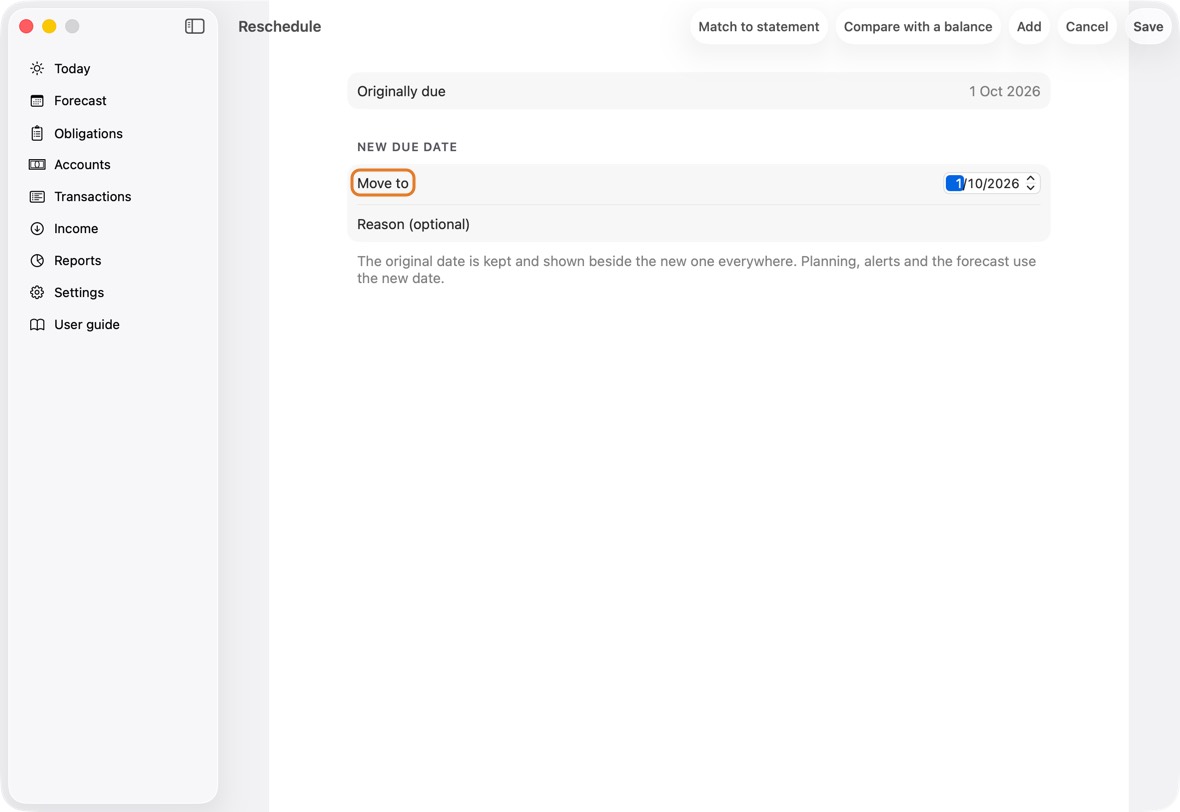
Field Must fill? What it means Example Move to No The day the payment is now due. Today, the Forecast and the advisor use it.
If you leave it: The payment's own date: Save changes nothing until you choose another.15 Nov 2026 Reason No Why it moved, for you to read later beside the dates.
If you leave it: No reason is kept.Waiting for the refund - To put it back, click Change or restore…, then Restore original date.
You should now see the payment on its new date, with Originally due and Moved to under Reschedule. Today, the Forecast and the advisor use the new date.
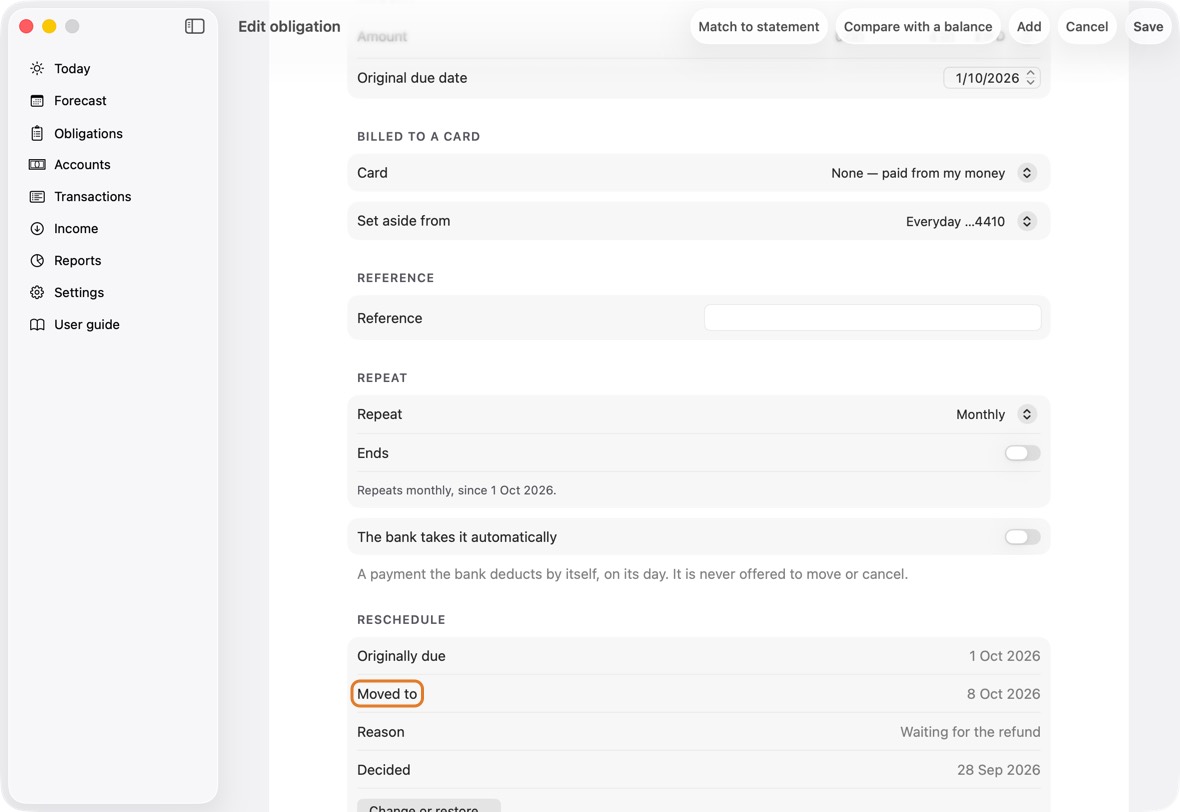
- Moving a payment changes only its date. Its amount and its plan stay as they are, and the original date stays beside the new one.
Stop a repeating payment, delete a bill, or reopen one
- Open the payment: in Obligations, click the payee, then the payment.
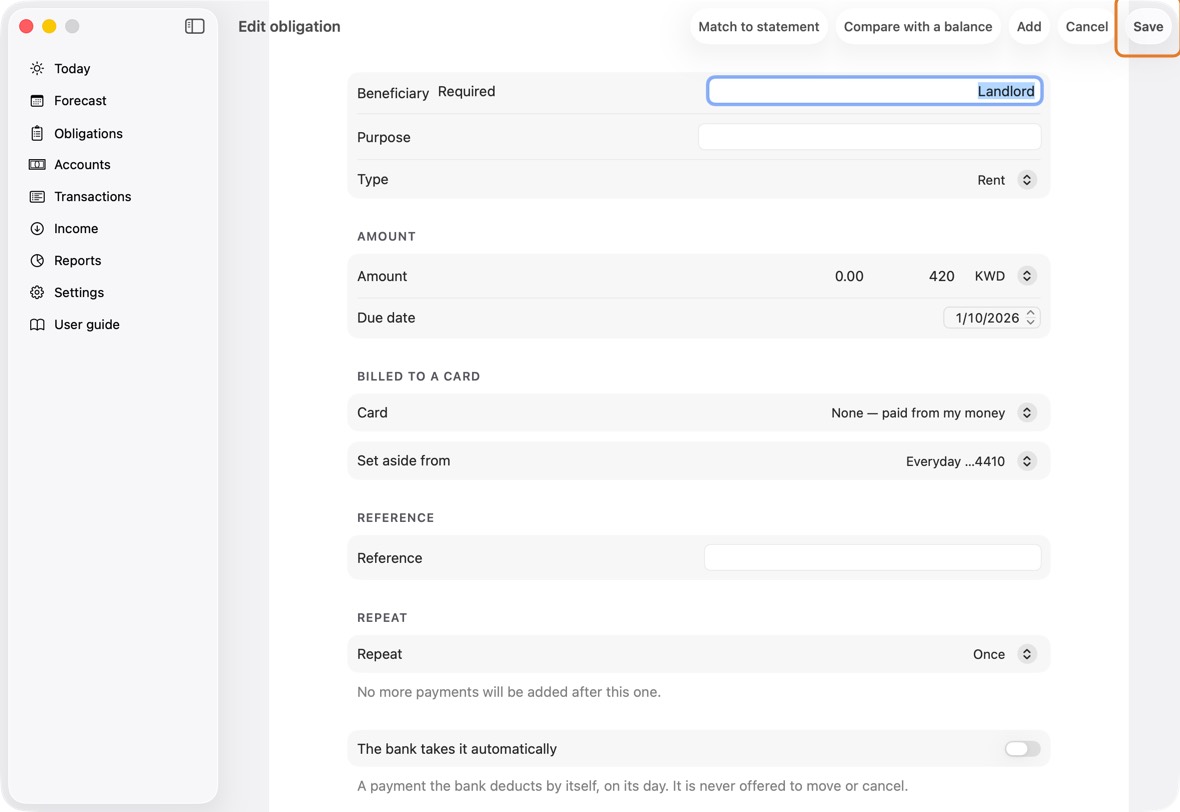
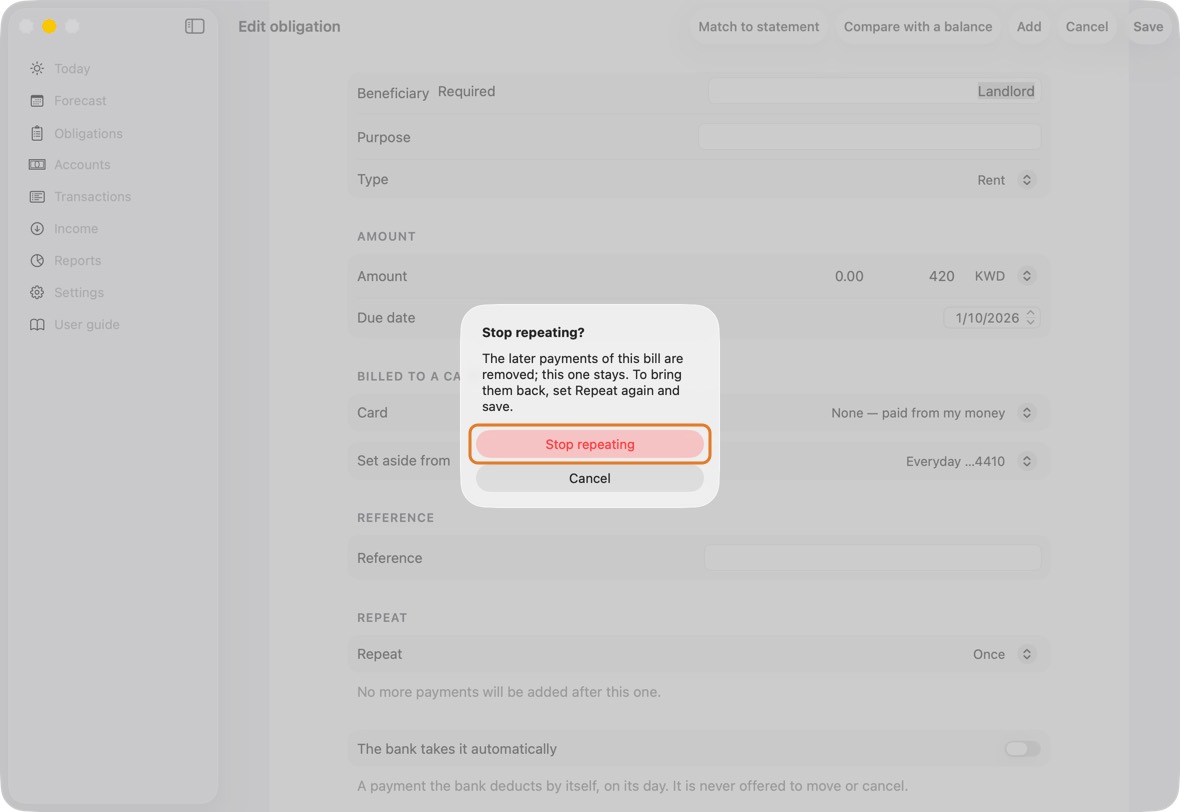
- To stop it repeating, set Repeat to Once and click Save, then Stop repeating. This payment stays; the later ones go.
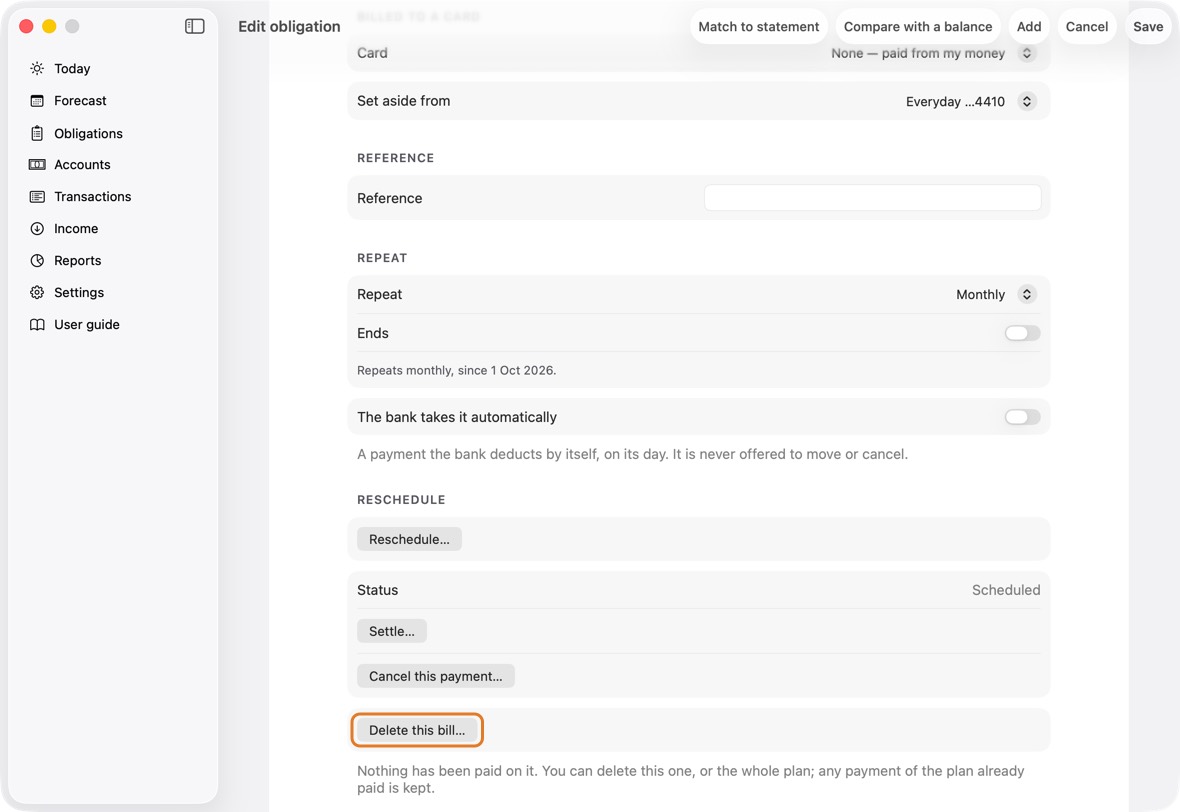
- To delete a bill nothing has been paid on, click Delete this bill… at the bottom. Choose this one or the whole plan; Keep it changes nothing.
- A settled or cancelled payment can be opened again: click Reopen…, then Reopen.
- To add another payment for the same payee, click Add item on the payee's list.
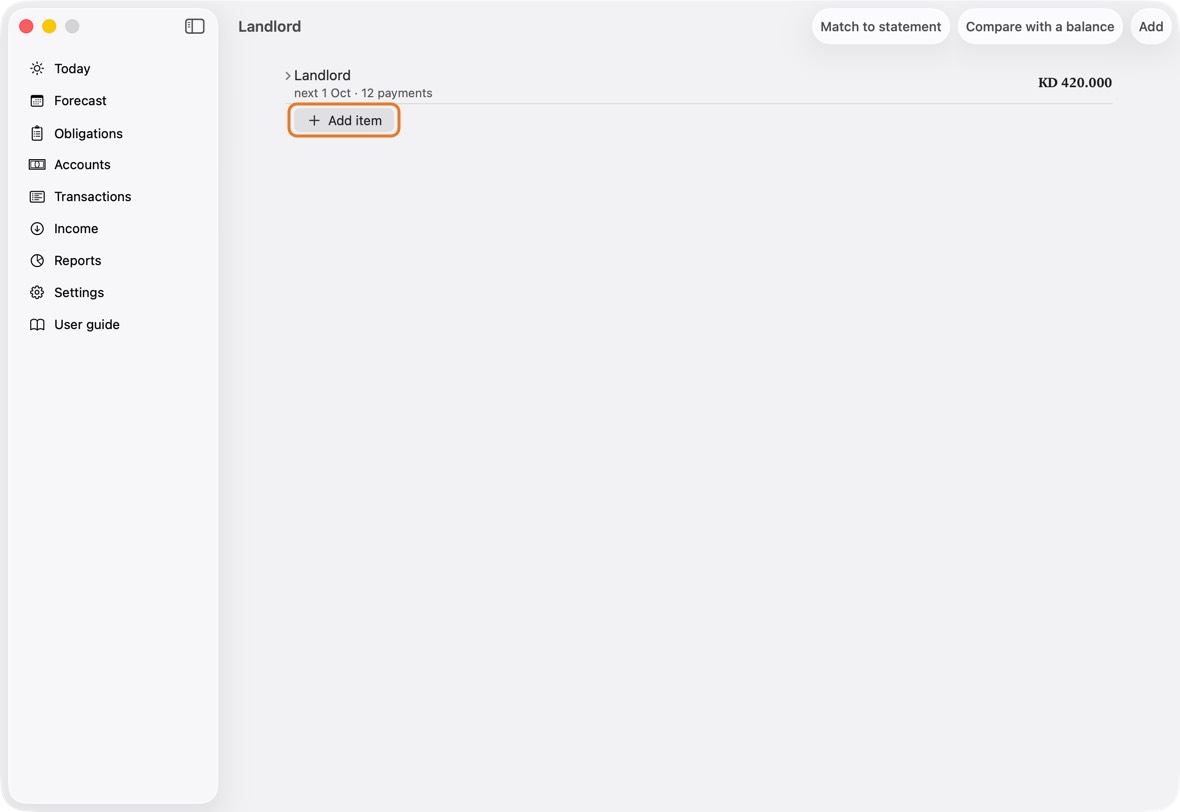
You should now see the payee's list without the payments you stopped or deleted, and any you reopened back as open.
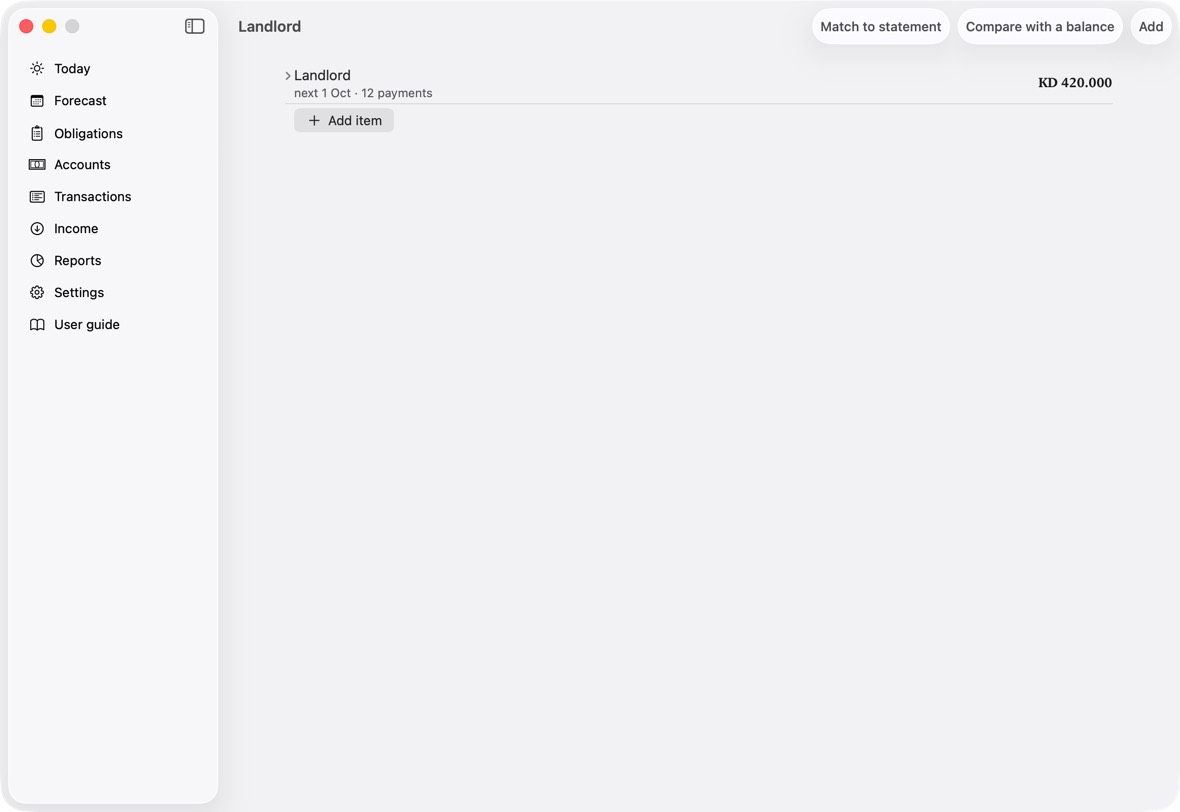
- The payee's list shows each payment still to come, and those paid, cancelled or written off.
An obligation billed to a card
- Add or open the obligation.
- Under Billed to a card, choose the Card.
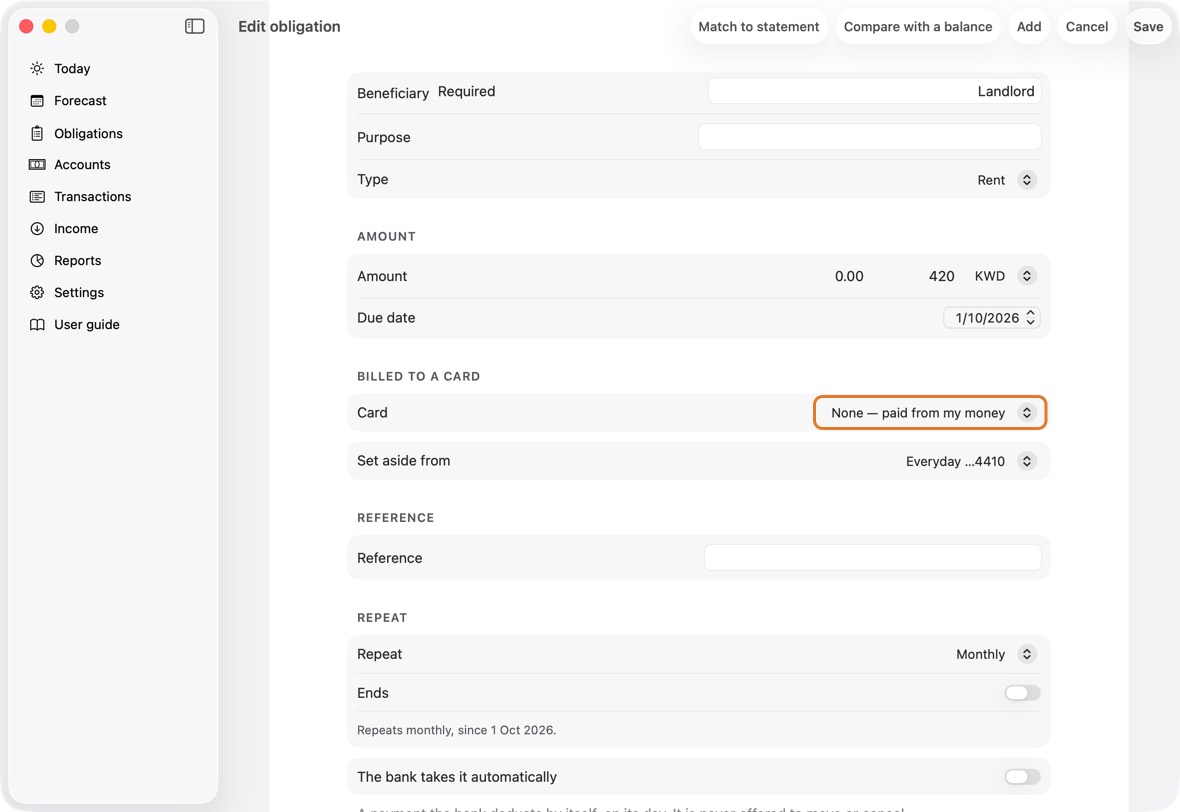
- Click Save.
You should now see it added to that card's bill, not taken from an account.
- The card's Owed includes it once it is charged; no account's figure moves until the card's bill is paid.
- It stays on the card even when the card has no room: Today then says the card will go over its limit. Changing the card on one payment of a repeating one changes the following payments too.
Add or change a loan
- Open Obligations, click ⋯, then Loans, and click Add.
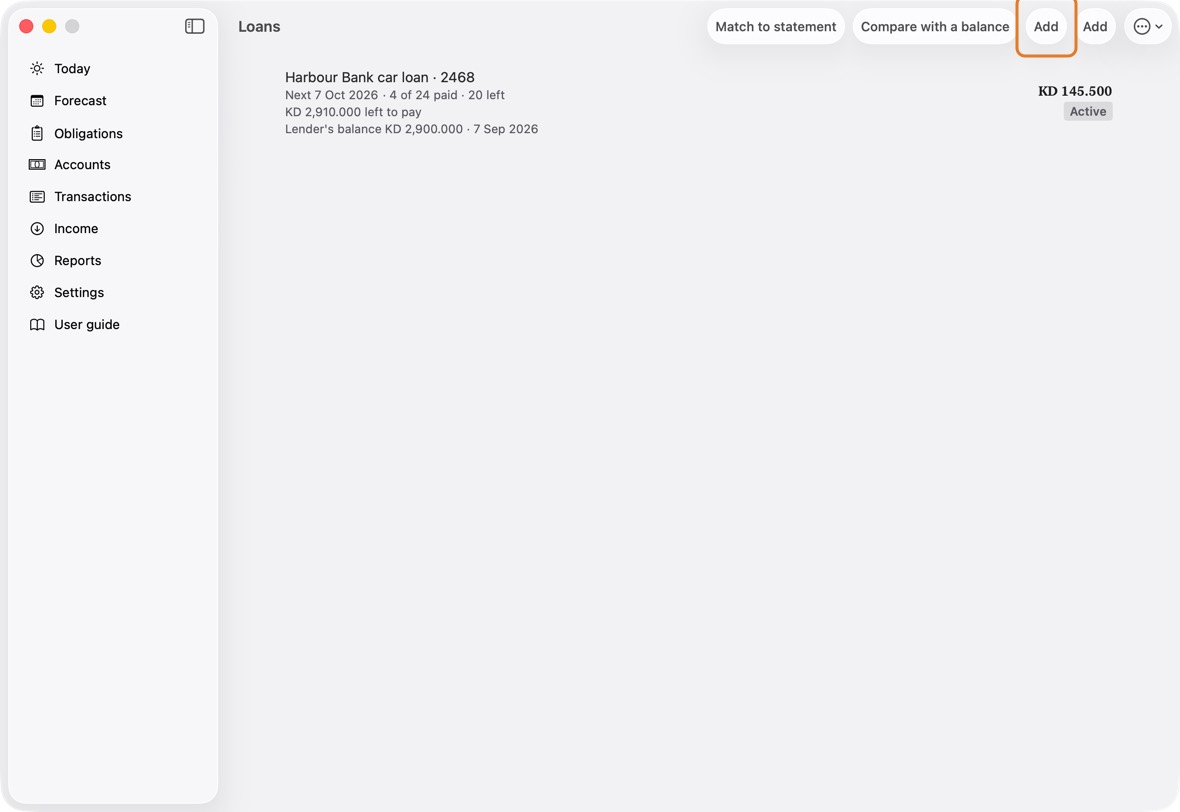
- Type the lender, the instalment and its currency, and choose the account it is paid from.
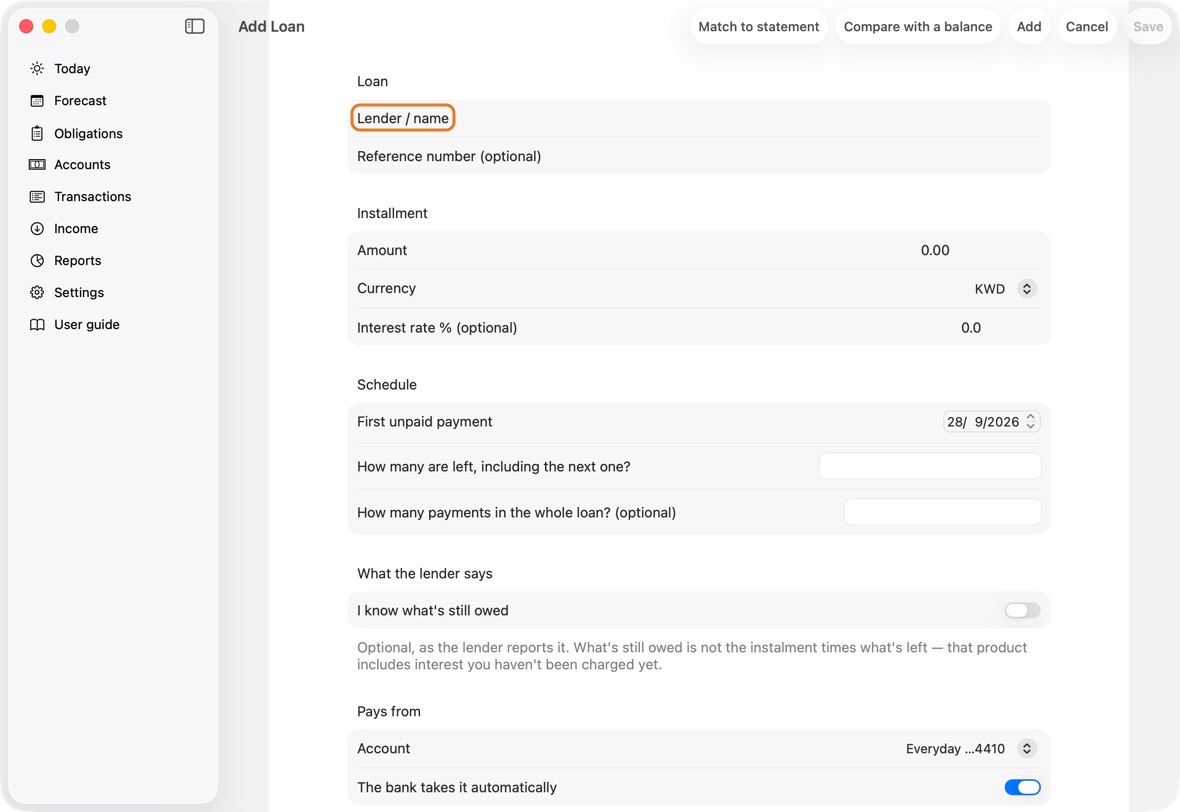
Field Must fill? What it means Example Lender / name Yes The bank or company you owe. Harbour Bank car loan Reference number No The loan's number at the lender. Its last four are shown beside the name. 7700002468 Instalment amount Yes The instalment: what you pay each time. 145.500 Currency No The instalment's currency.
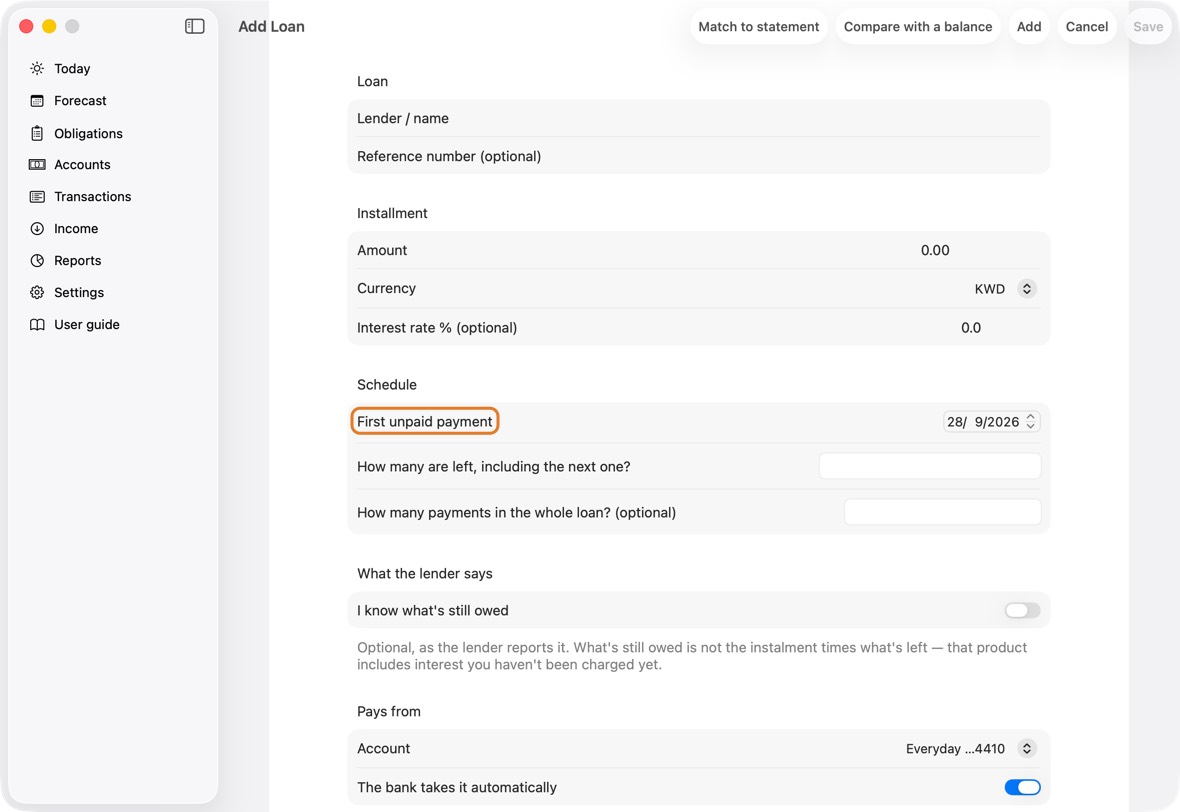
If you leave it: KWD.Interest rate, percent No For your reference only; the app doesn't use it. 7 First unpaid payment No The date of the first payment not paid yet, even if it is past. The due day comes from it.
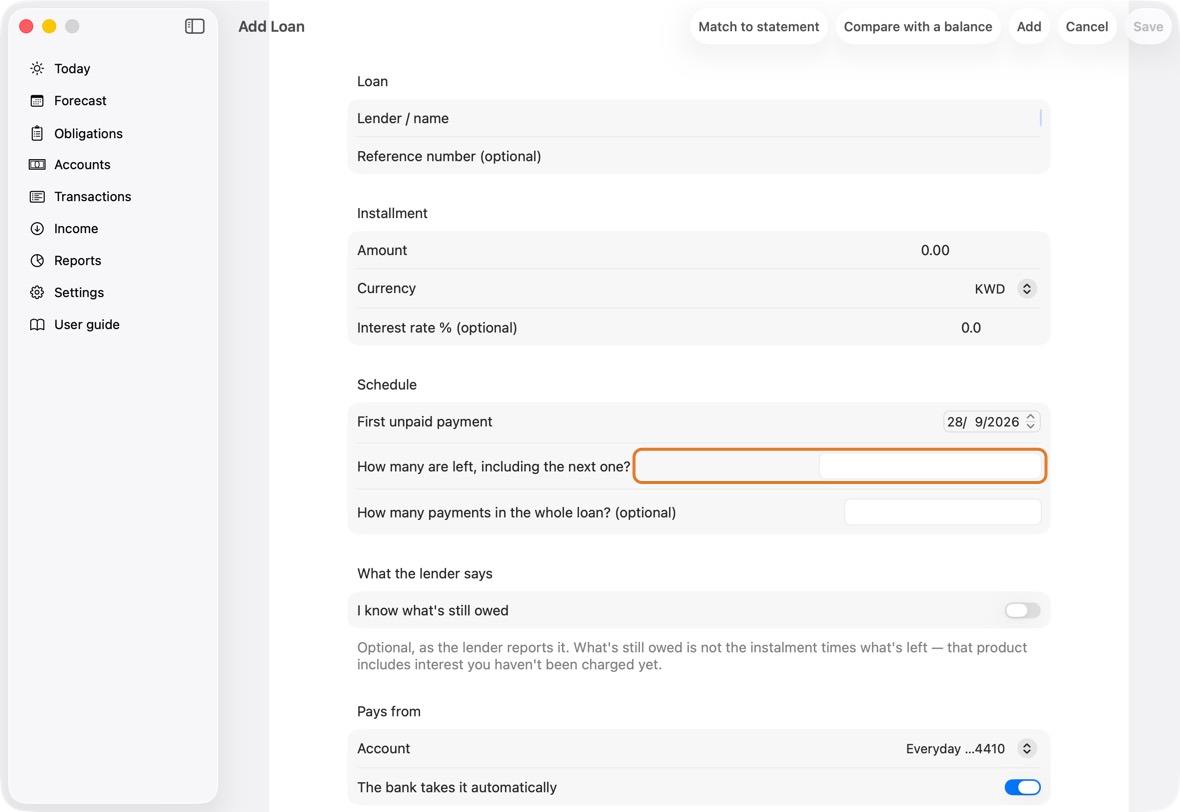
If you leave it: Today.28 Sep 2026 How many are left, including the next one? Yes How many payments are left, counting the next one. This builds the schedule. 5 How many payments in the whole loan? (optional) No How many payments the whole loan has, paid ones included. Only for "7 of 12 paid". 12 I know what's still owed No Turn on to note what the lender says is still owed.
If you leave it: Off.Outstanding balance Only if you know what's still owed The lender's figure. It is not the instalment times what's left. 2,900 As of No The day of the lender's figure.
If you leave it: Today.Account Yes The account the instalments are paid from. Cash is fine.
If you leave it: A bank account in the loan's currency. Change it if you pay from elsewhere.Everyday The bank takes it automatically No On for a loan: the bank deducts each instalment by itself. The Advisor lists them as fixed. Turn it off only for a loan you pay by hand. Note No Anything you want to remember. How many payments in the whole loan counts every payment, paid ones too: 12. How many are left counts only those still to pay, from the next one: 5. Only the second builds the payments.
- Choose the First unpaid payment and type How many are left, including the next one?. Add the whole loan's count to see "7 of 12 paid".
- Click Save. While nothing on it is paid, you can change it and its payments are rebuilt, or click Delete loan.
You should now see the loan on Loans: its next payment, "N of M paid · K left", and what is left to pay.
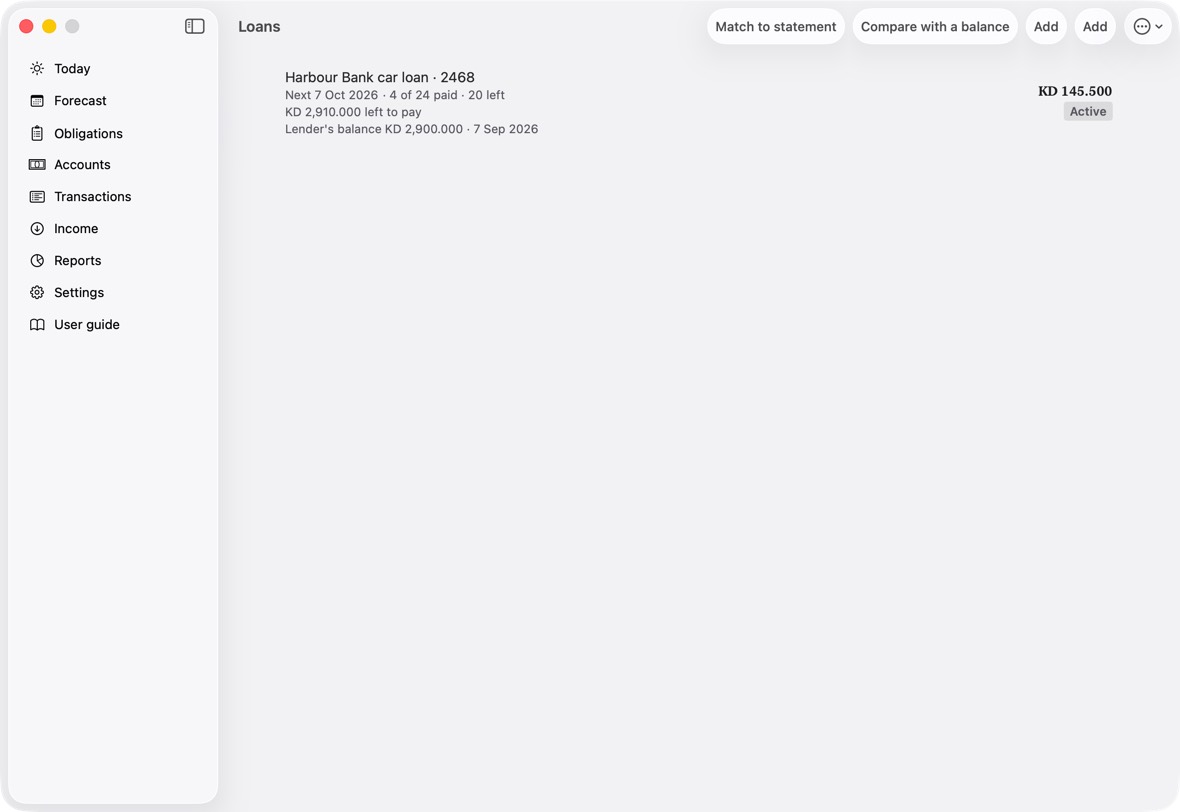
- Next with its date, or Overdue in red for a payment still unpaid; then N of M paid · K left.
- … left to pay: the payments left times the instalment. Lender's balance, with its date, when you gave one. The large figure is the instalment.
Refinance or reopen a loan
- Open Obligations, click ⋯, then Loans.
- Swipe left on the loan and click Refinance. Say why in the reason, and click Mark Refinanced. Its remaining instalments are cancelled.
- To bring a closed loan back, swipe left on it and click Reopen, or open it and click Reopen loan.
- Sort by payee and Drag to reorder, in the ⋯ menu, set the list's order.
You should now see the refinanced loan closed, with no payments left to plan, and a reopened loan active again with its instalments back.
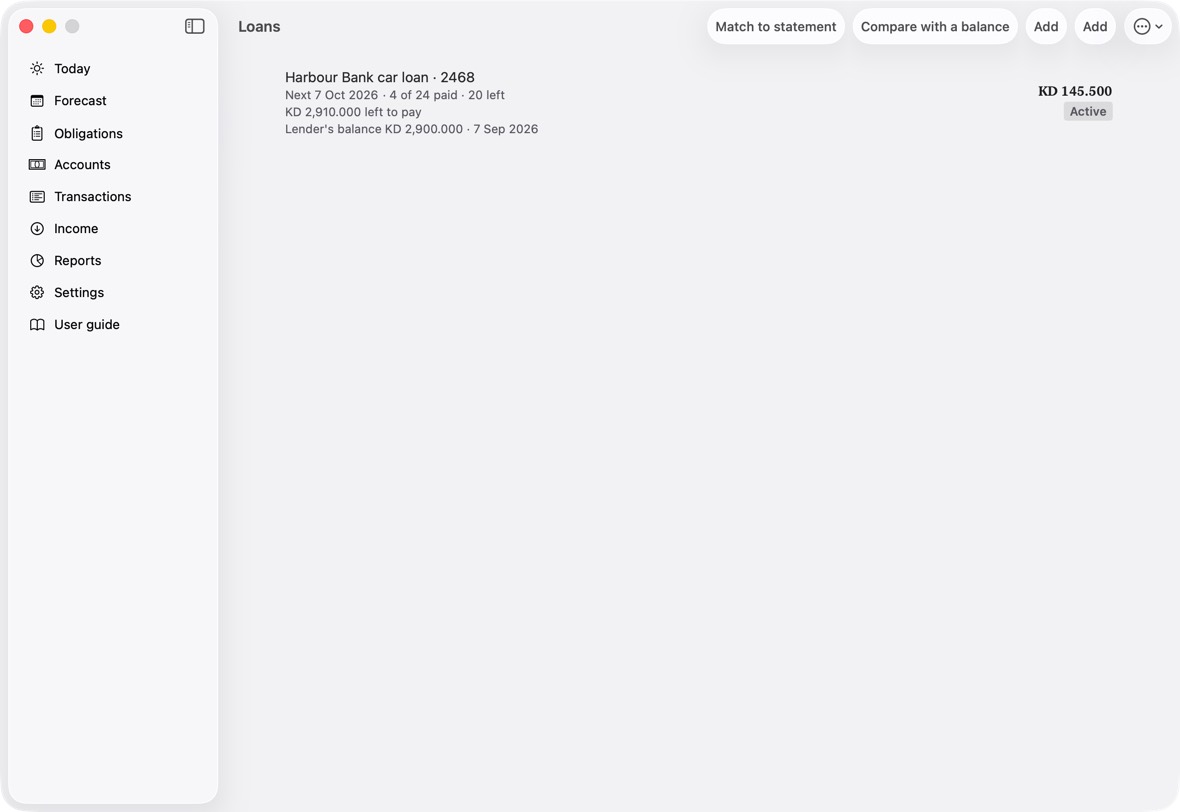
- Loans lists the active loans first, then the closed ones; a closed loan has no payments left to plan.
Money you borrowed or lent
- Open Obligations, click ⋯, then Borrowing and lending. On Personal Debts, click Add.
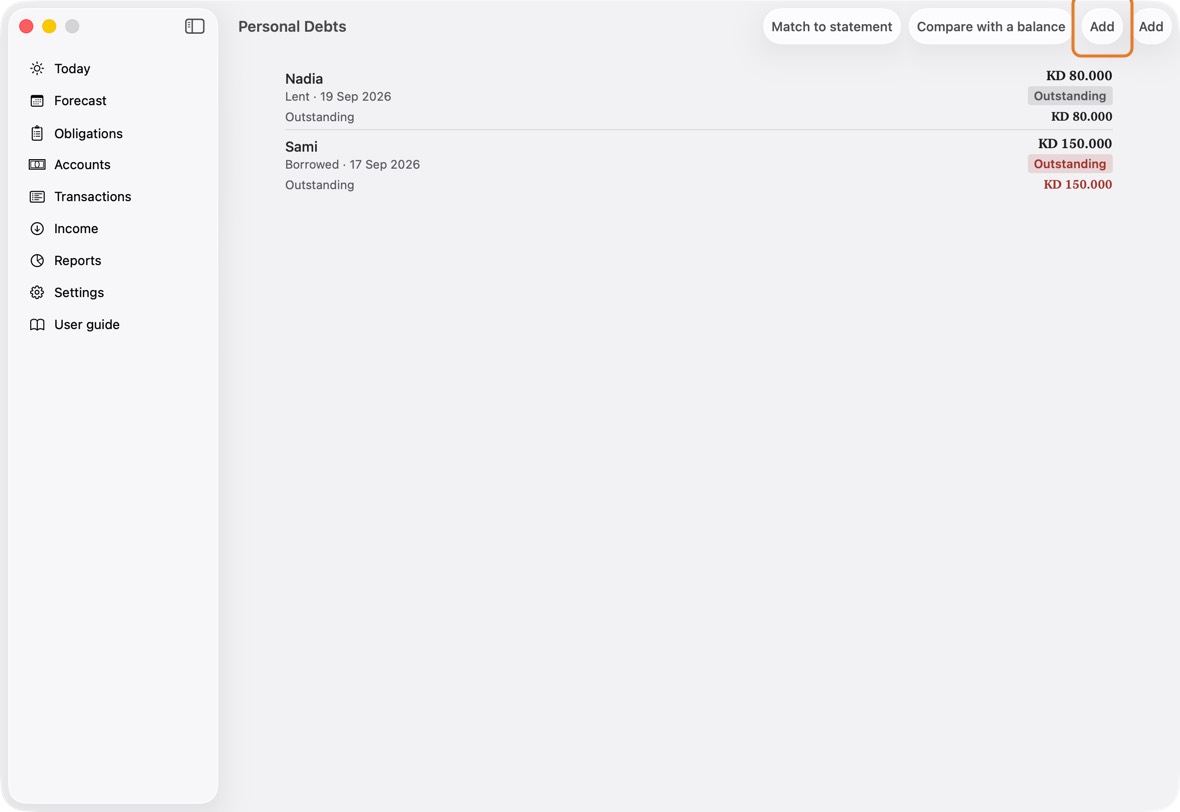
- Type the person and the amount, choose Borrowed or Lent, and the account the money went into or came from. Click Save.
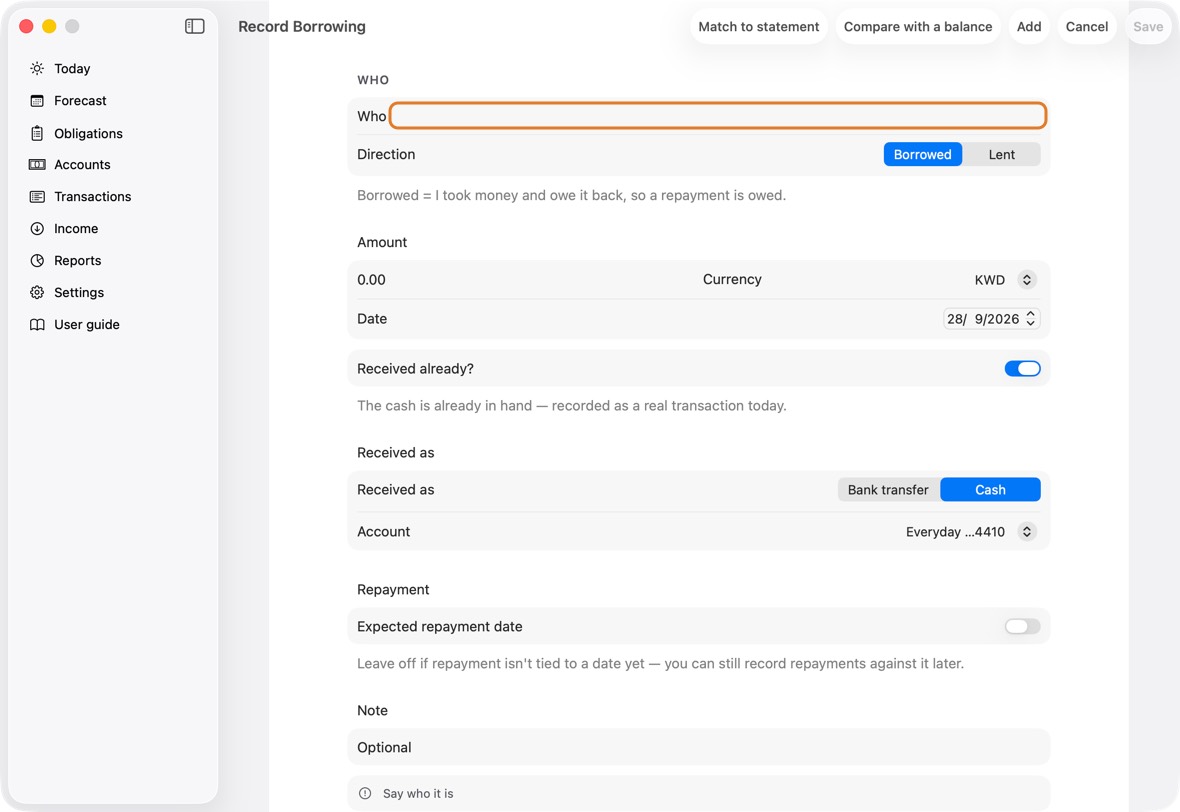
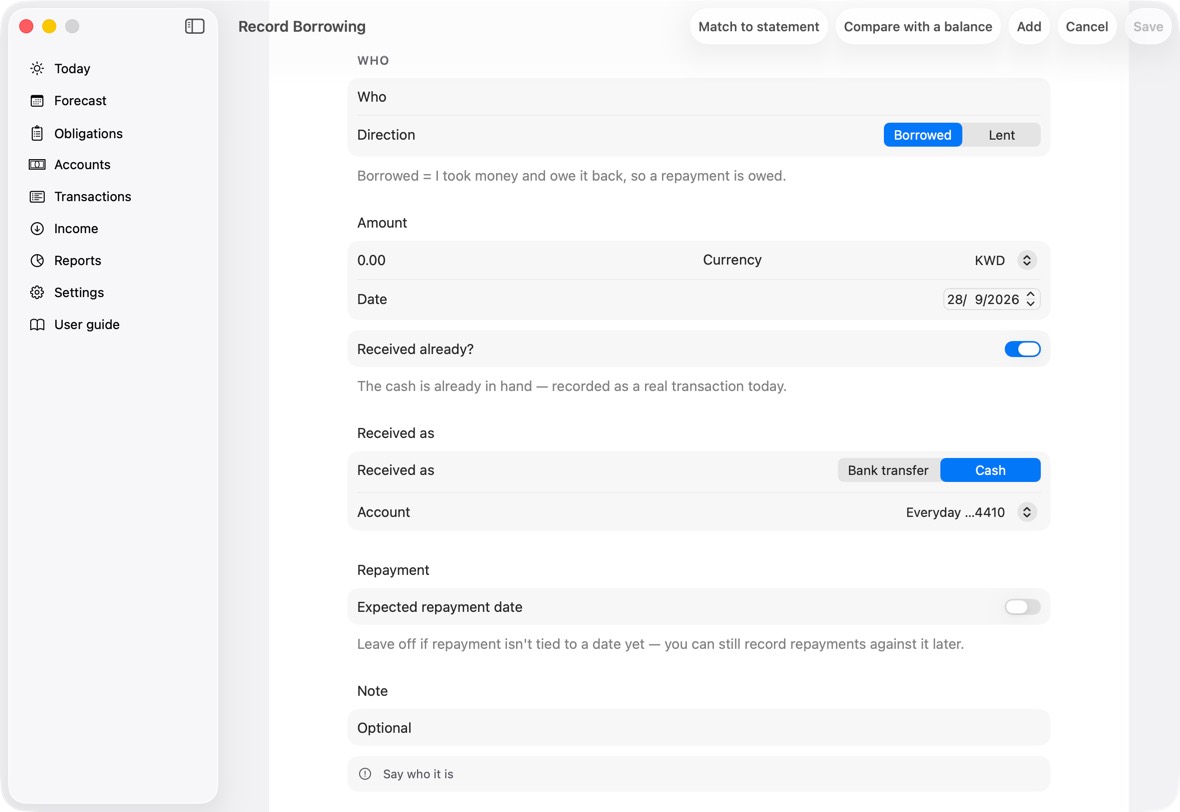
Field Must fill? What it means Example Who Yes Who you borrowed from or lent to. Sami Direction No Borrowed or Lent.
If you leave it: Borrowed.Amount Yes How much. 200 Currency No The amount's currency. Date No When.
If you leave it: Today.Received already? No Borrowed only: whether the money has already arrived.
If you leave it: On.Received as No Borrowed only: cash or a bank transfer. Account Yes The account the money went into or came from.
If you leave it: The first account in that currency.Everyday Expected repayment date No Turn on if it is due back by a date.
If you leave it: Off.Due Only if you expect a repayment date The date it is due back. Note No Anything you want to remember. - When money is paid back, click the debt, then Record Repayment. Type the amount and the account, and click Save.
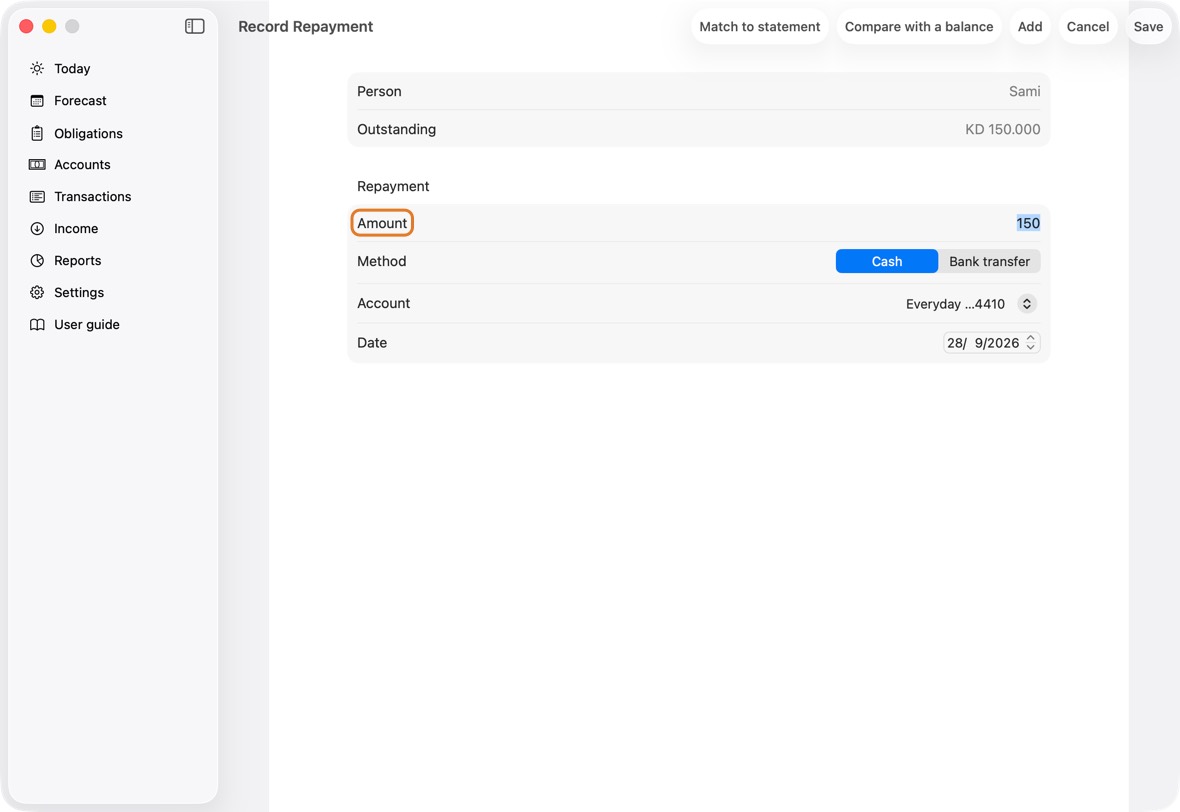
Field Must fill? What it means Example Amount Yes How much was paid back now.
If you leave it: What is still owed.50 Method No Cash or a bank transfer. Account Yes The account it was paid from or into. Date No When.
If you leave it: Today.
You should now see what is still owed, either way, on Personal Debts and under Loans on Accounts.
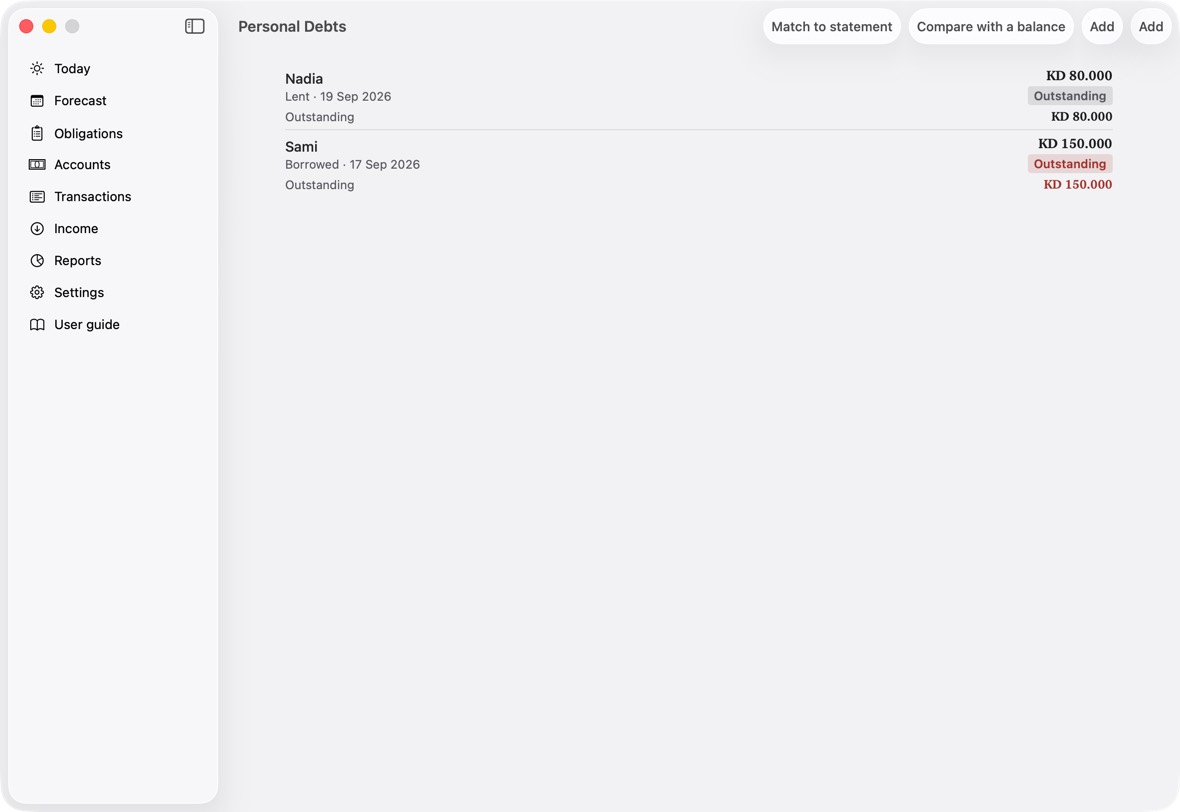
- Each person: Lent or Borrowed and the date, the amount, and Outstanding with what is still owed.
Record a repayment, or take one back
- Open Obligations, click ⋯, then Borrowing and lending.
- Swipe left on the debt and click Repay. Type the amount, how and from which account, and the date, and click Save.
Field Must fill? What it means Example Amount Yes How much was paid back now.
If you leave it: What is still owed.50 Method No Cash or a bank transfer. Account Yes The account it was paid from or into. Date No When.
If you leave it: Today. - Money you lent that comes back shows on Today under Expected: click it, then It arrived…, and confirm the amount on Confirm it arrived.
- A repayment recorded by mistake: open the debt and click Take back this repayment. A debt with nothing repaid can be removed with Delete this debt.
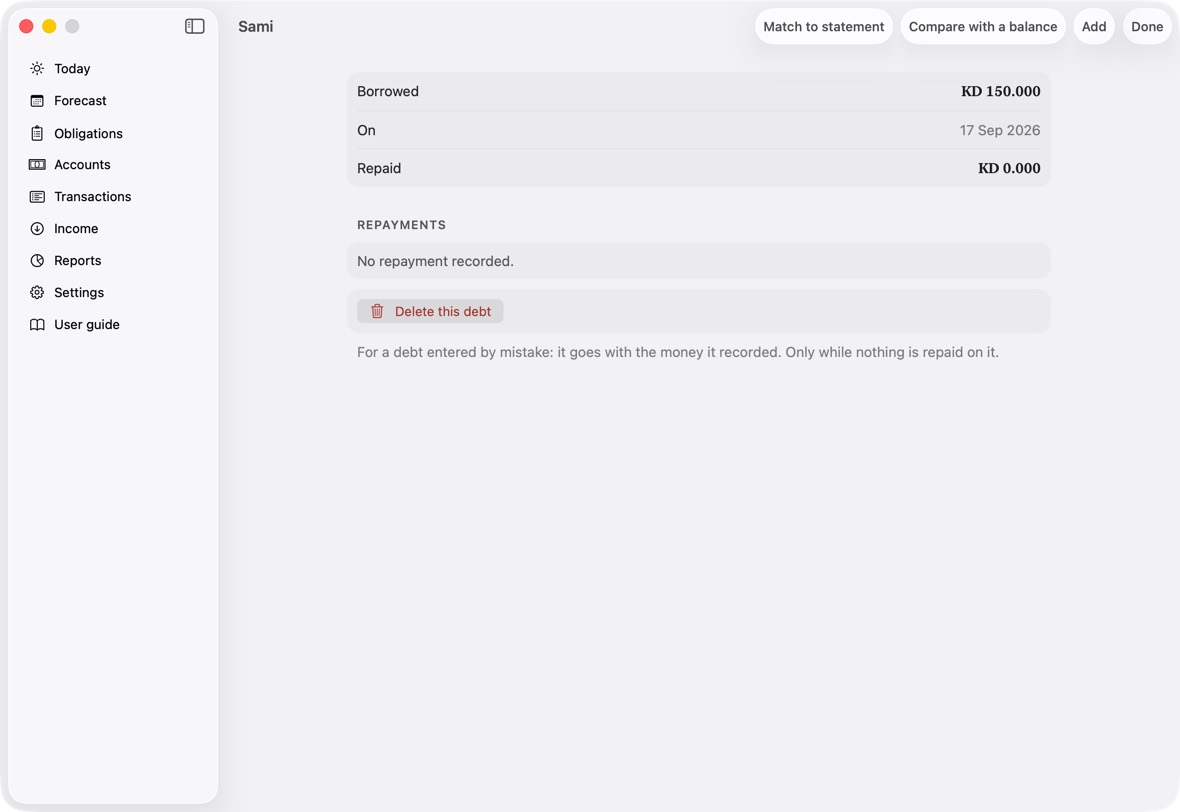
You should now see what is still owed go down by the repayment, or back up by one taken back.
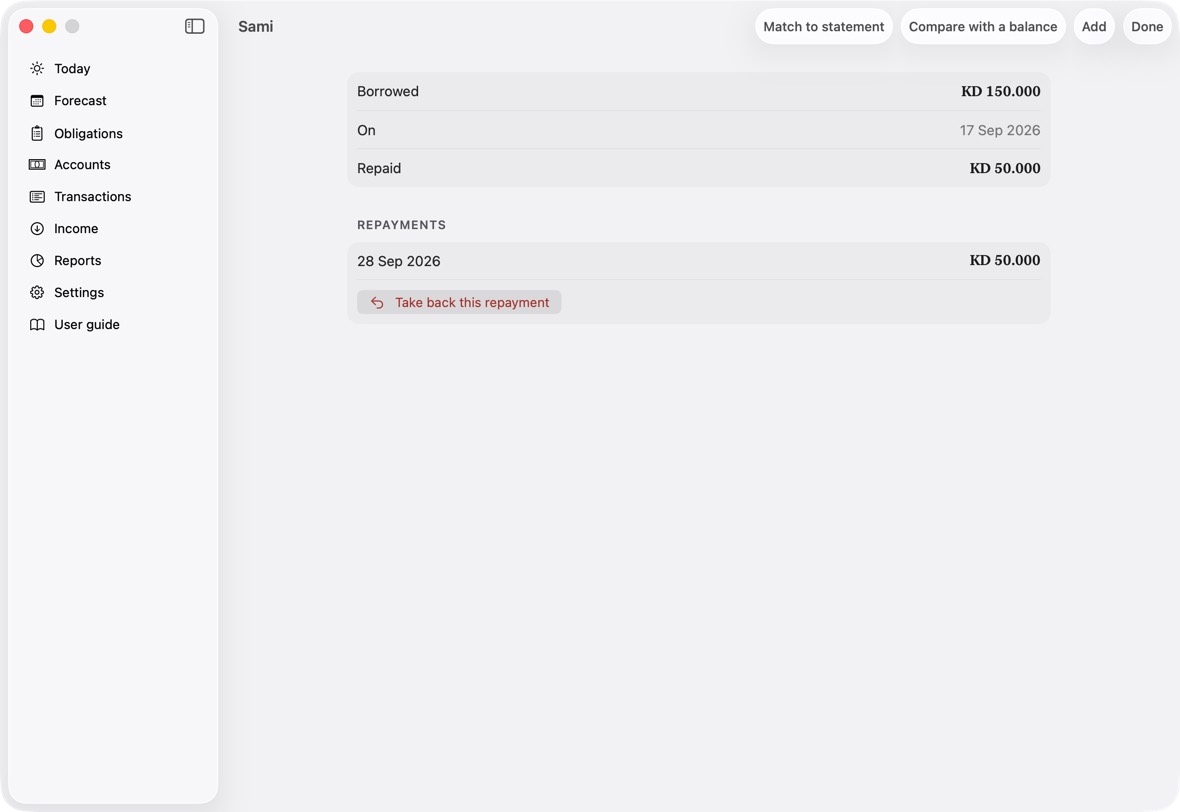
- A debt's screen lists each repayment with its date; the amount still owed is at the top.
Today and Forecast
Read Today
- At the top, Bank, Credit cards, Cash and Loans show what you hold and owe. Click one to see each account.
- Due lists what you have to pay this cycle and the next.
- The cards row says what your cards owe, and what to pay by when.
- When a cycle runs short, a row with a red dot near the top says by how much and when; click it to see each account's shortfall. Further down, Advisor — ways through it appears: click it for the advisor.
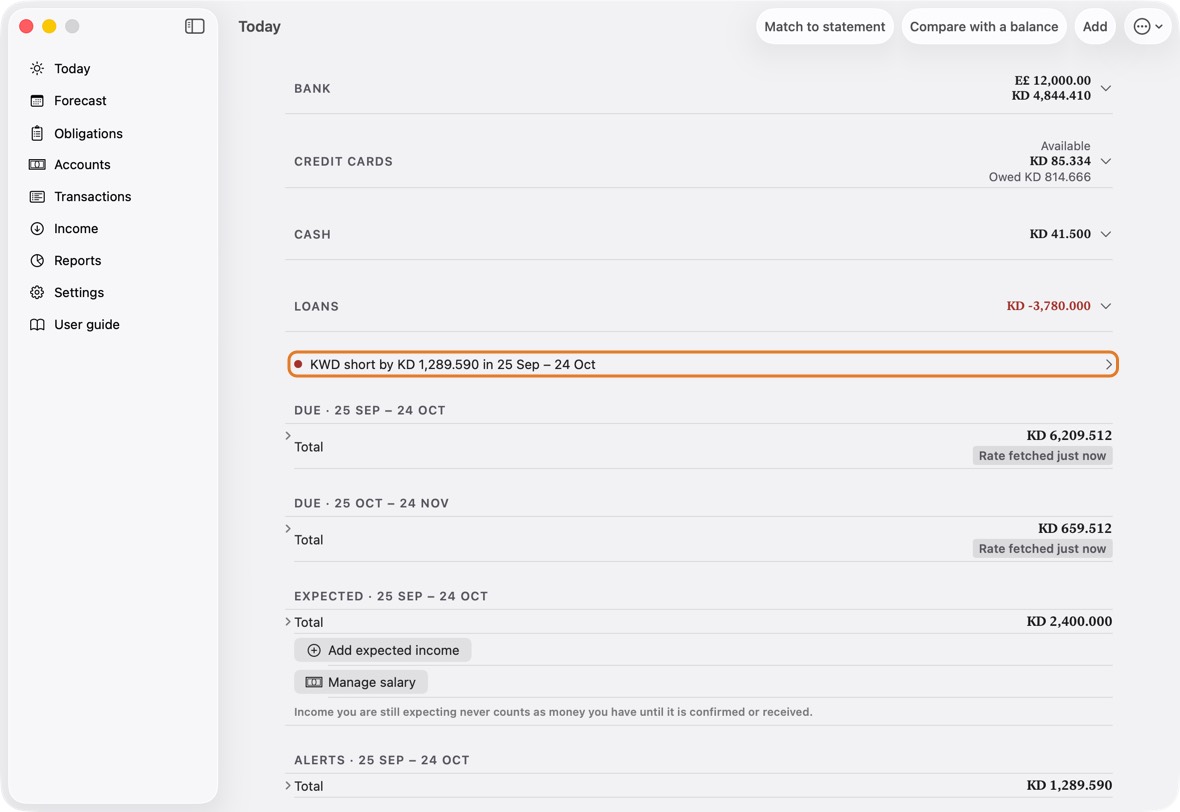
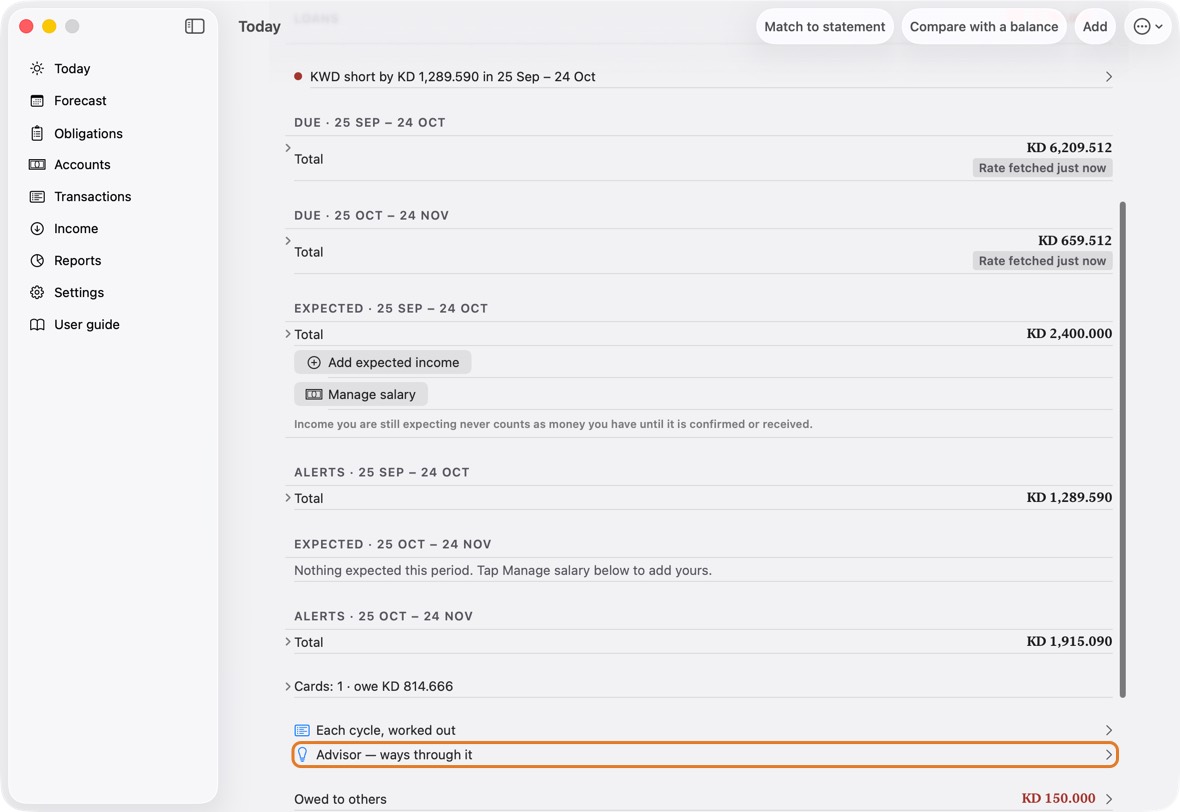
You should now know whether this cycle is covered, and what to pay next.
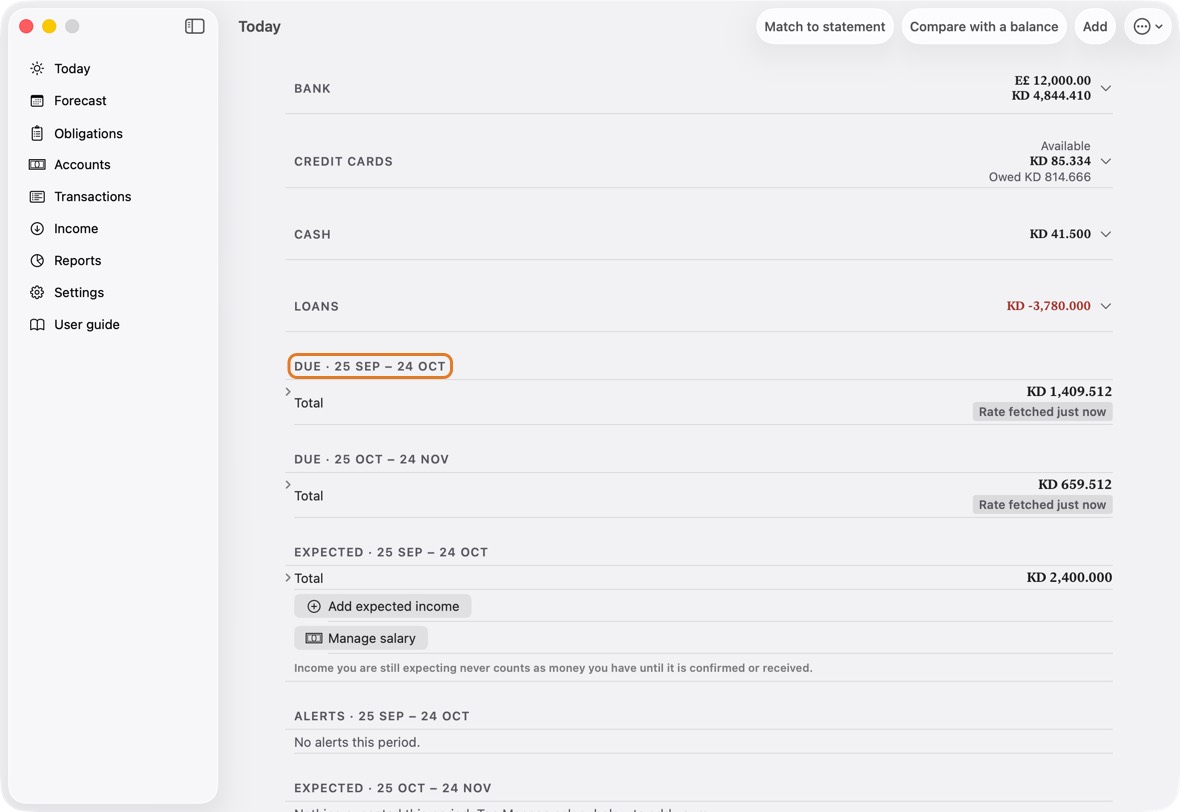
- A red dot: a cycle short of money, by how much and when. Click it for the advisor.
- Due · 25 Sep – 24 Oct: each cycle's total; Rate fetched just now when a currency was converted.
- The cycle Today and the advisor plan over starts on the day set in Settings, Salary cycle starts on day.
Money to send to another account
- When an account in another currency can't cover its own payments, Money to send says how much to send.
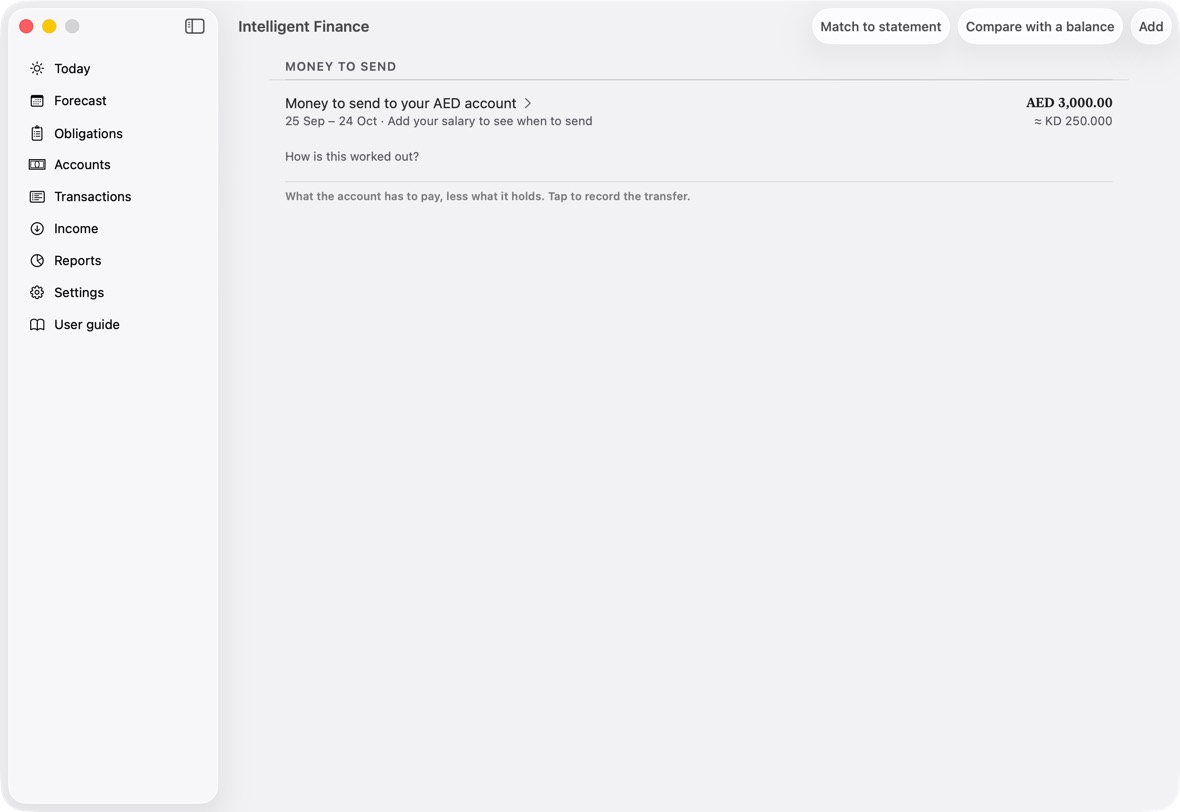
- Click it. Add opens as a transfer with the figures filled in.
- Check them and click Save.
You should now see the transfer recorded and the account covered.
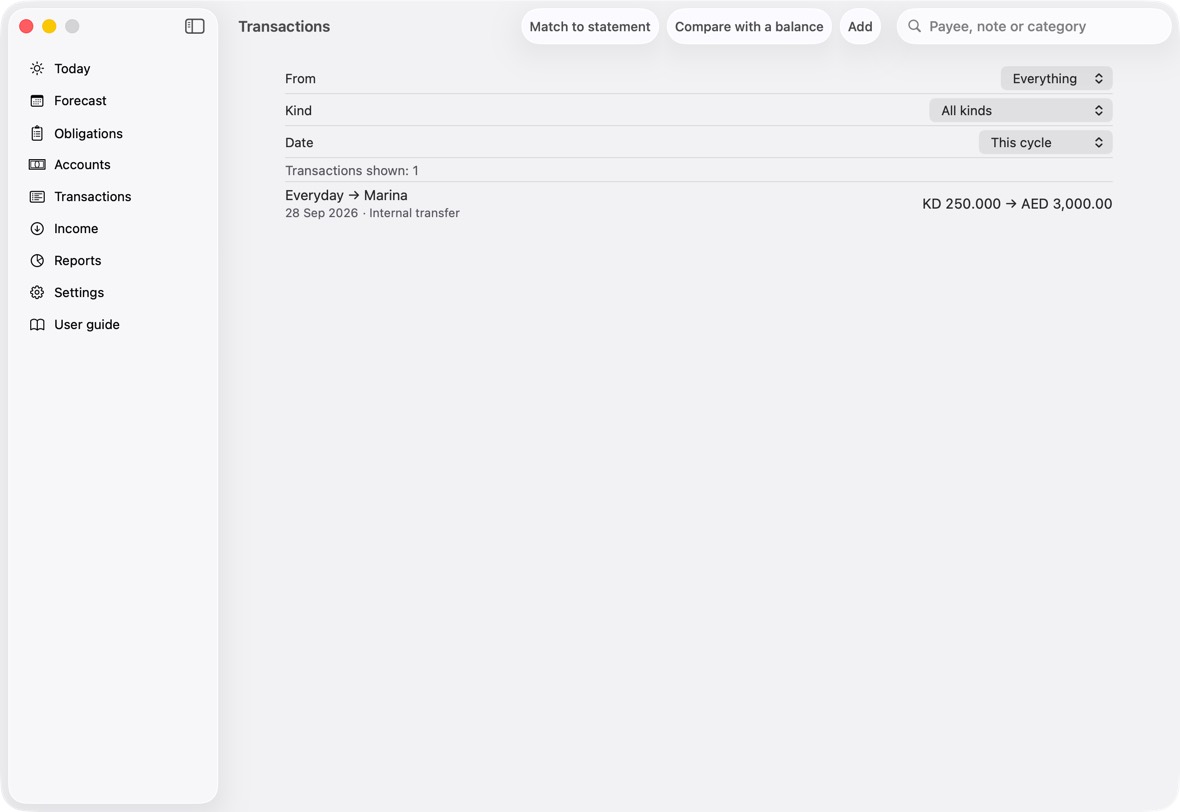
- Money to send to your AED account: what that account has to pay this cycle, less what it holds.
- The figure in that currency, and about how much it is in KD. How is this worked out? shows the sum.
Look ahead with Forecast
- Open Forecast.
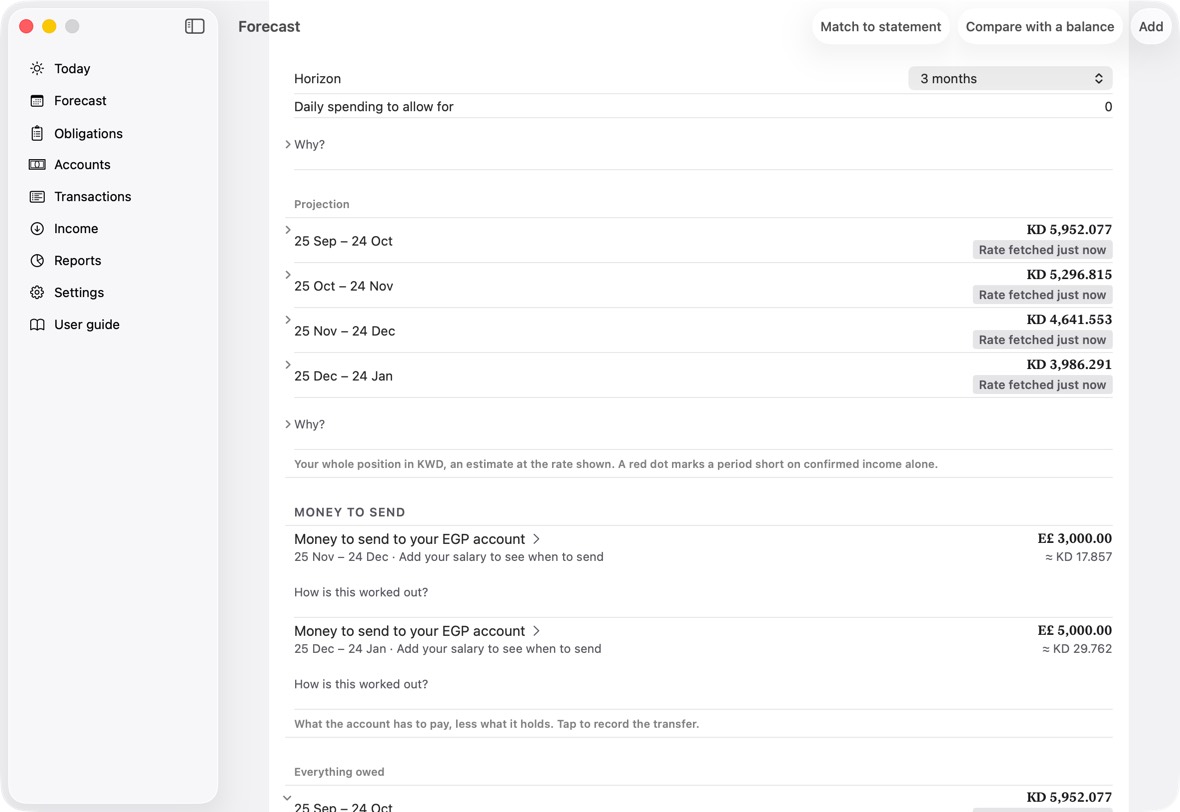
- Choose how far to look under Horizon.
- On Today, click Each cycle, worked out to see every cycle's money in and out, line by line.
You should now see each cycle's balance ahead, and where it runs short.
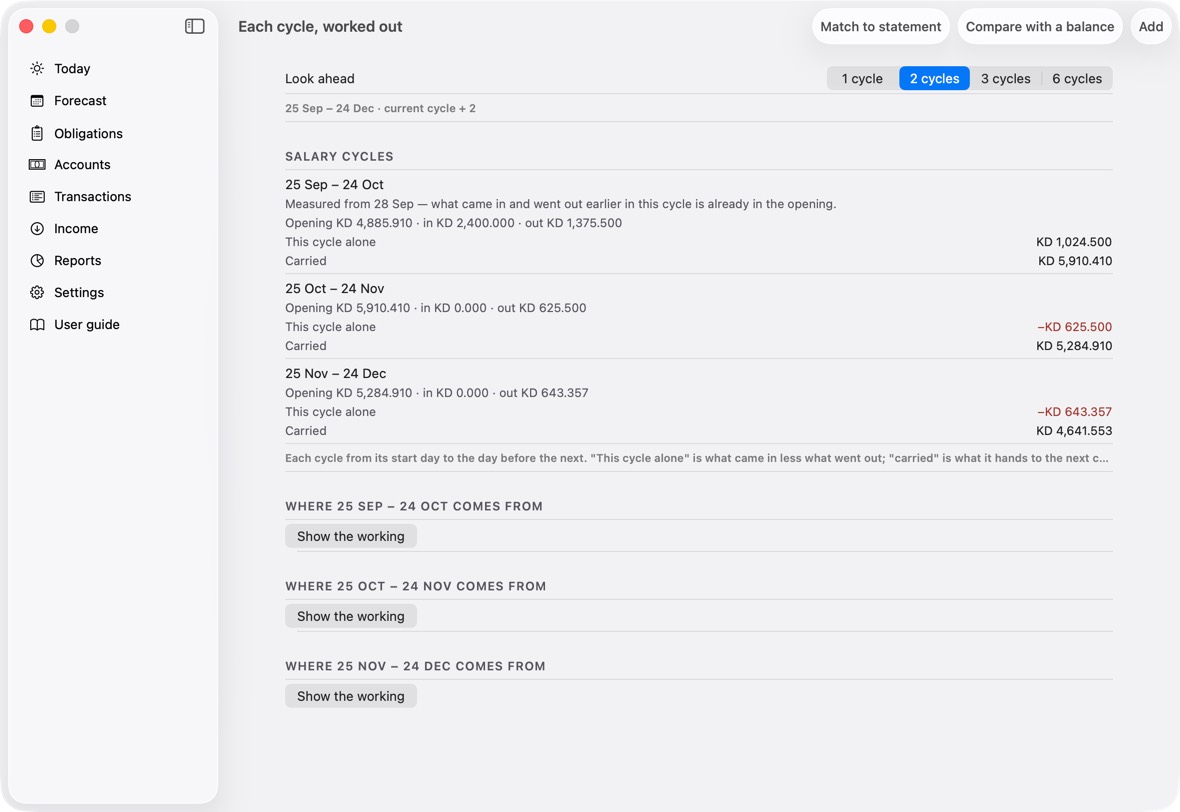
- Each cycle's closing figure in KD; open it for each currency's closing.
- counts as KD …: a balance in another currency, converted at the rate shown. A red dot marks a cycle short on confirmed income.
See each card month by month
- On Today, click the cards row to open it, then Month by month, every card.
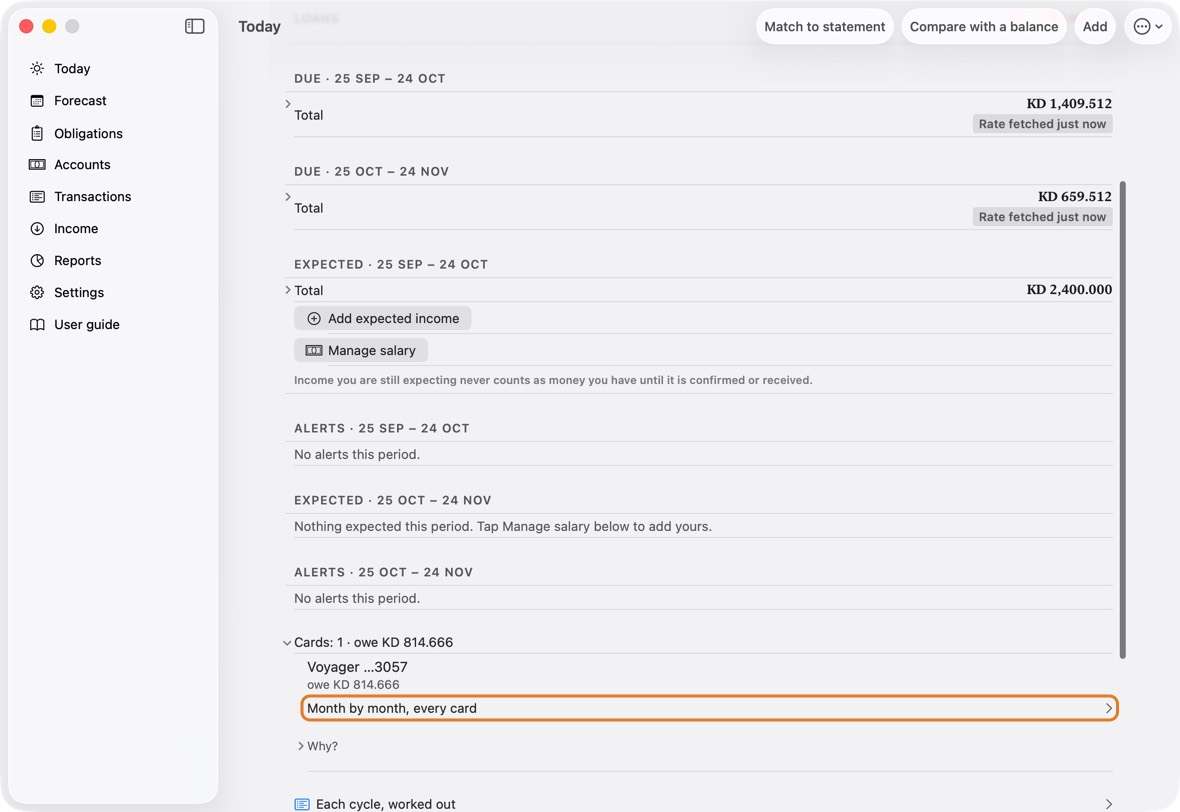
You should now see Card months: the debt on the cards you carry from month to month, then each card's statements. The Card debt row on Today says how that debt moved since the last statement.
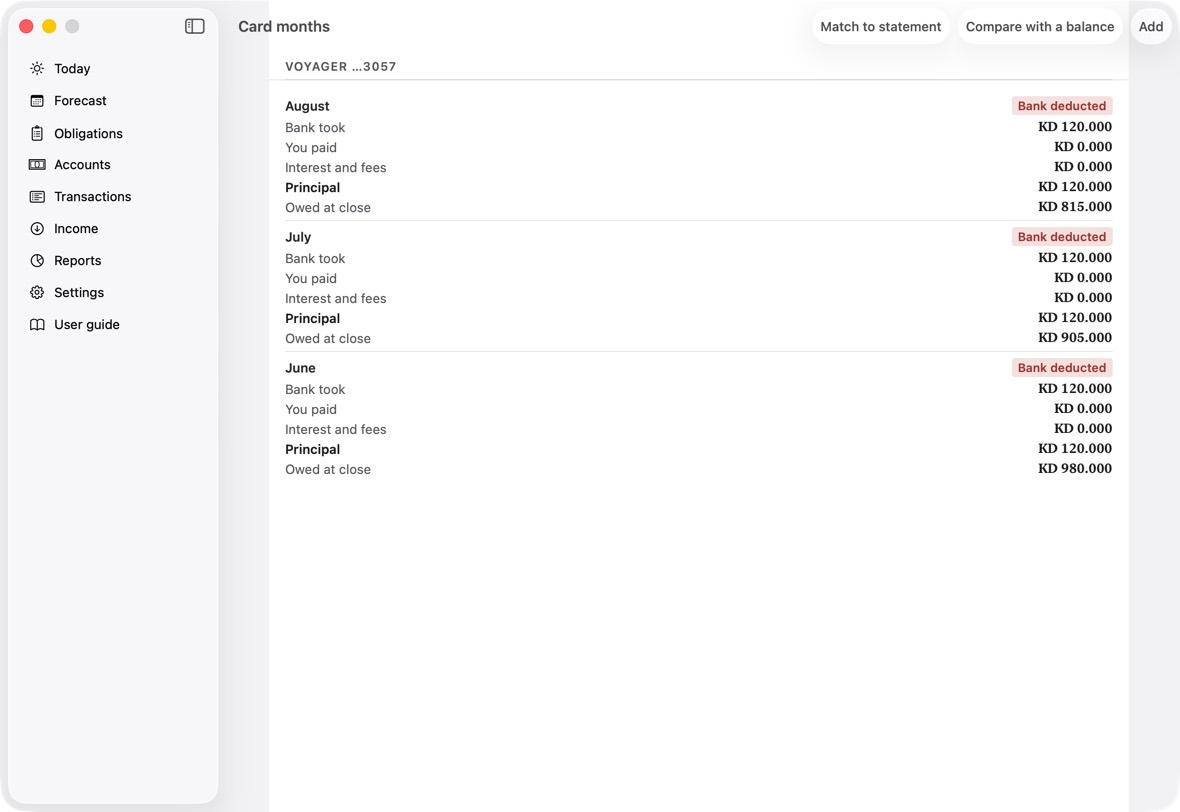
- Card months is read-only: it shows what the statements say, card by card.
See where your money goes
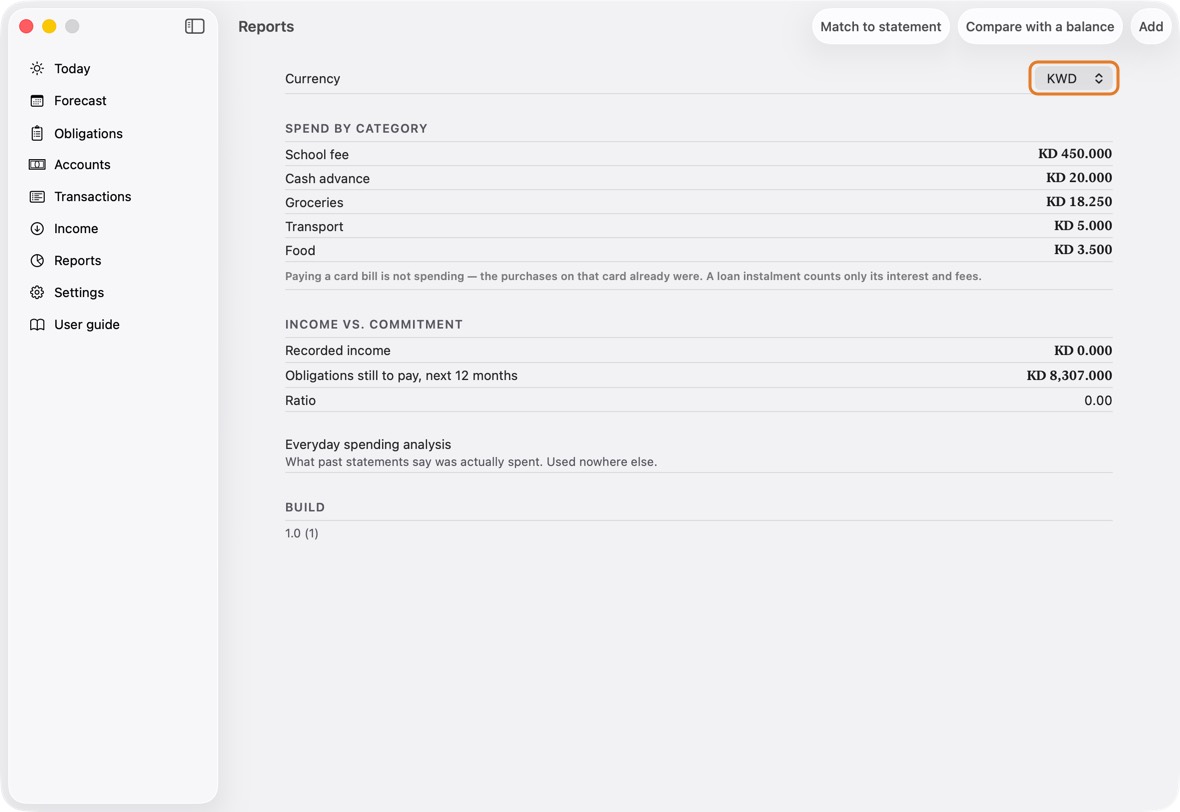
- Open Reports. Choose the Currency.
- Click Everyday spending analysis for what you spend each cycle beyond your plans.
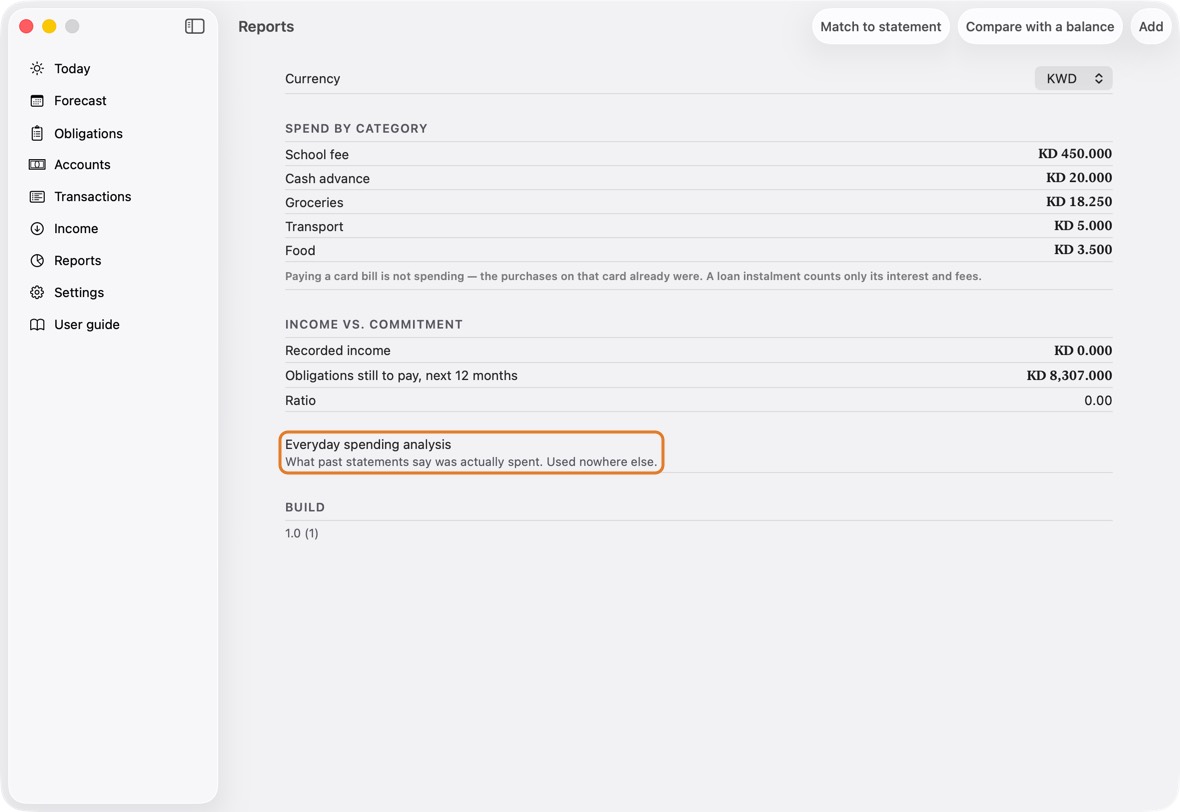
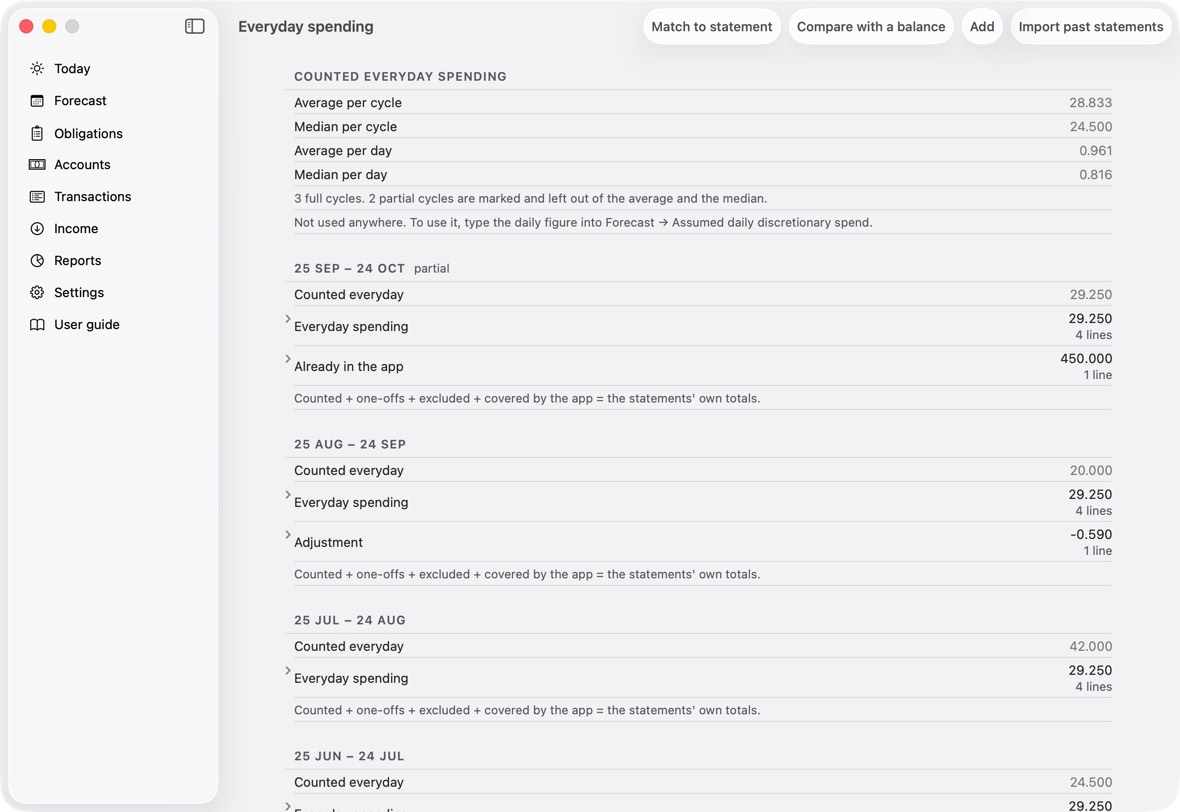
You should now see Everyday spending: the usual spend per cycle, then each cycle's lines. Mark a one-off line Not everyday and it leaves the average.
- Reports shows spending by category, and recorded income against what is still to pay in the next 12 months.
The advisor
Use the advisor's suggestions
- When a cycle runs short, click Advisor — ways through it on Today.
- Read the payments it suggests moving, and why. A payment the bank takes by itself, such as a card's automatic debit, is never suggested: it is listed as fixed, under "Fixed: the bank takes these by itself". A card bill, a loan instalment or a personal debt is never offered to cancel, because it is still owed; moved later, it says a late payment may bring a late fee and interest.
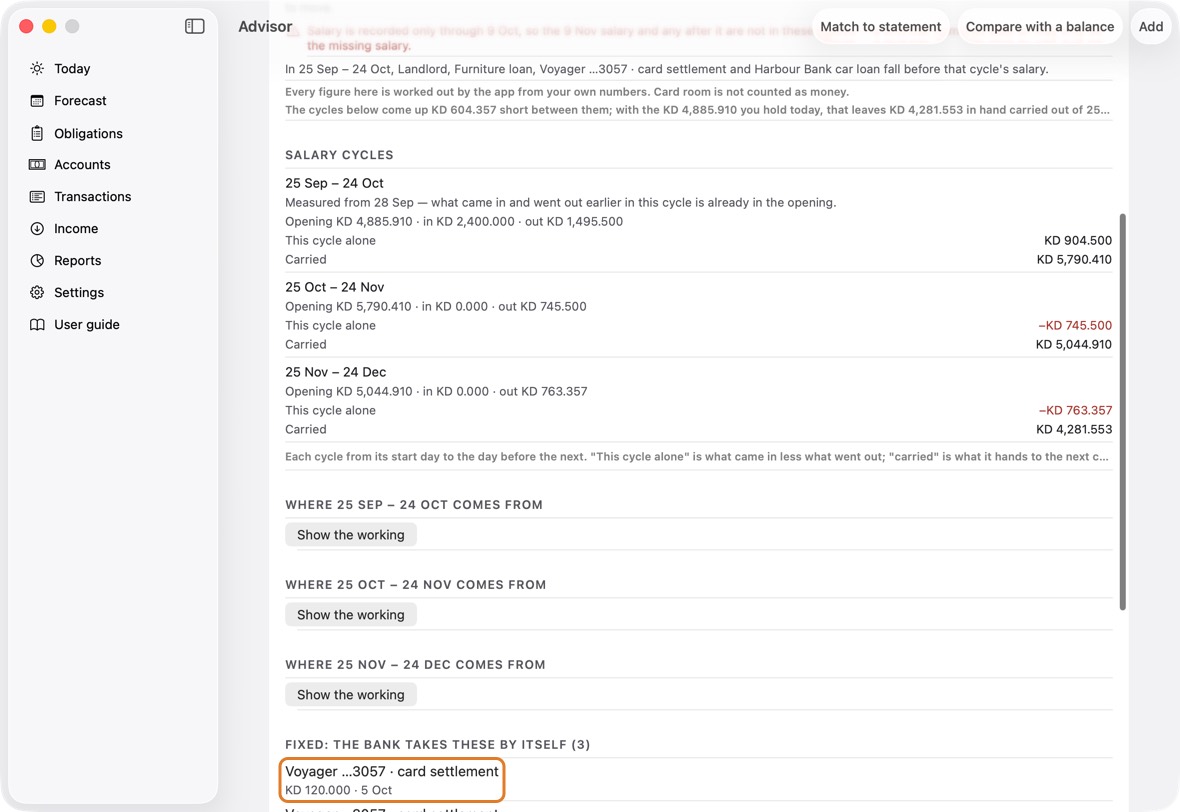
- Tick the ones you agree with, then click Apply.
You should now see the moved payments on their new dates, and the cycle covered or less short.
- The heading: whether the cycles ahead are covered, and by how much they are short.
- Each cycle's lines, and a warning when a salary isn't recorded yet.
- On Advisor, to move an item to a date of your own, tick it, open its options and choose Pick a date…, then Use this date. Nothing changes until you apply it; Not now leaves everything as it is.
- Payments the advisor must never move are in Settings (under More), under Never move: click its line to open the list, each with its switch.
The advisor only suggests. Nothing moves until you click Apply.
Match to statement
Download your statements from NBK
- In NBK Online or the NBK app, open each account and each card, and choose its statement for the month.
- Choose Excel (.xlsx) or CSV as the format. PDF is not supported yet in Match to statement. Another bank's file: the first time, click Set up its columns.
- Save every file in one iCloud Drive folder, downloaded on the Mac (see Before you start).
You should now have each account's and card's statement in a folder on the Mac, ready to choose.
- Choose statements opens a window of your folders, where you pick them.
Choose several statements at once
- Open Accounts, click ⋯, then Match to statement.
- Click Choose statements and pick every file at once.
- Under each file, Account ending 4410 or Card ending 3057 says which account or card it was placed on, by the last four digits the bank prints. Give every account and card its last four first.
- A file that isn't placed says why: no account or card in the app ends in those digits, two cards end in them, or it is another bank's file whose columns aren't set up yet. Fix that and choose it again.
- Click Match.
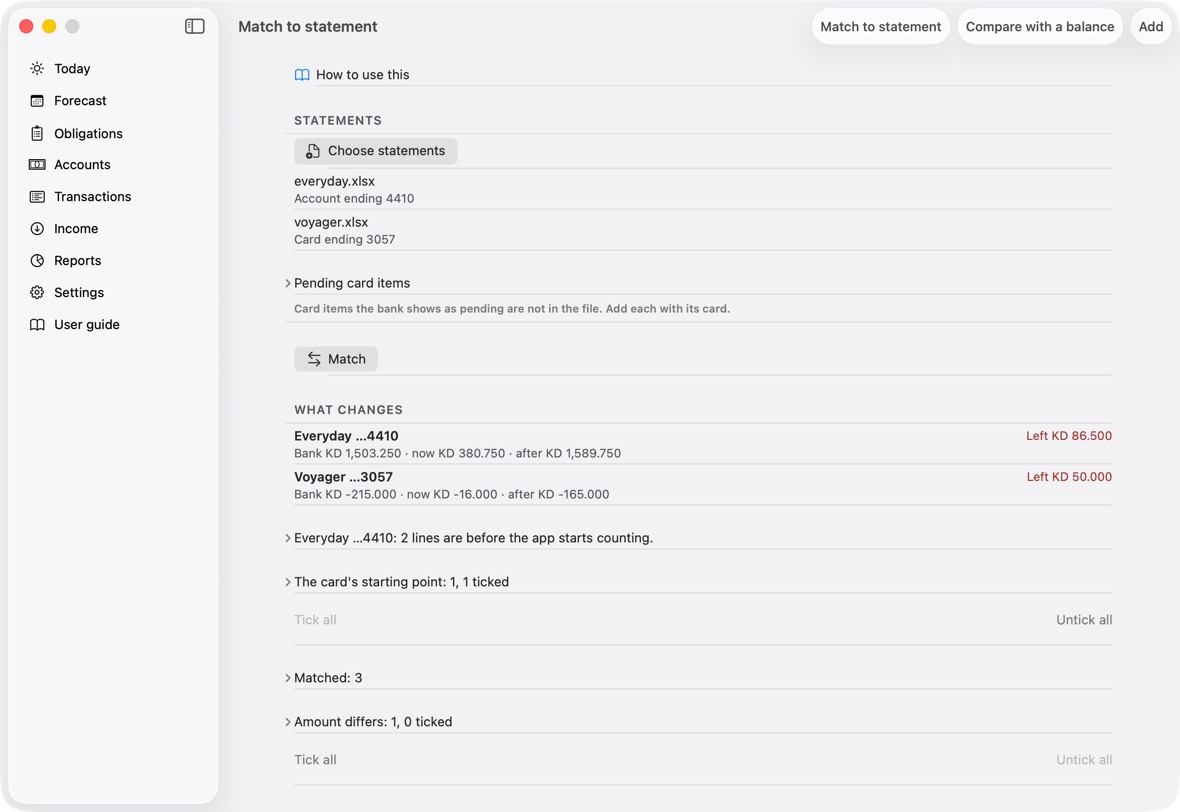
You should now see What changes for every account and card, and the groups below it.
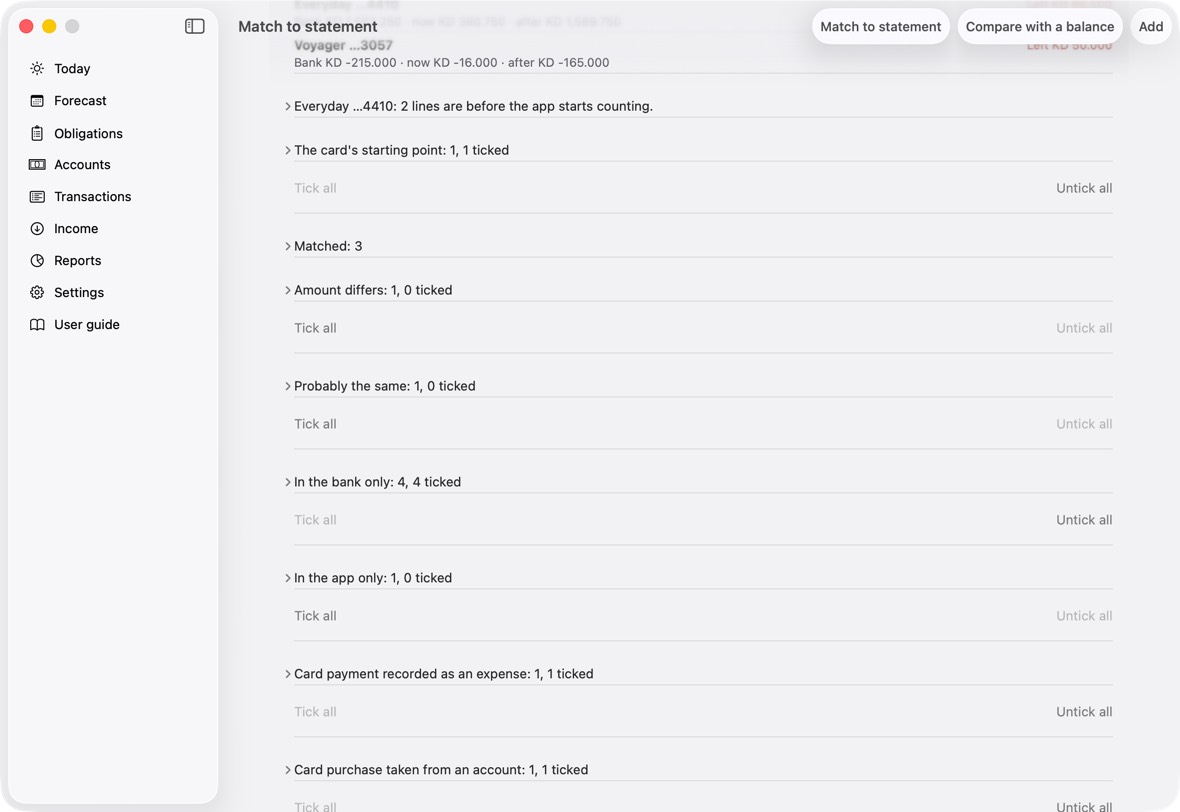
- Each row is an account or a card: Bank is the bank's figure, now the app's today, after the app's once the ticked changes are applied.
- Agrees in green: after the changes, the app and the bank are the same. Left in red: still this far apart.
- How to use this, the first row of Match to statement, opens this part of the guide.
Another bank's file: set up its columns once
- Under the file, click Set up its columns.
- Check the columns the app found, and the preview at the bottom: the balance it reads must match the file's.
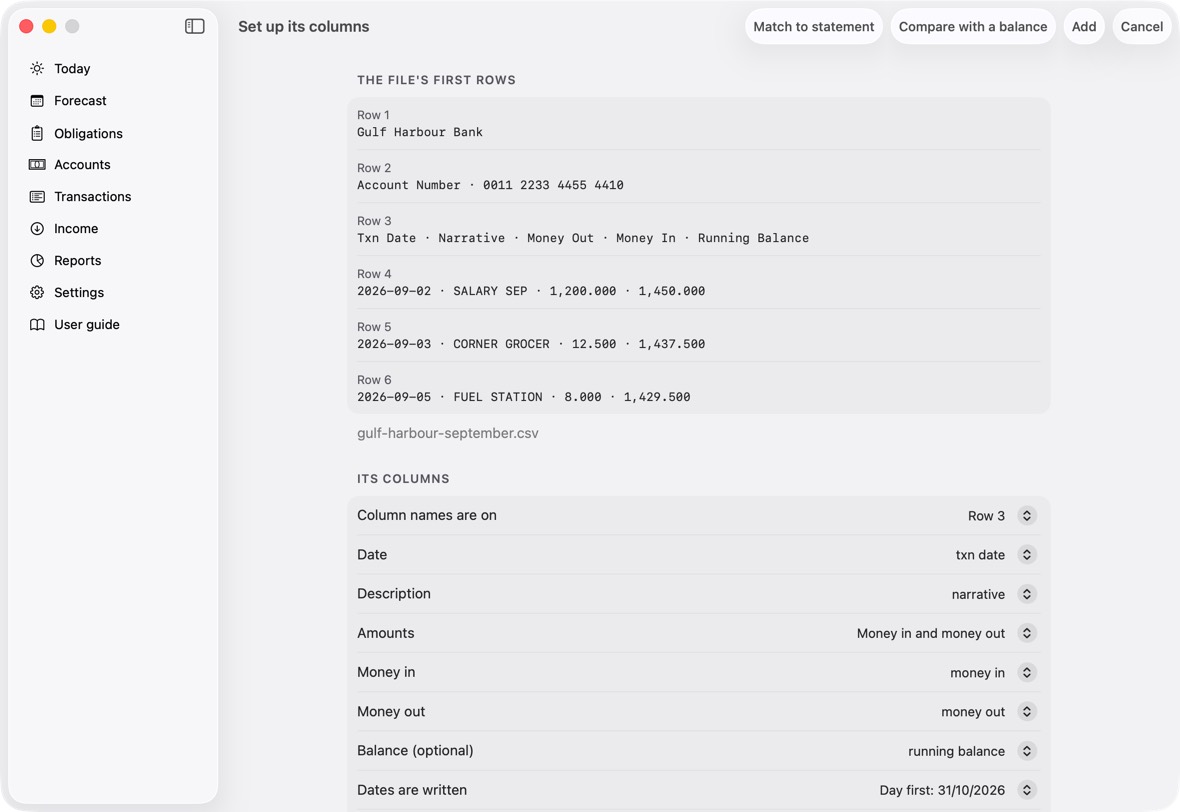
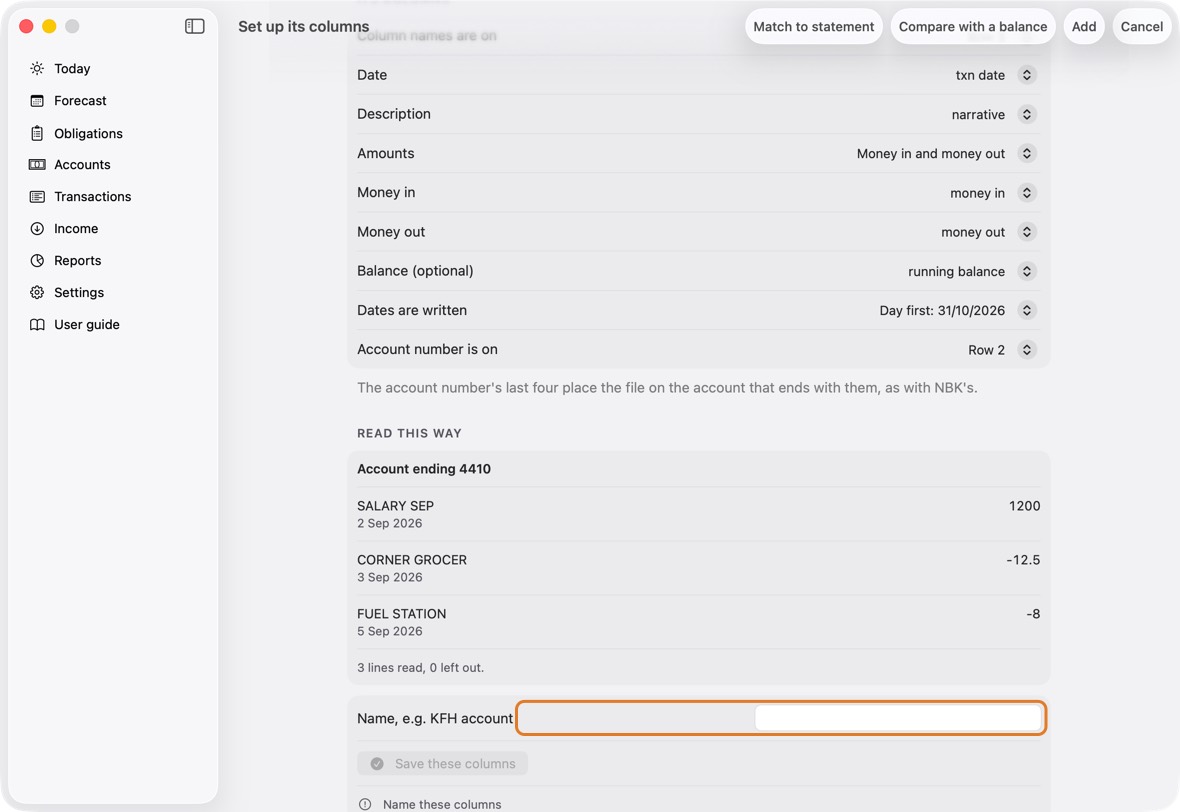
Field Must fill? What it means Example Column names are on No The row with the column names.
If you leave it: Found from the file.Date Yes The column with each line's date.
If you leave it: Found from the file.Description Yes The column that says what each line was.
If you leave it: Found from the file.Amounts No One column with money out negative, or money in and money out apart.
If you leave it: Found from the file.Amount Only if amounts are in one column The amount column, when amounts are in one. Money in Only if money in and out are apart The money-in column. Money out Only if money in and out are apart The money-out column. Balance (optional) No The running balance column, if there is one. Dates are written No How dates are written: day first or month first.
If you leave it: Found from the file.Account number is on No The row with the account number, to place the file. Name, e.g. KFH account Yes A name for these columns, to use them again. KFH account - Give it a name and click Save these columns. Every file from that bank is read the same way from now on.
You should now see the file placed, like an NBK one.
- Under the file: Account ending … with the account's last four.
Pending card items
- A purchase your bank shows as pending is not in the card's file yet. Add it so the card's figure matches the bank's.
- In Match to statement, open Pending card items. Choose the card, type what it was, the amount and the date, and click Add pending item. Once for each.
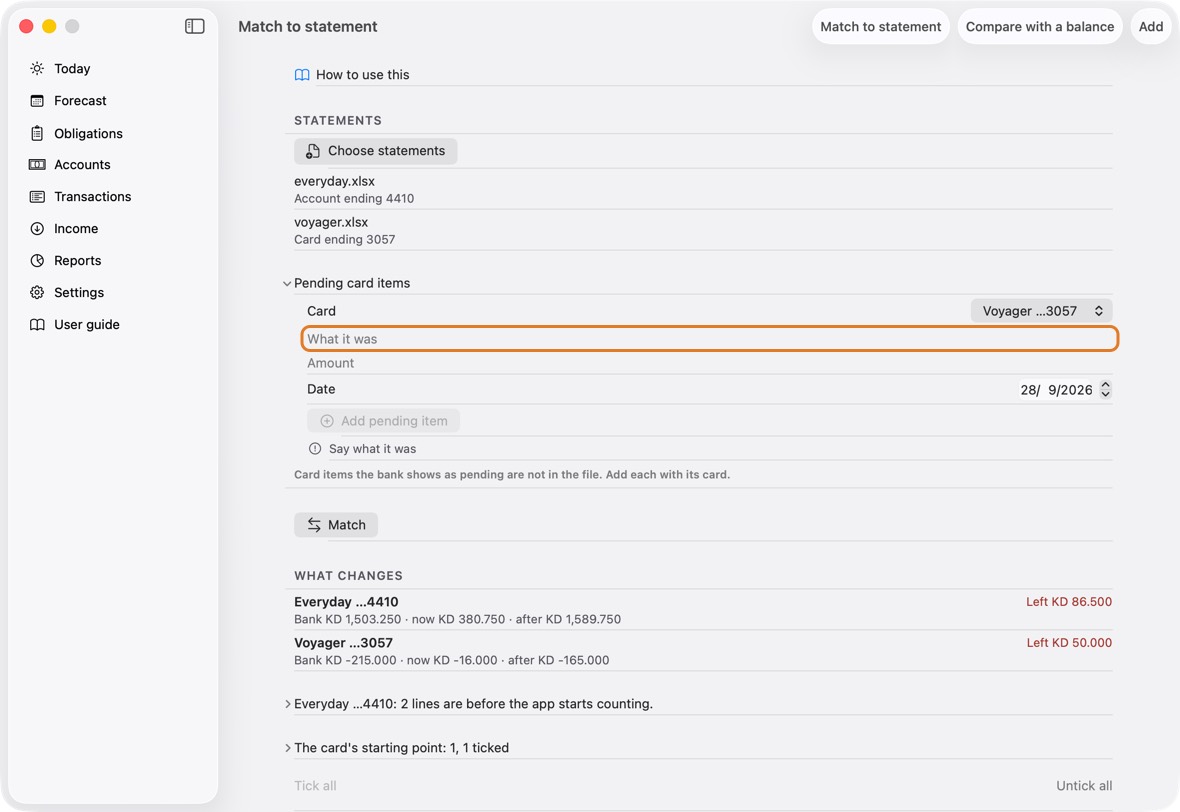
Field Must fill? What it means Example Card Yes The card the purchase is on.
If you leave it: Your first card.Voyager …3057 What it was Yes Where you bought it. Corner Grocer Amount Yes How much. 7.250 Date No When.
If you leave it: Today. - To remove one, swipe it left. Remove it once the bank's statement lists it, or it is counted twice.
You should now see the card agree with the bank's figure, pending items included.
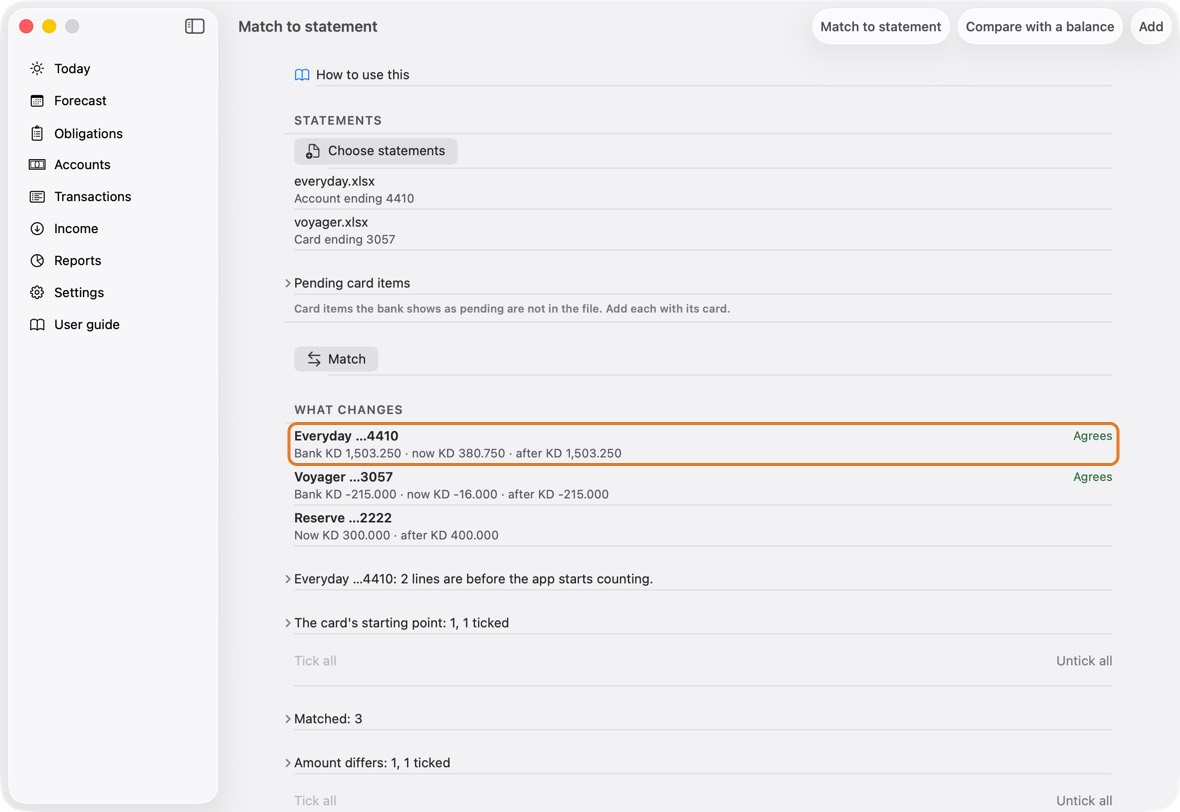
- The card's row in What changes counts the pending items in after.
Each group, and what to tick
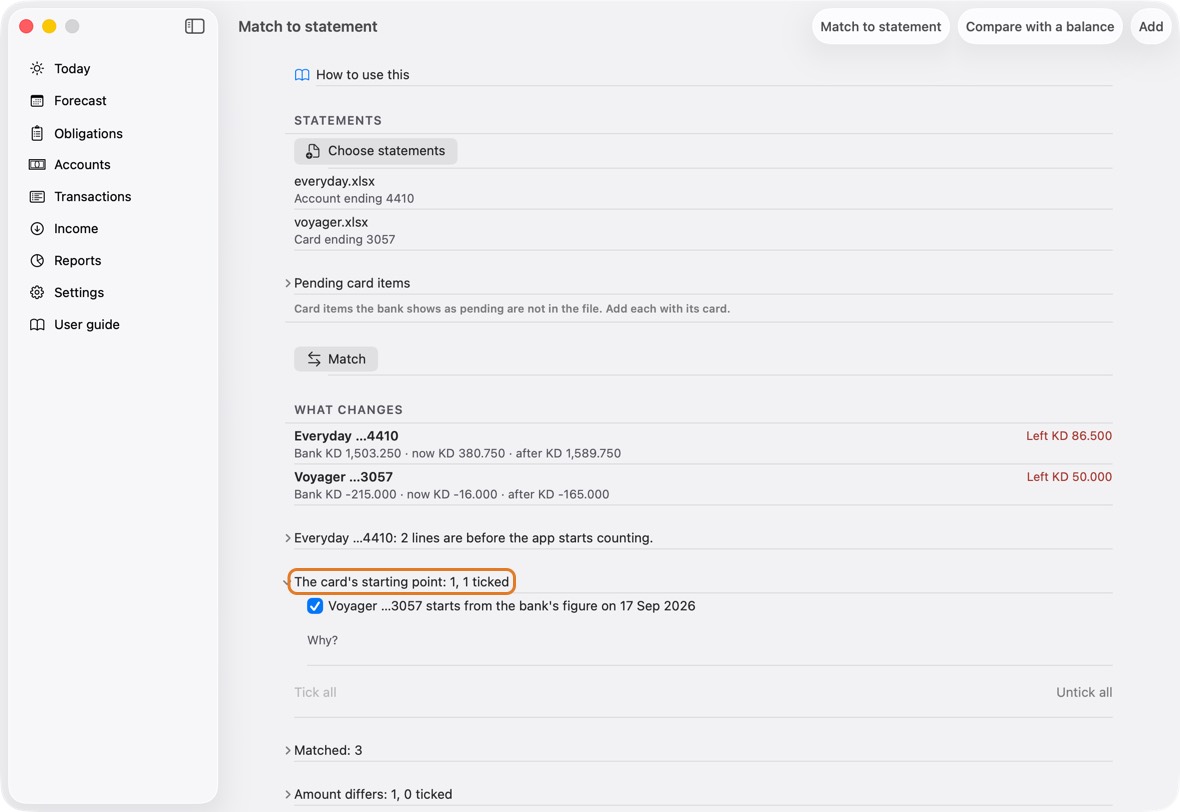
- The card's starting point: Where the card starts counting, worked out from the bank's own figures. Starts ticked. Untick it only if you have set the card's starting point yourself and trust it.
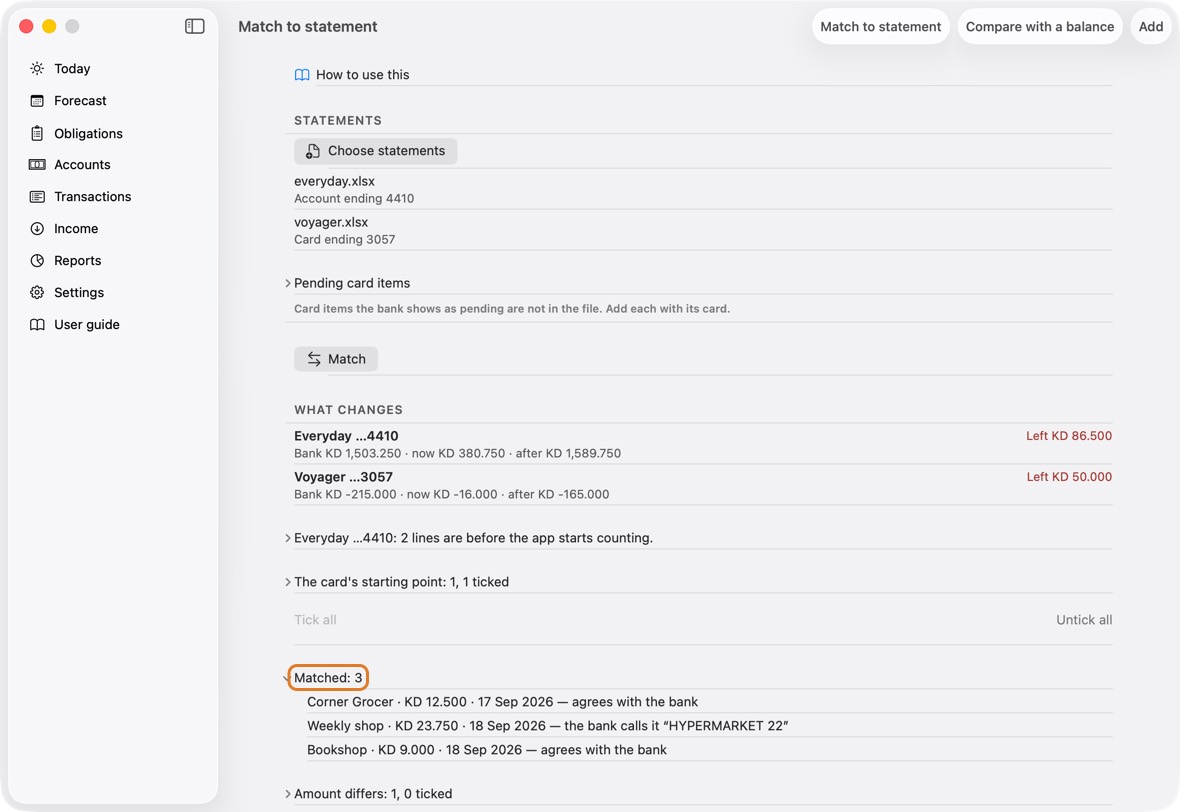
- Matched: The app and the bank agree; nothing to tick. A line the bank names differently, the same money on the same day or the next, is matched too, and the app remembers the bank's name for next time.
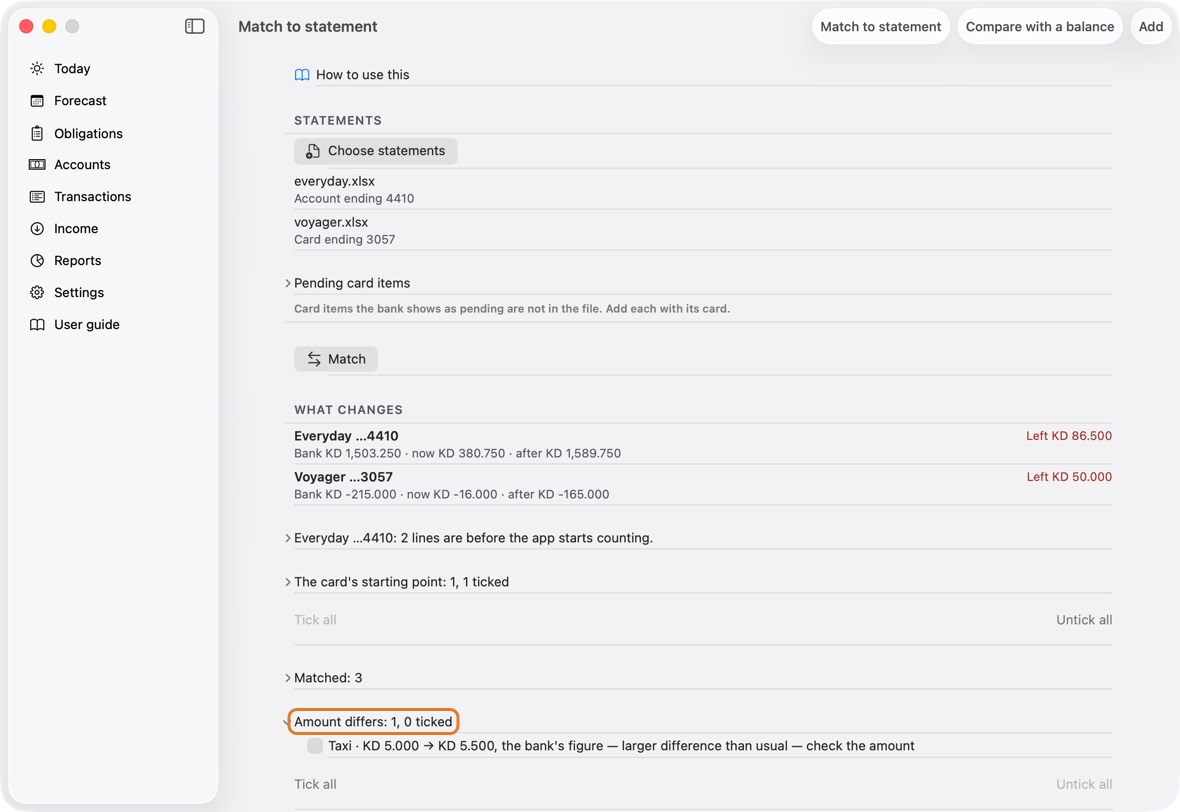
- Amount differs: The same purchase at a different figure; applying takes the bank's. Starts ticked when the two are within 5% of each other; between 5% and 10% it starts unticked and says so: check it before you tick. Further apart, they are not paired at all.
- Probably the same: The bank has a line the app may already have under another name or a few days apart. Starts unticked. Open it, check the row it chose, and tick it to link the two; untick it if they are different things.
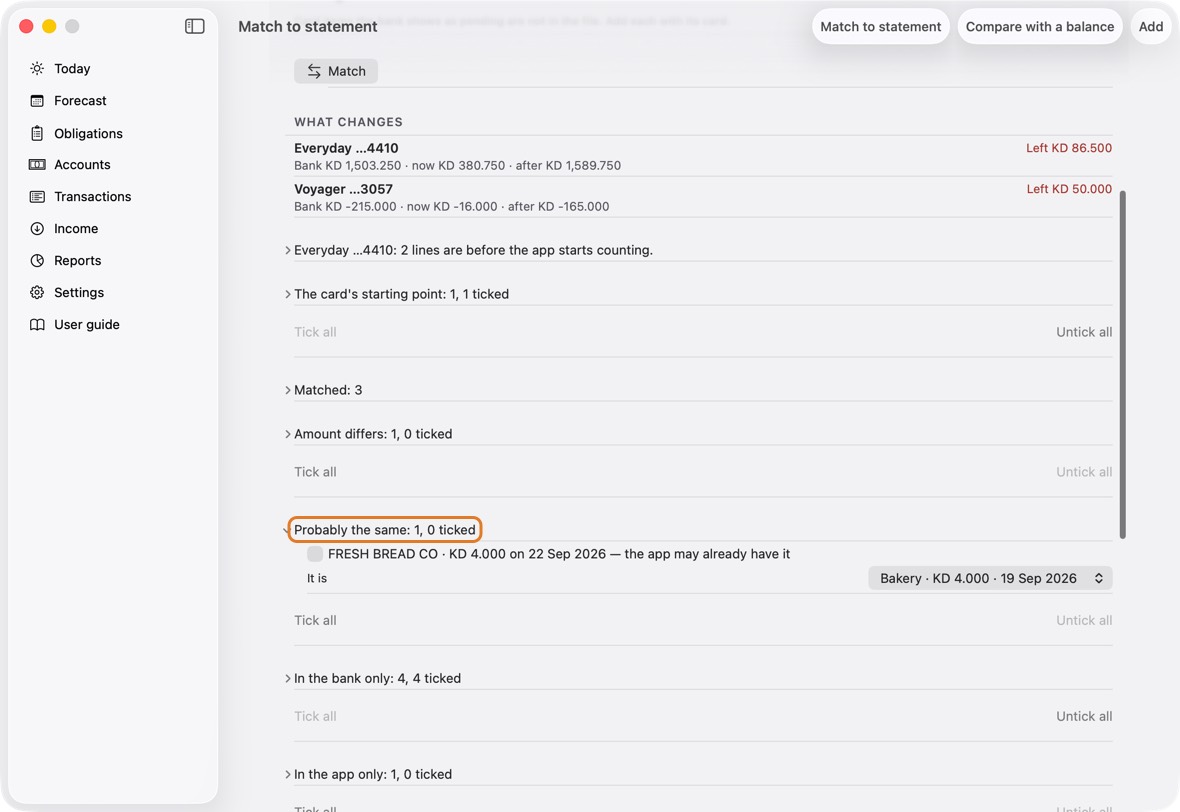
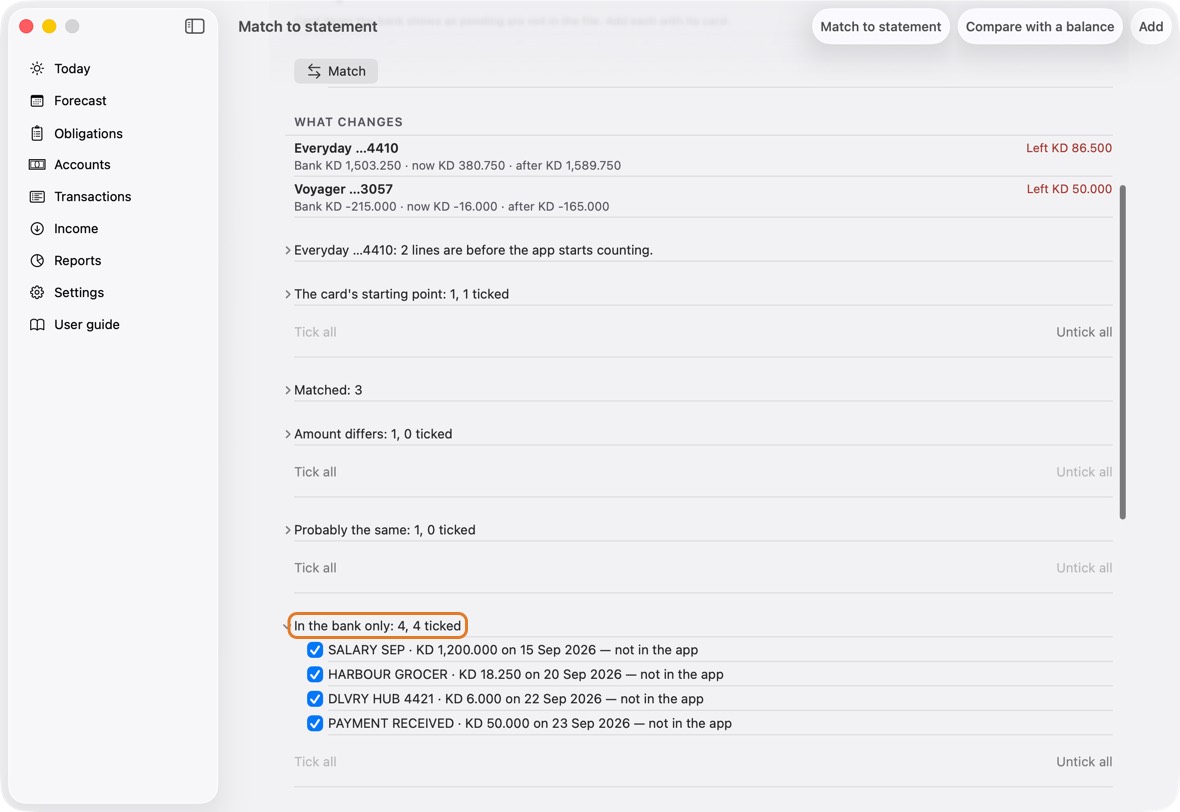
- In the bank only: The bank has it and the app doesn't; applying adds it. Starts ticked. Untick a line you'd rather add by hand.
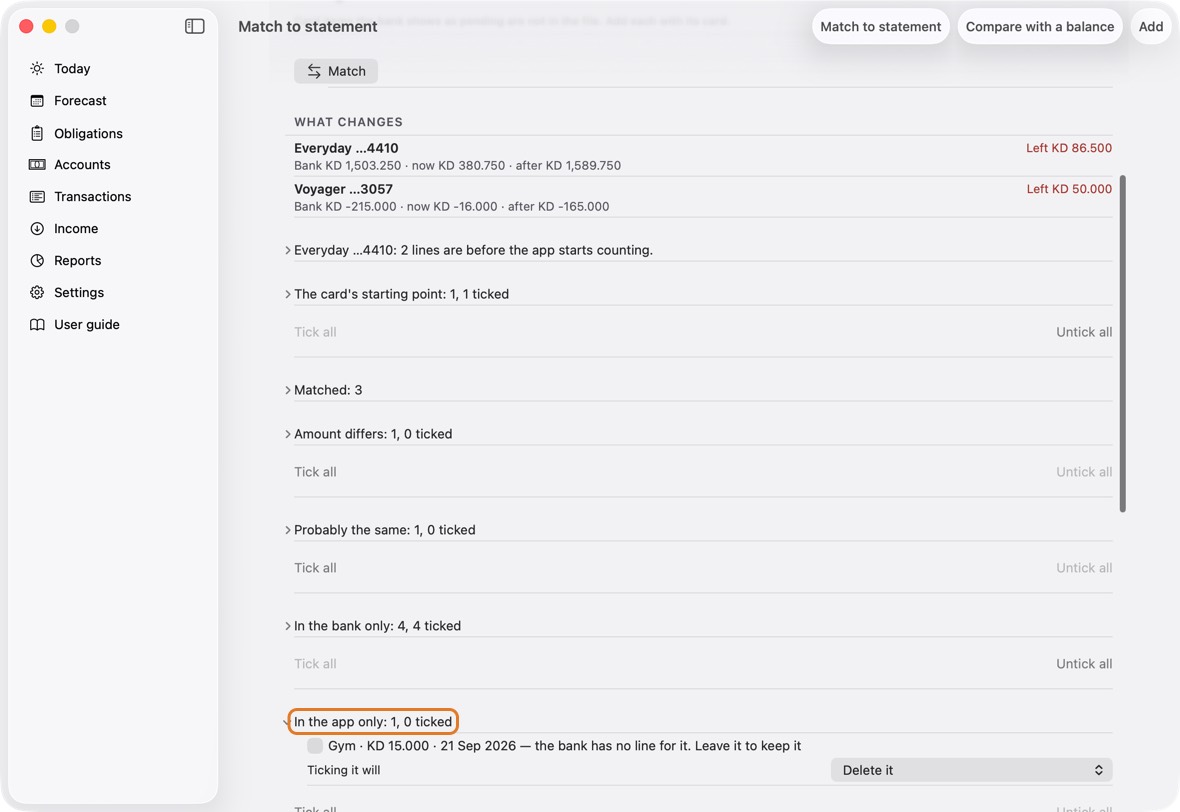
- In the app only: The app has it and the bank doesn't. Starts unticked, and stays unless you tick it, which deletes it. A balancing entry the app made starts ticked. Leave unticked anything still to come.
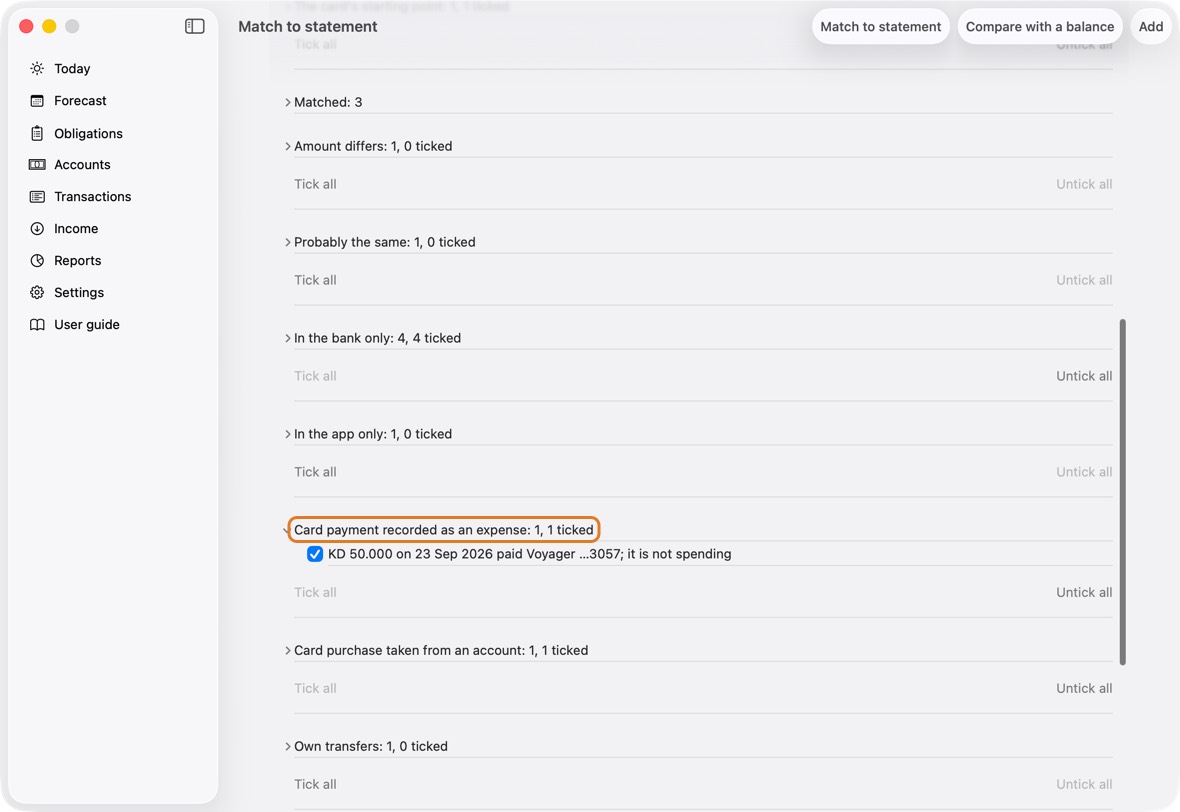
- Card payment recorded as an expense: A payment to a card saved as ordinary spending. Starts ticked; applying turns it into a payment of the card's bill, so the card's figure goes down too.
- Card purchase taken from an account: A card purchase that also came out of an account. Starts ticked; applying leaves it on the card only.
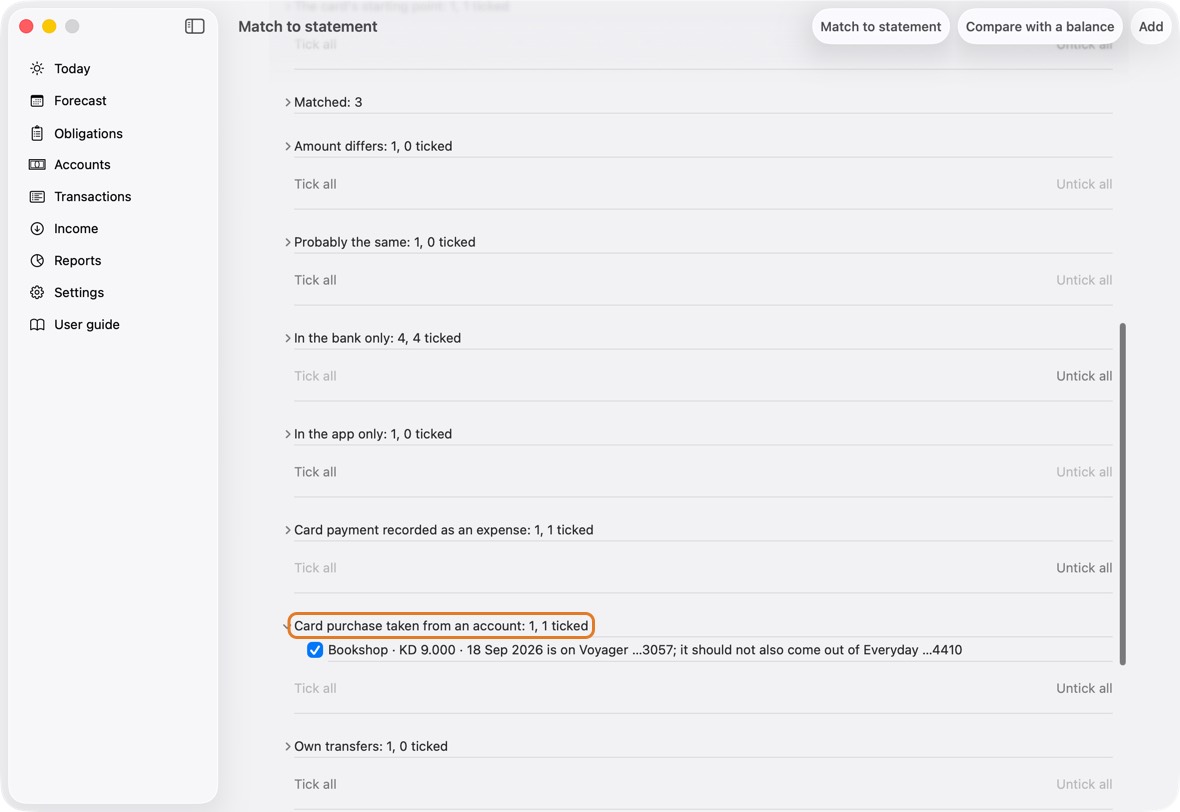
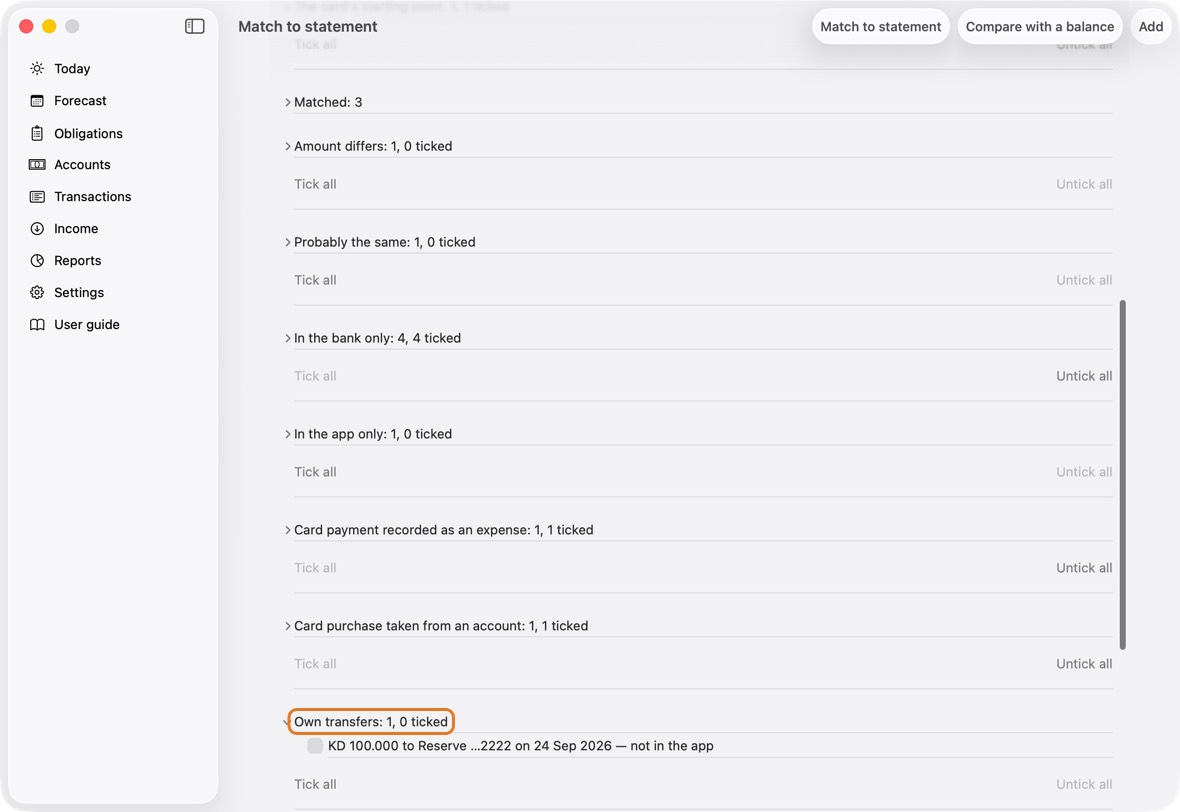
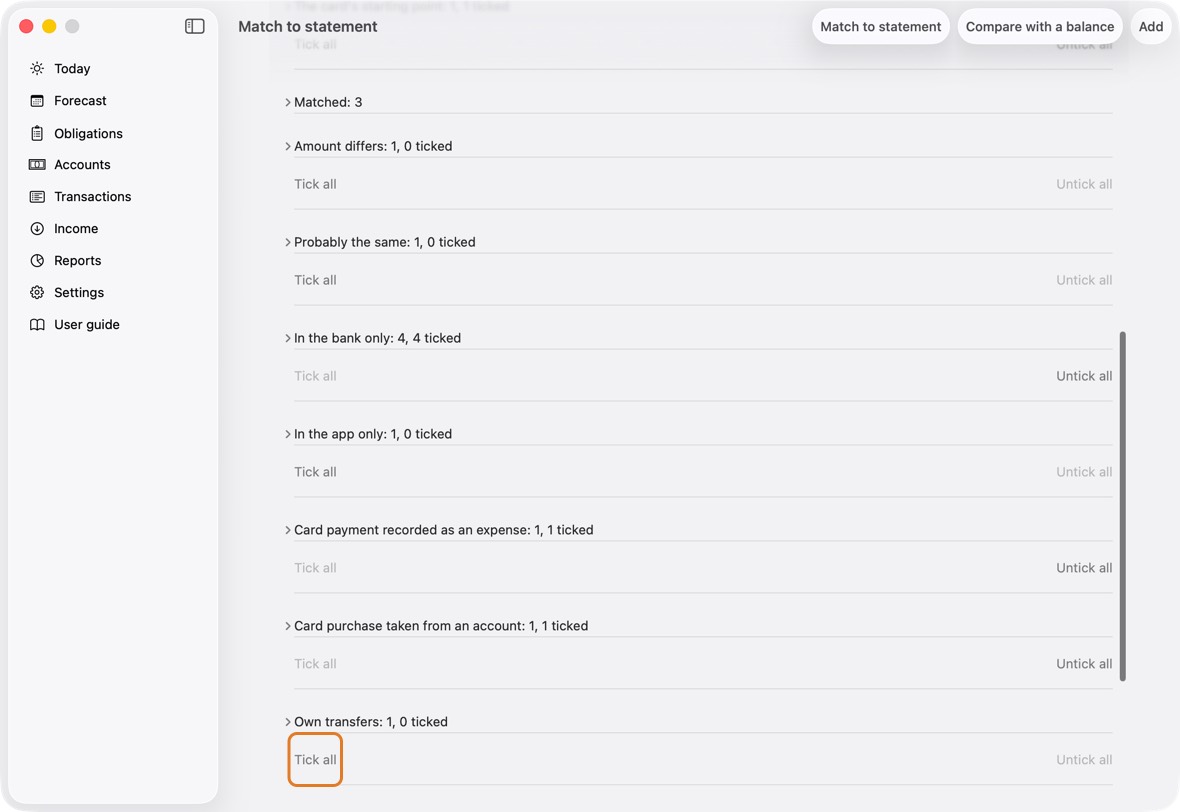
- Own transfers: Money between your own accounts. Starts unticked: tick it when the app hasn't recorded that transfer. Tick all helps when there are many.
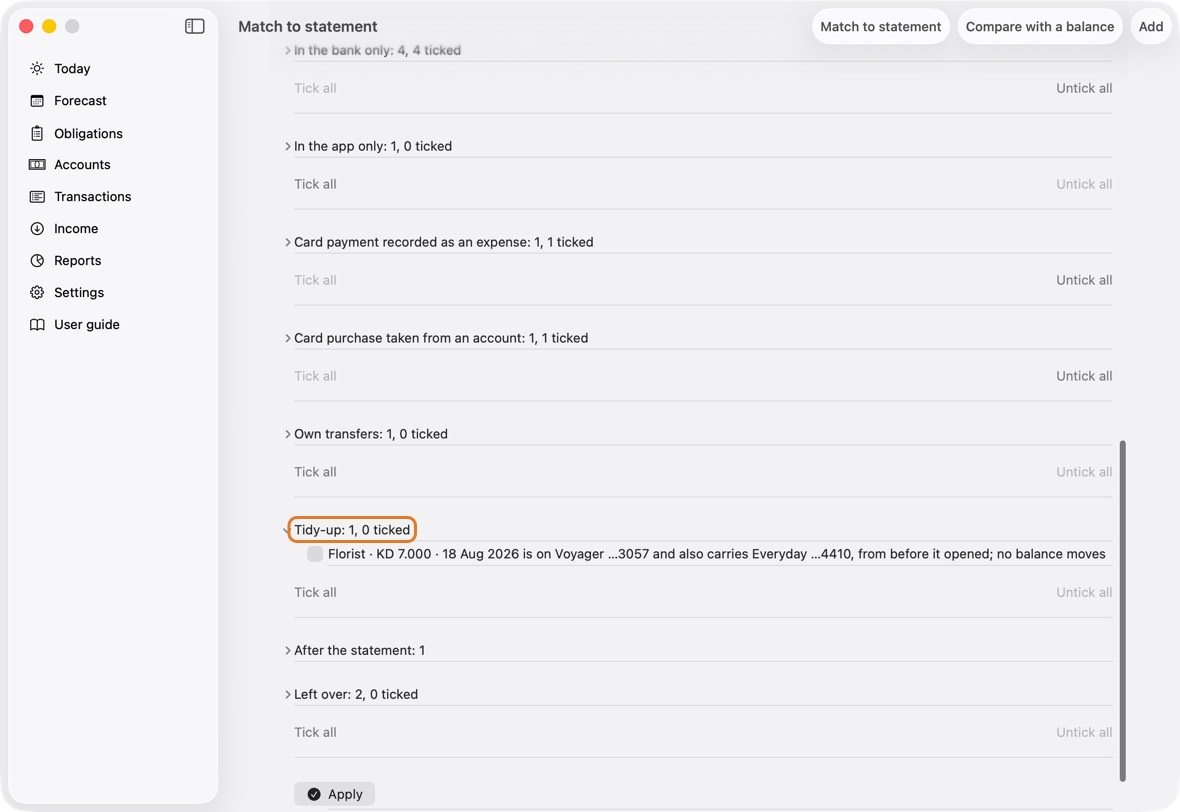
- Tidy-up: Rows that move no balance, such as a card purchase from before the account opened. Starts unticked; ticking only tidies the record.
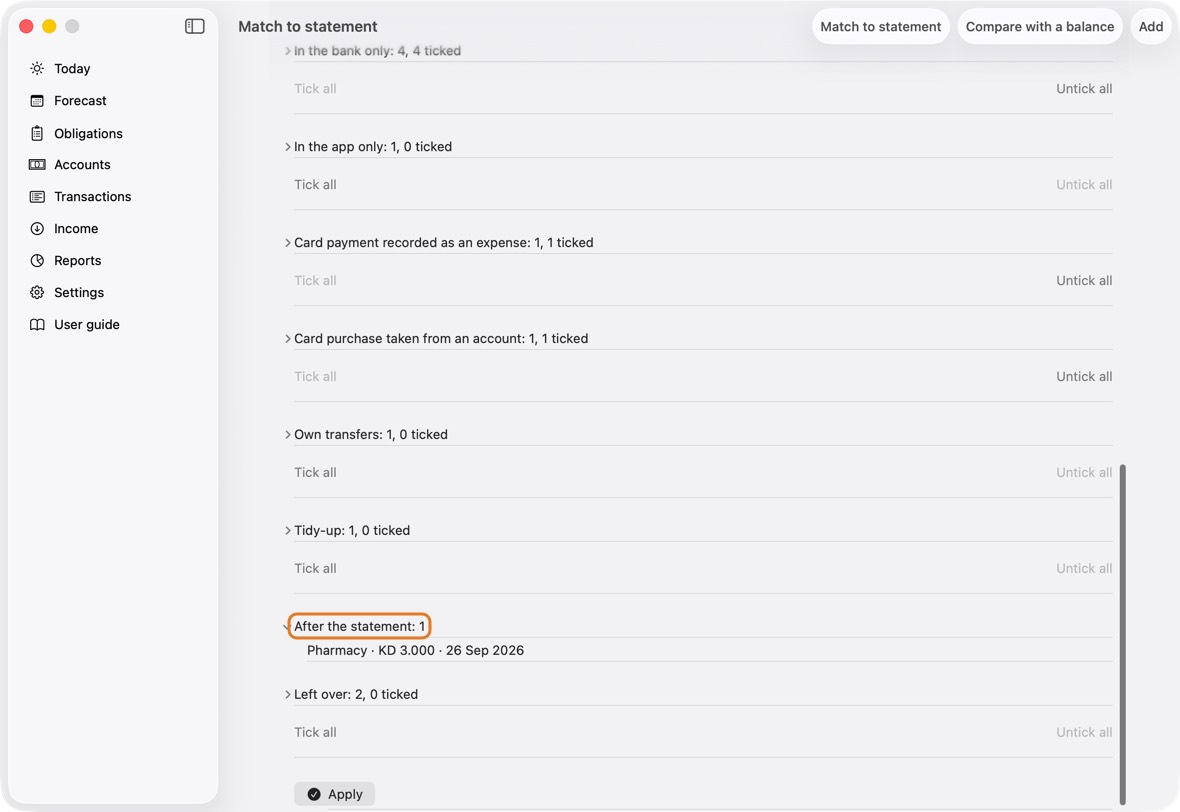
- After the statement: What you added after the statement's last day. Listed only: never matched, never counted. The next statement will have it.
- Left over: A correction for what is still different after everything else. Starts unticked. Use it last, and only once you know why the difference is there: it changes the balance without saying what the money was.
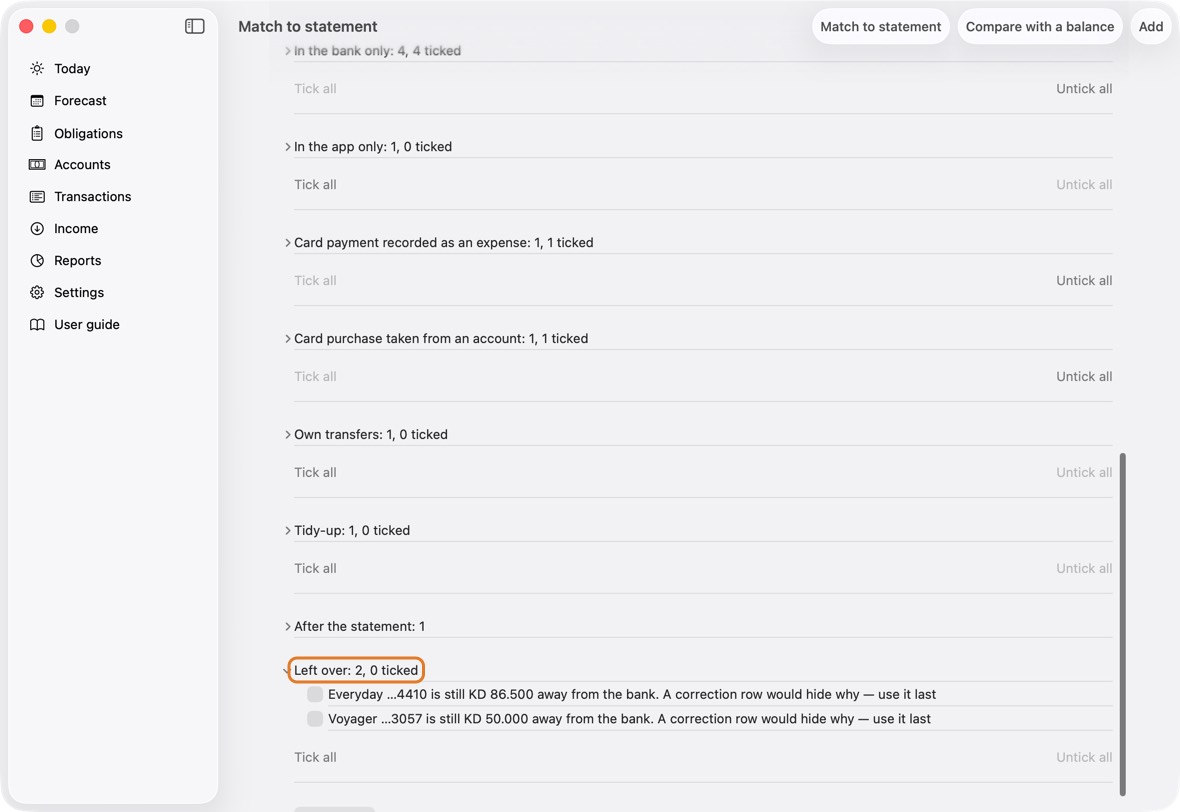
- Each group has Tick all and Untick all: one click for every line in it.
You should now see, under What changes, each account's and card's figure after the ticked changes.
- Ticking or unticking a line changes after at once; aim for Agrees on every row.
Start an account at the bank's balance
- When a statement has lines from before the account opened in the app, a row says so: "2 lines are before the app starts counting." Open it.
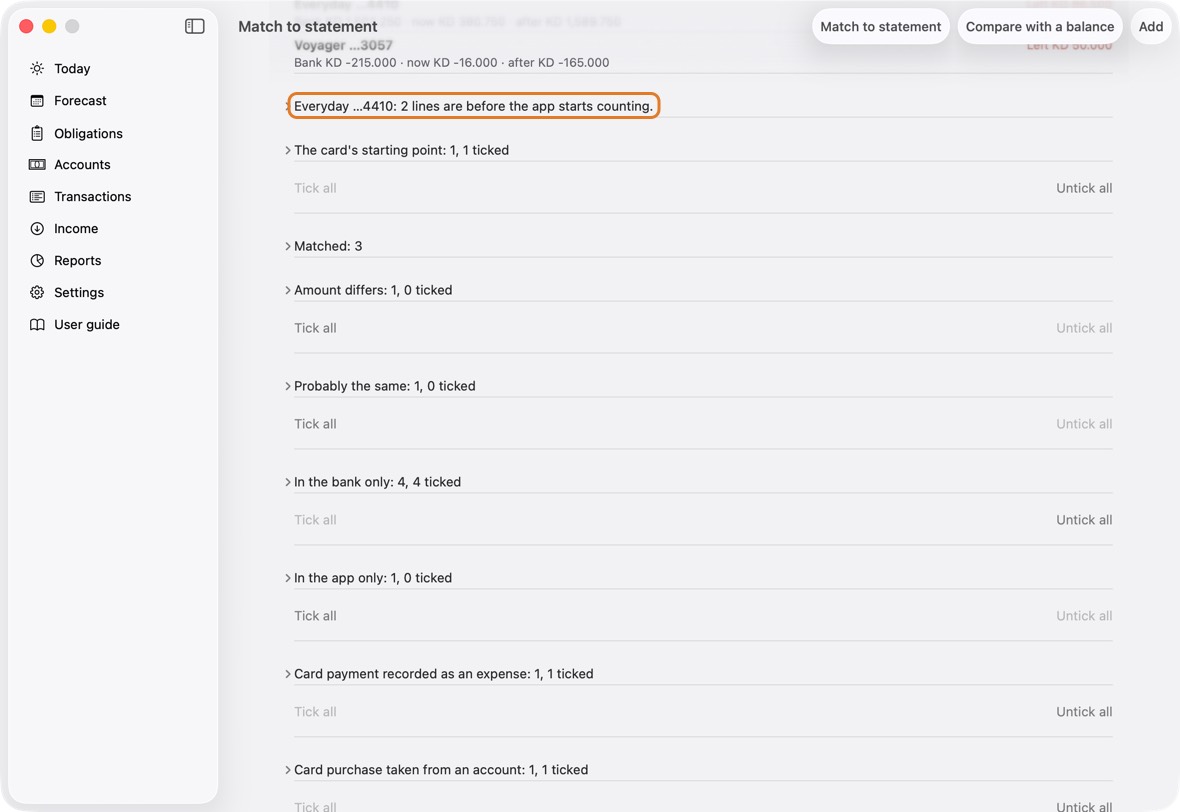
- Start on … at the bank's balance moves the opening to the day before those lines, at the balance the bank printed that day. It is right whenever the file shows a balance: the account then matches the bank line by line.
- Start on …, balance unchanged keeps your opening balance and only moves the date. Use it only if you typed that balance for that earlier day yourself.
- For example: the account opened on 1 Sep at 1,850.000, and the file has two lines on 28 and 29 Jul, the bank's balance on 27 Jul being 1,754.250. At the bank's balance starts it on 27 Jul at 1,754.250, and the two lines bring it to the bank's figure. Balance unchanged starts it on 27 Jul at 1,850.000, and it stays 95.750 away.
- Confirm. Put back the opening date undoes it.
You should now see those lines counted, and the account agreeing.
- The account's row shows Agrees, and the row about lines before the start is gone.
Apply, and the check after it
- When every row in What changes shows Agrees, or you know why one doesn't, click Apply. Confirm. Nothing you left unticked changes.
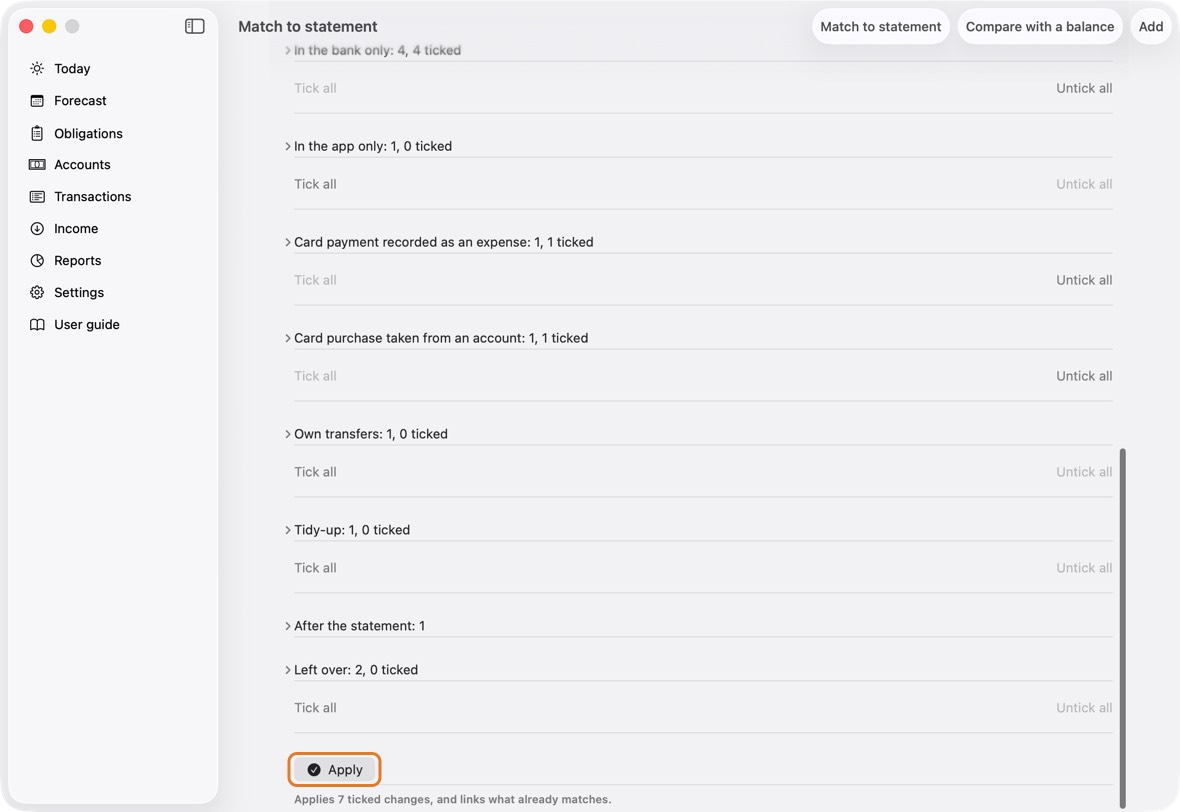
- After Apply the app works every account and card out again and holds it to what it showed. If any differs, it says so in red at once: "Everyday is KD 3.000 away from what was shown. Undo this match, and tell us." Then click Undo this match and send us that line.
You should now see your balances the same as the bank's.
- No red line under the statements: what was shown came true.
Undo this match
- At the bottom of Match to statement, click Undo this match, and confirm. Everything the match added, changed or deleted goes back as it was.
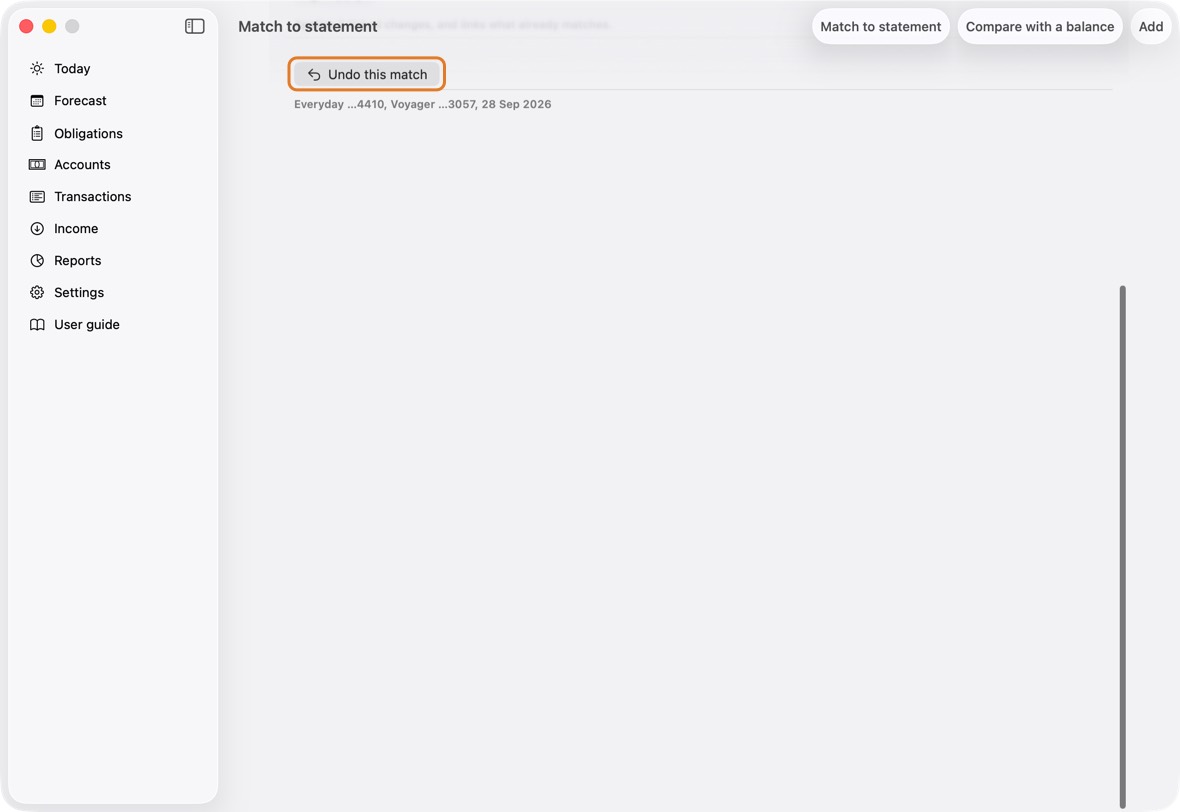
You should now see the statements to match again, as before you applied.
- The groups are offered again, ticked as before; nothing of the match is left.
Run Match again later
- Choose the next month's files and click Match as before. Lines matched last time are not offered again.
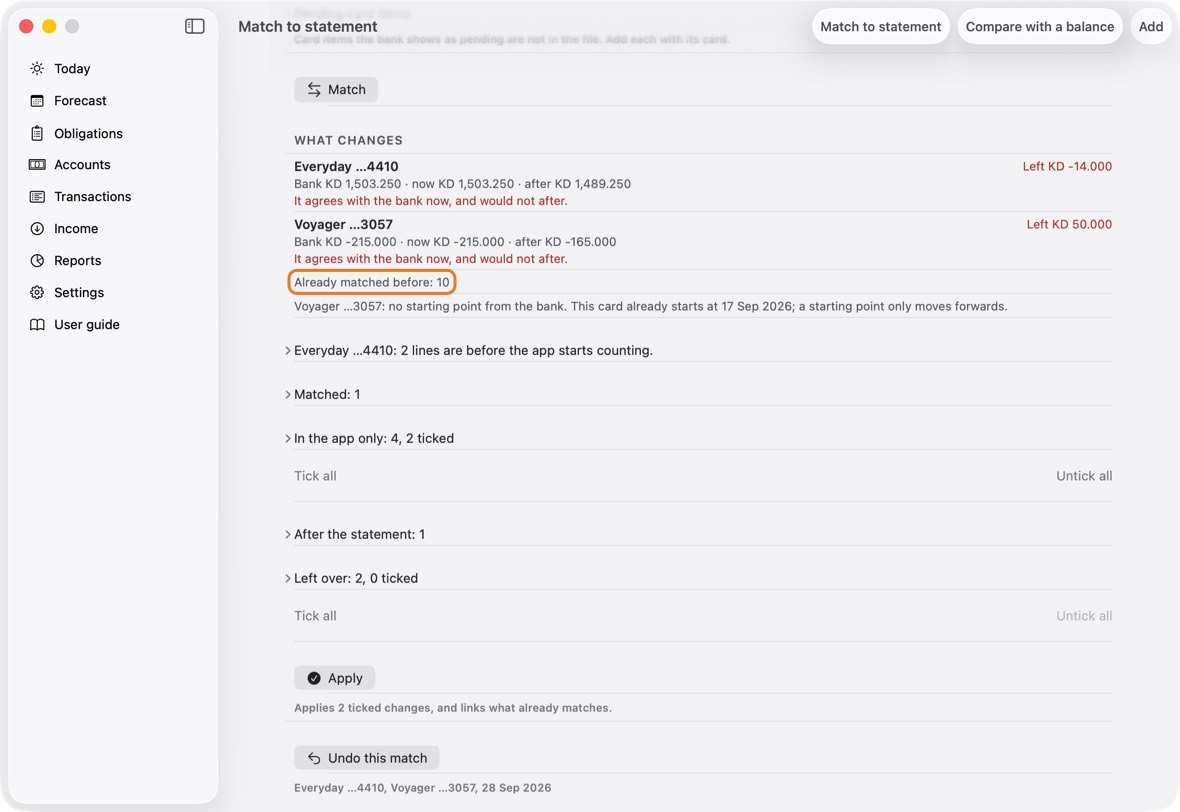
- Already matched before: N says how many lines of these files an earlier Apply linked. They count, and need nothing.
You should now see only the new lines offered.
- Already matched before counts the lines an earlier Apply linked; they need nothing.
- Match remembers the names you matched. To forget one, open Settings, swipe the name under Match to statement and click Forget.
Compare with a balance
- For a bank that sends only PDFs: open Accounts, click ⋯, then Compare with a balance.
- Choose the account, the date, and type the Bank's stated balance.
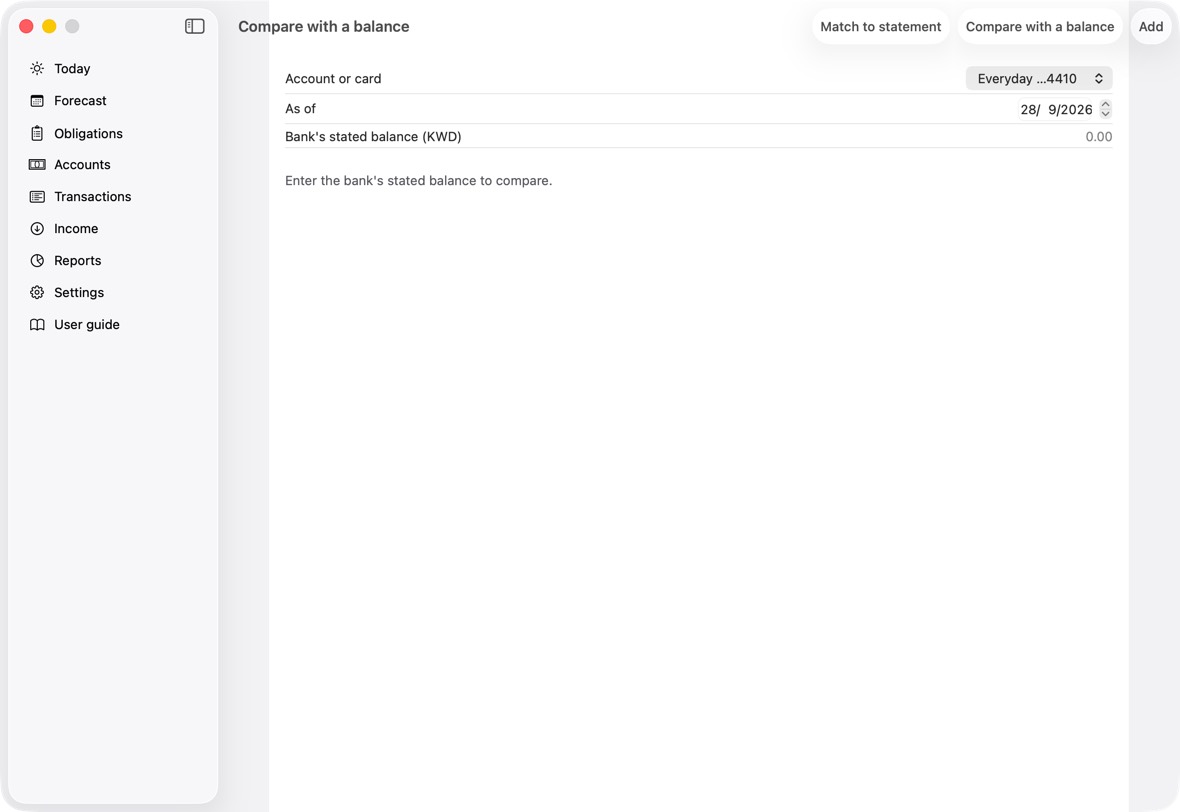
- If there is a difference you can't explain, click Record a correction to match the bank.
You should now see the difference, or Reconciled.
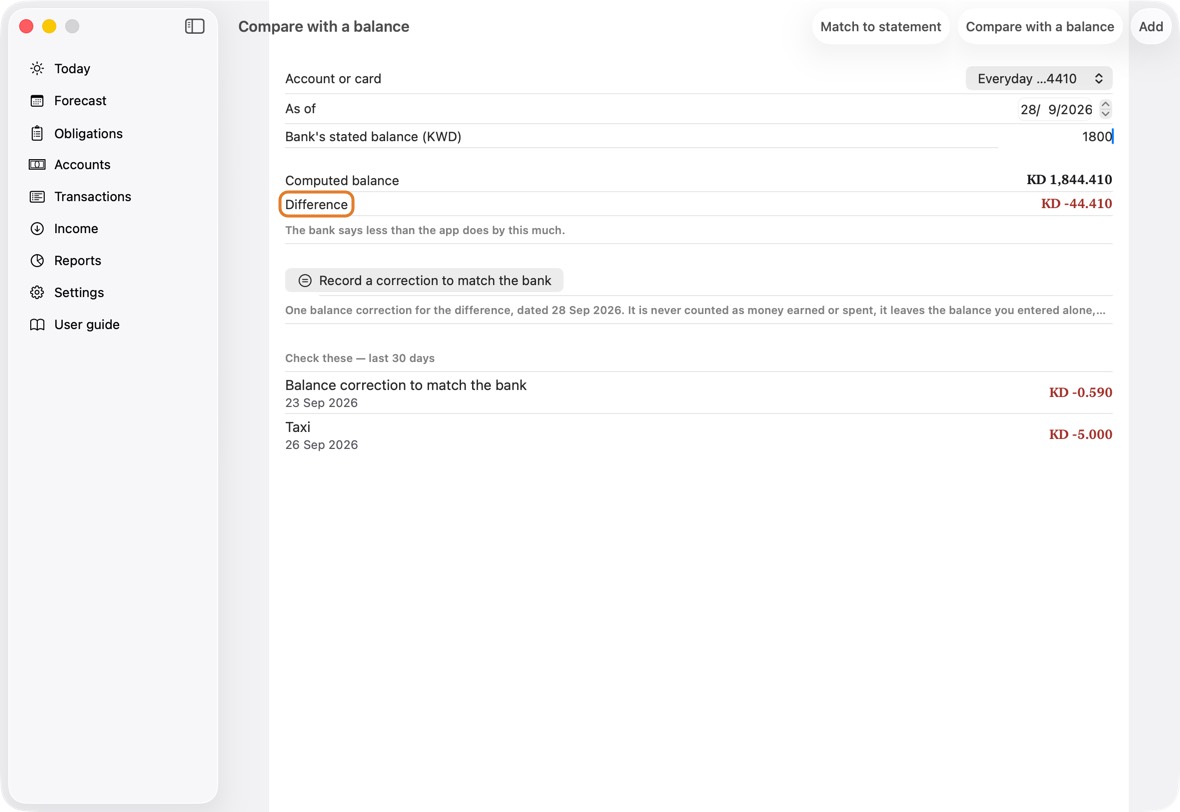
- Once you type the bank's balance: the difference, or Reconciled when there is none.
- If they differ, Record a correction to match the bank, then Record correction, adds one correction for the difference.
A correction hides why the figures differed. Look for a missing or wrong transaction first.
Bring in past statements
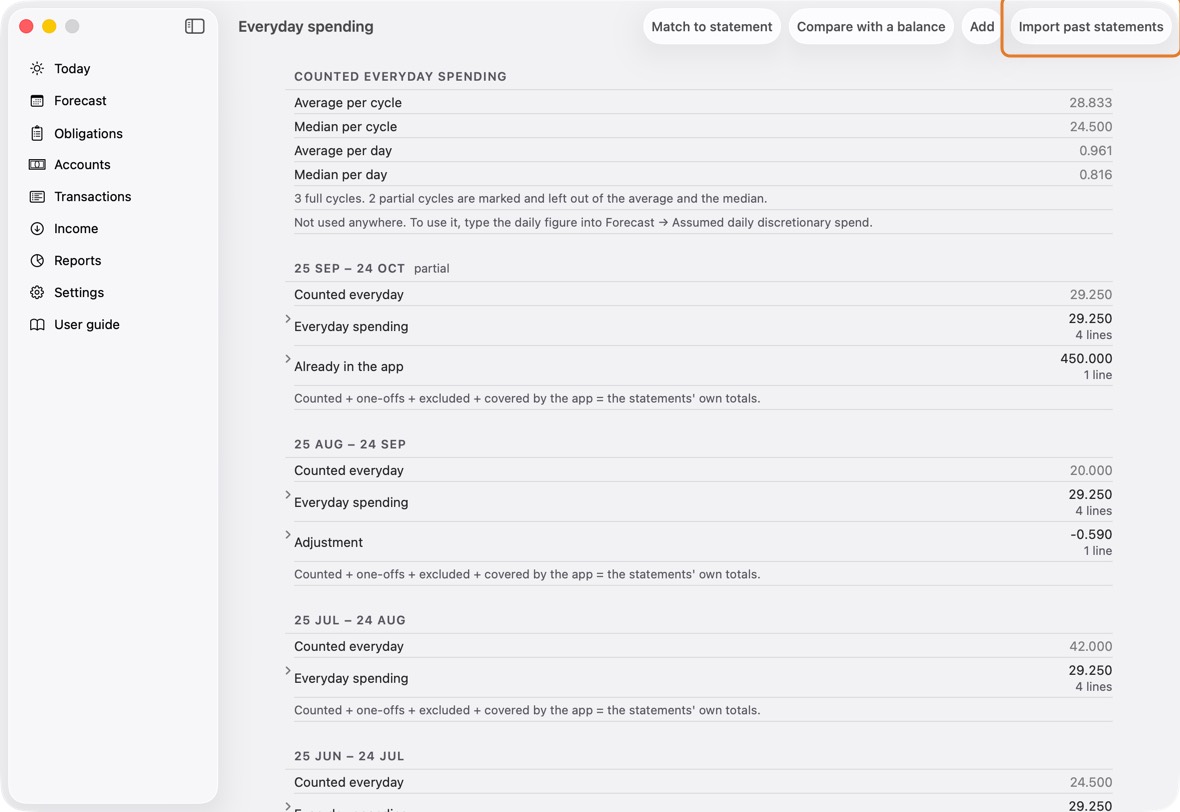
- Open Reports, click Everyday spending analysis, then Import past statements. It is also offered at the end of Setup.
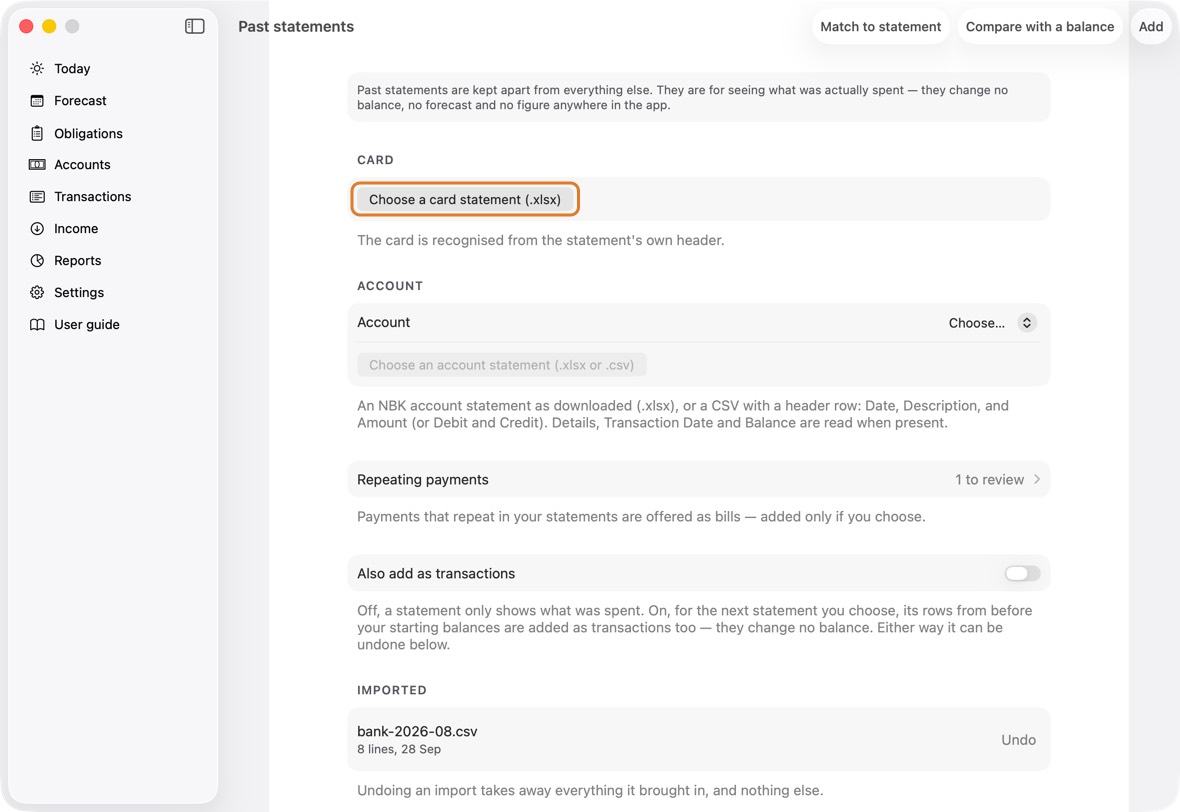
- Click Choose a card statement (.xlsx), or choose the account and click Choose an account statement (.xlsx or .csv).
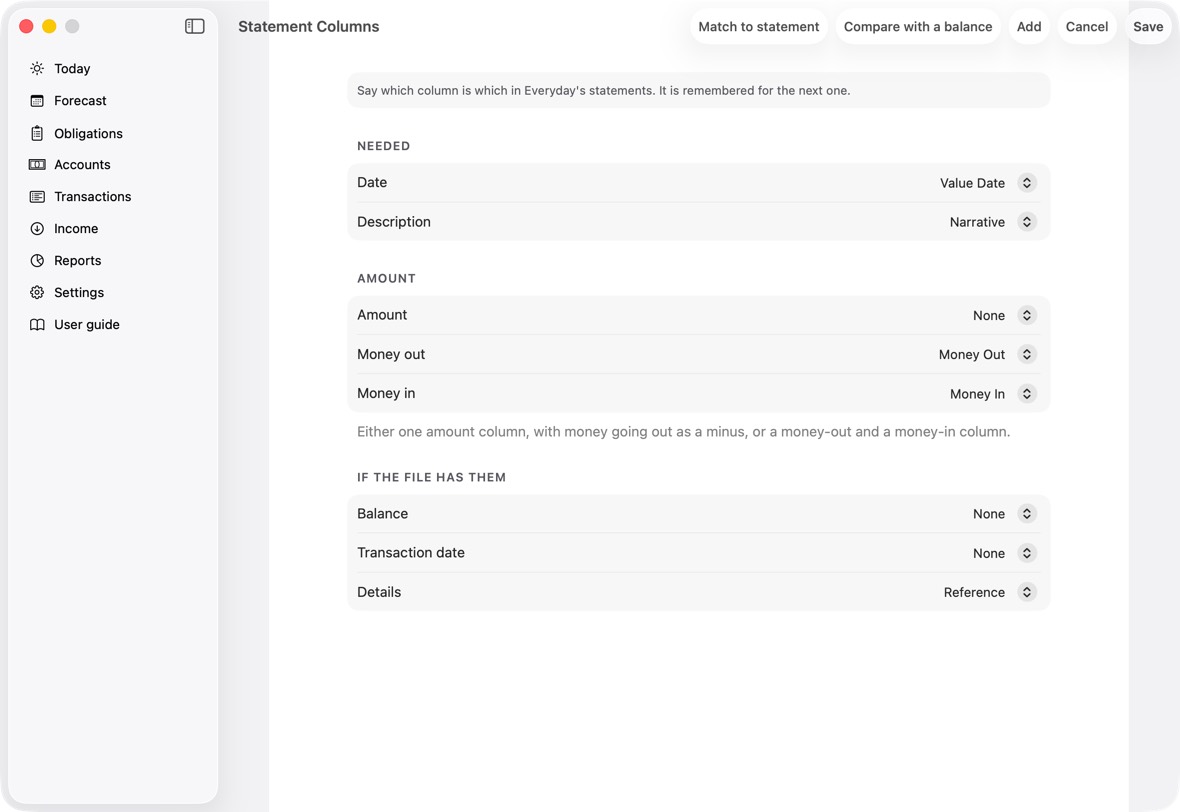
- If the app doesn't know the file's columns, Statement Columns opens: say which column is the date, the description and the amount, and click Save. It is remembered for that account.
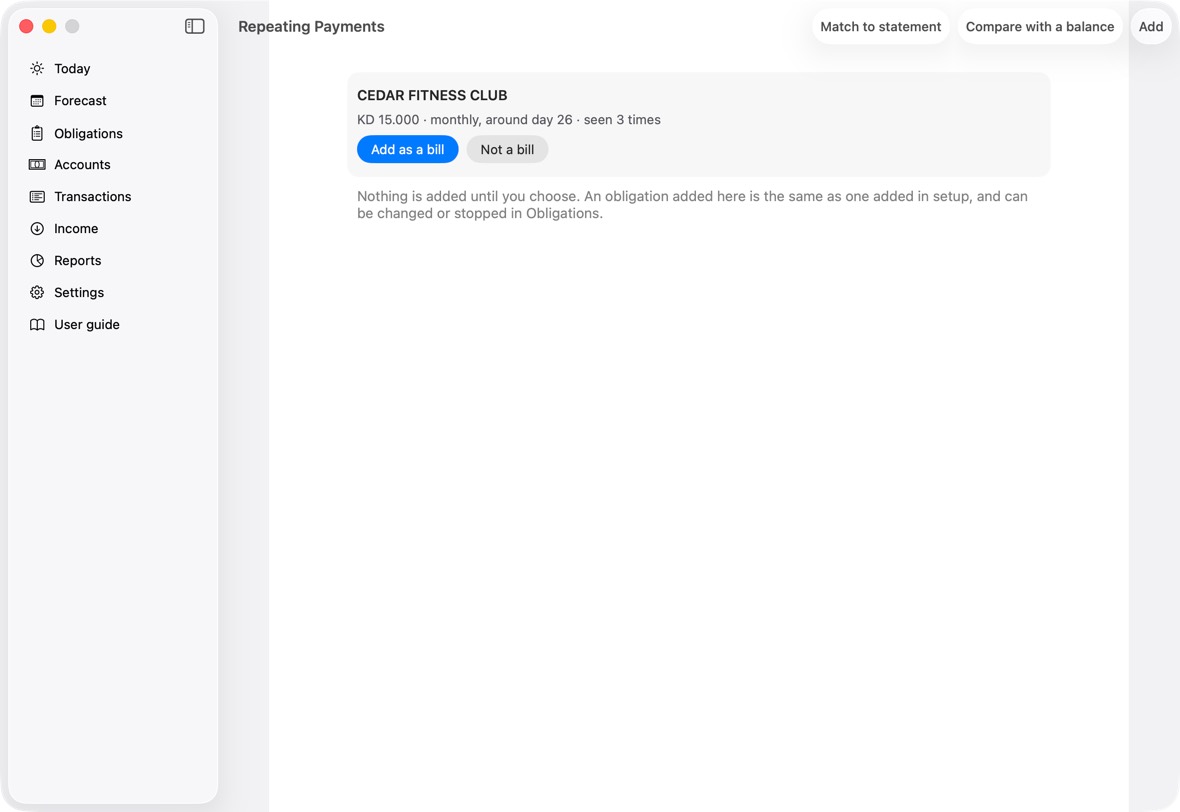
- Click Repeating payments to see the bills the statements show. For each, Add as a bill or Not a bill.
- To take an import back, click Undo beside it, then Undo import. Keep it leaves it.
You should now see Past statements listing each import, and Everyday spending worked out from them. The bills you added are in Obligations; Repeating Payments lists only the ones left to decide.
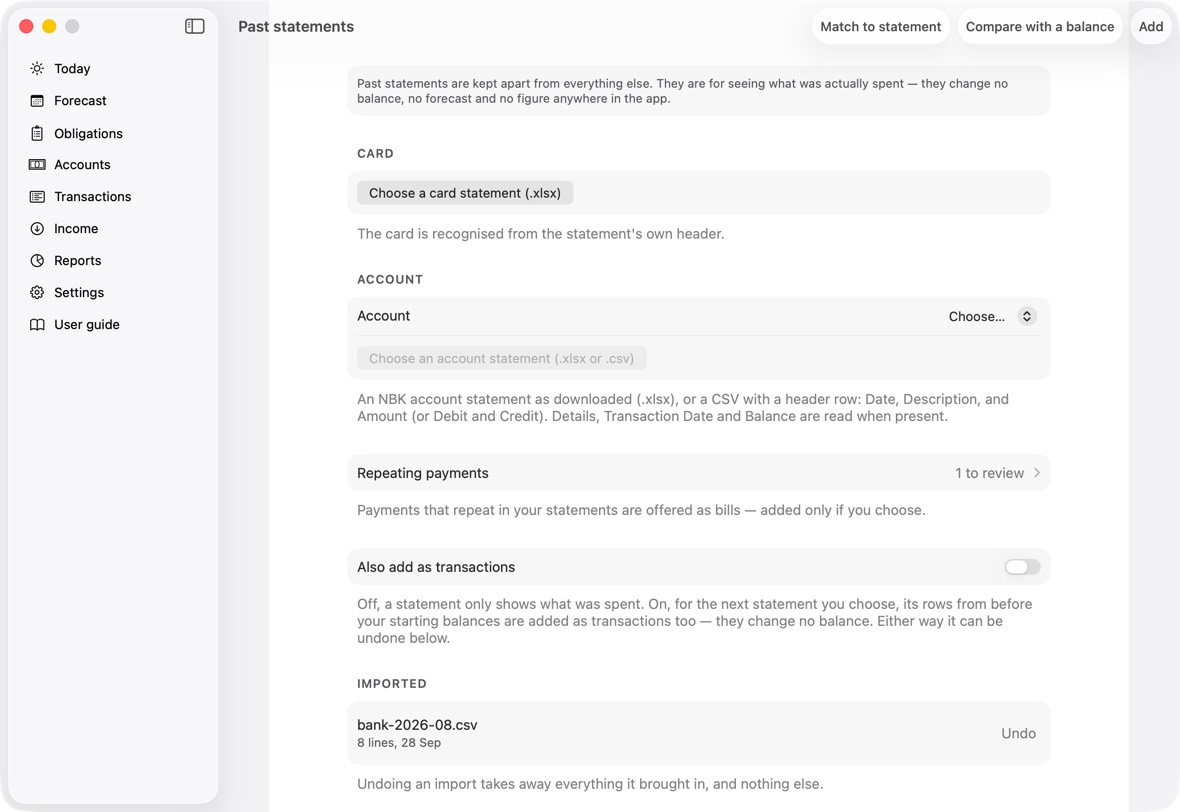
- Past statements teach the app what you usually spend. They don't change your balances unless you turn on Also add as transactions.
Record a card's statement line by line
- Open Accounts, click ⋯, then Import a statement.
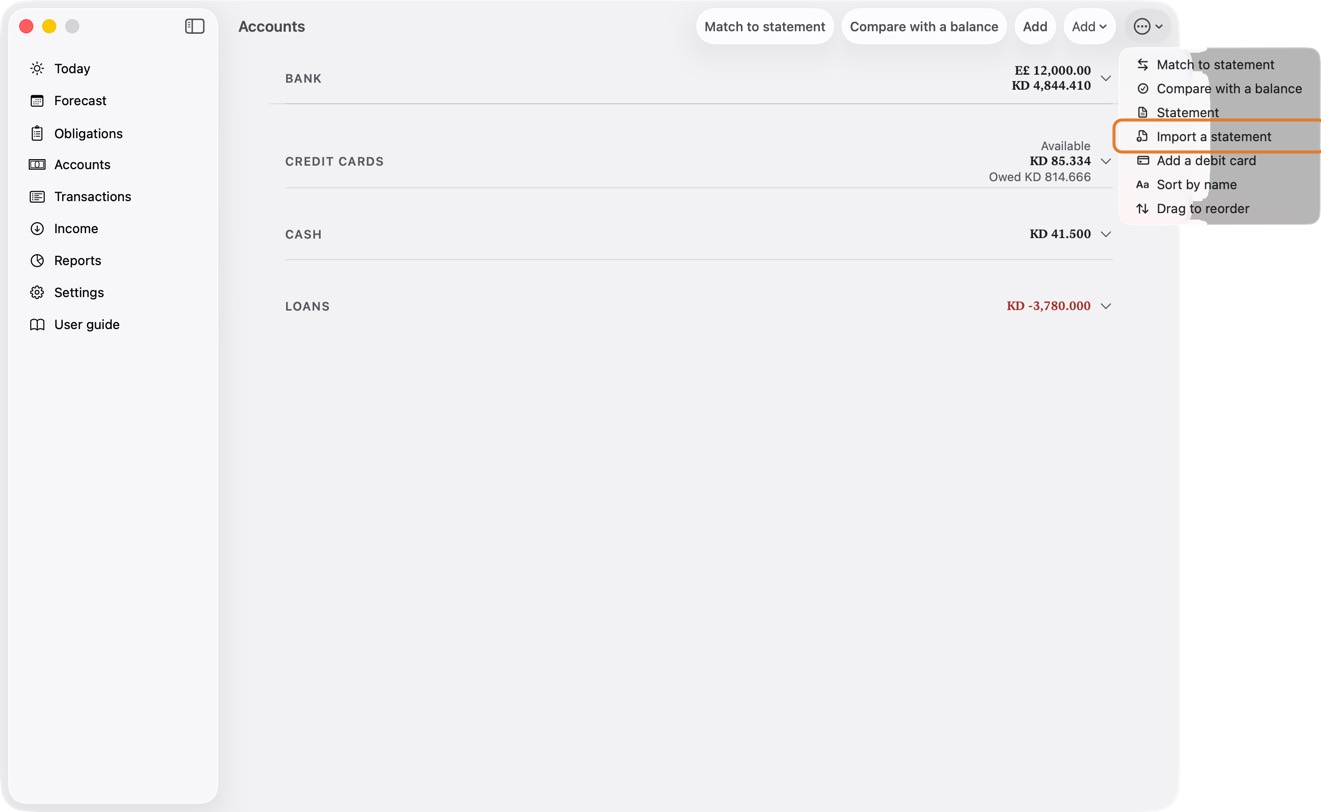
- Choose the Card, then click Choose statement file… and pick the bank's .xlsx.
- Click each line to confirm it: Confirm Purchase for a purchase, Confirm Payment for a payment.
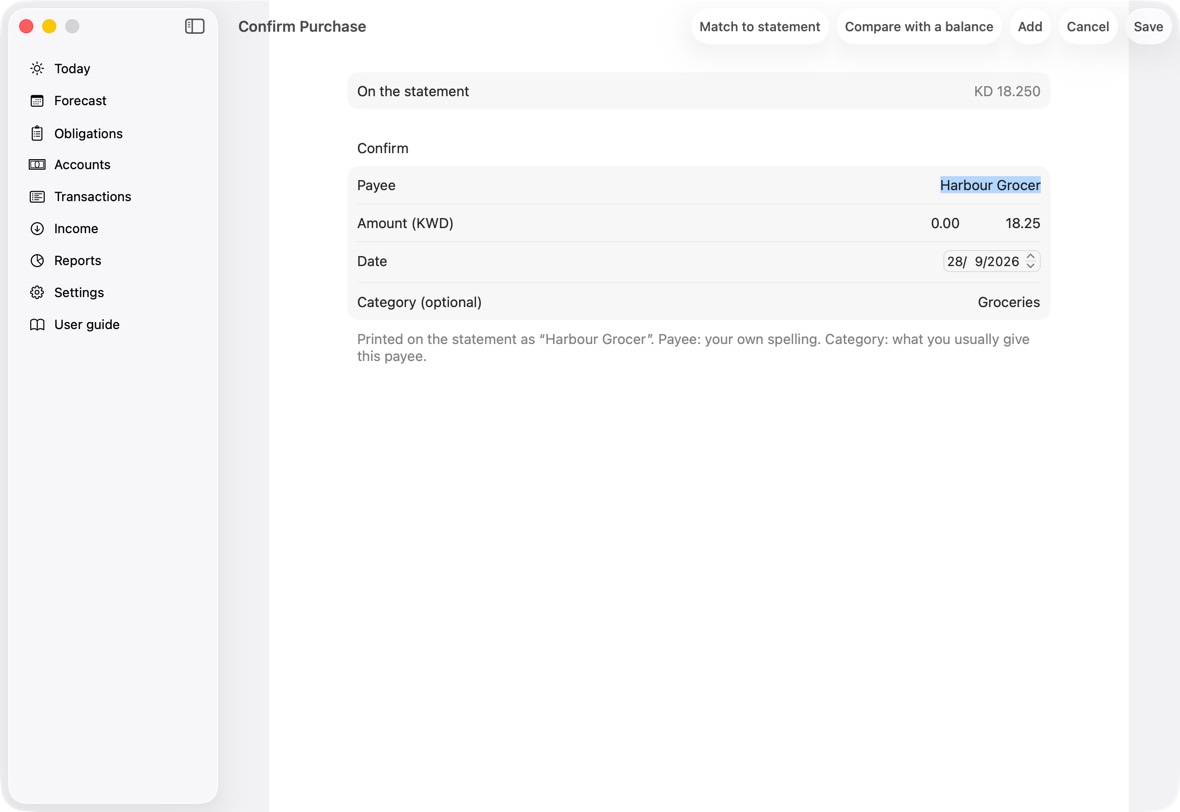
You should now see the confirmed lines under Already recorded on Import Statement, and on the card.
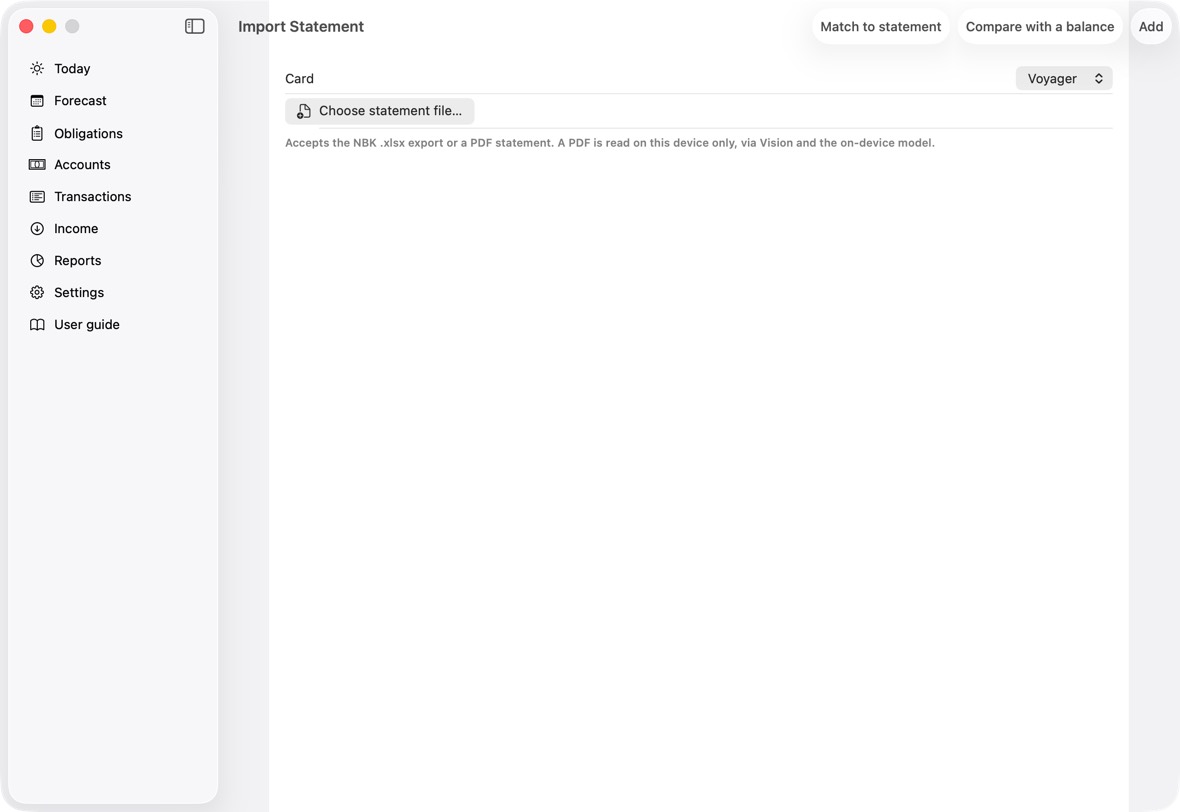
- Match to statement does the same for many lines at once; this screen is for going through one statement line by line.
Siri and Shortcuts
Add an expense, income or a transfer
- Say any of these: “Add an expense in Intelligent Finance”; “Add a purchase in Intelligent Finance”; “Add a payment in Intelligent Finance”; “Add a spending in Intelligent Finance”; “Record an expense in Intelligent Finance”; “Log an expense in Intelligent Finance”; “Log a purchase in Intelligent Finance”; “I spent money in Intelligent Finance”; “I paid for something in Intelligent Finance”.
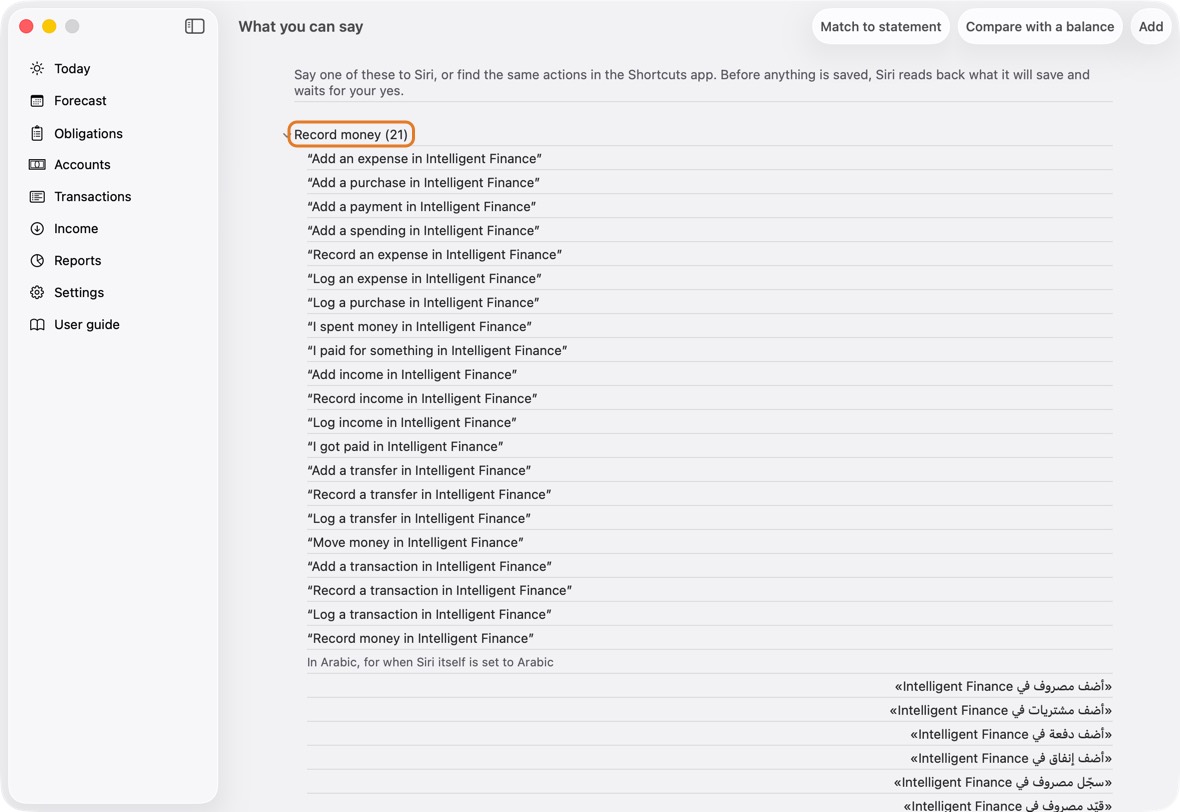
- For income: “Add income in Intelligent Finance”; “Record income in Intelligent Finance”; “Log income in Intelligent Finance”; “I got paid in Intelligent Finance”.
- For a transfer: “Add a transfer in Intelligent Finance”; “Record a transfer in Intelligent Finance”; “Log a transfer in Intelligent Finance”; “Move money in Intelligent Finance”.
- Or, and Siri asks which: “Add a transaction in Intelligent Finance”; “Record a transaction in Intelligent Finance”; “Log a transaction in Intelligent Finance”; “Record money in Intelligent Finance”.
- If it isn't clear, Siri asks “Is it an expense, income or a transfer?” Then “How much?”
- An expense: “Paid with?” (choose a card or account), then “What for?”. Paid by card in another currency: which currency, then what the bank charged; say “estimate” if you don't know yet.
- Income: “Who paid it?”, then “Which account did it go into?”. A transfer: “Which account is it from?”, then “Which account is it going to?”, and what arrived if the currencies differ.
- Siri reads it back, for example “12.500 for Corner Grocer, paid with Voyager. Save it?” Say yes to save it, or cancel. Siri says “Saved.”
You should now see it in Transactions, as if you had typed it.
- Each row: who or what, the date and category, and the amount, red when money left.
- At the top, how many transactions are shown and their total out and in.
Add an obligation
- Say any of these: “Add a bill in Intelligent Finance”; “Add an obligation in Intelligent Finance”; “Add a commitment in Intelligent Finance”; “New bill in Intelligent Finance”; “Record a bill in Intelligent Finance”.
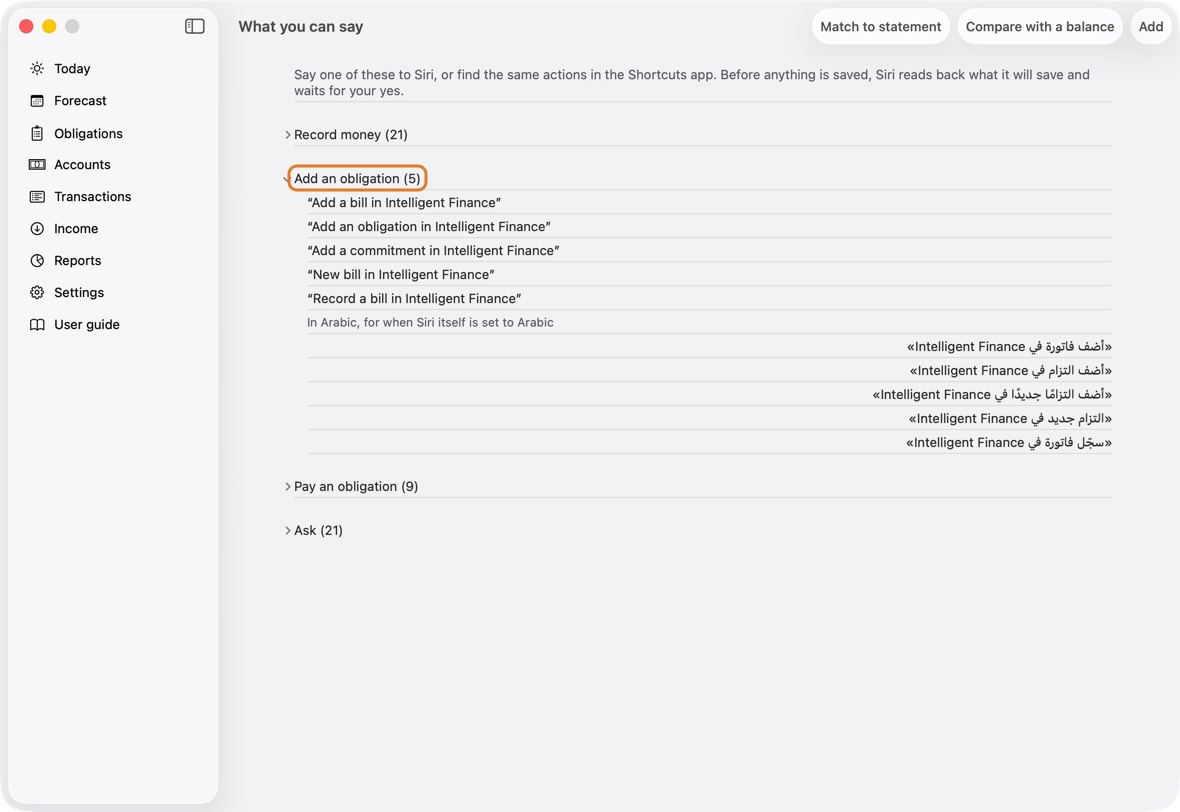
- Siri asks, in order: “Who is the obligation to?”, “How much is it?”, which currency, “When is it due?”, whether it repeats (once, monthly or yearly), and whether it is billed to a card (say the card's name, or none).
- Siri reads it back and asks to save it. Say yes, or cancel.
You should now see it in Obligations.
- Under the payee: the next date, how many payments, and the amount.
Pay an obligation
- Say any of these: “Pay an obligation in Intelligent Finance”; “Settle an obligation in Intelligent Finance”; “I paid an obligation in Intelligent Finance”; “Mark an obligation paid in Intelligent Finance”; “Mark paid in Intelligent Finance”; “Pay a bill in Intelligent Finance”; “Settle a bill in Intelligent Finance”; “Mark a bill paid in Intelligent Finance”; “I paid a bill in Intelligent Finance”.
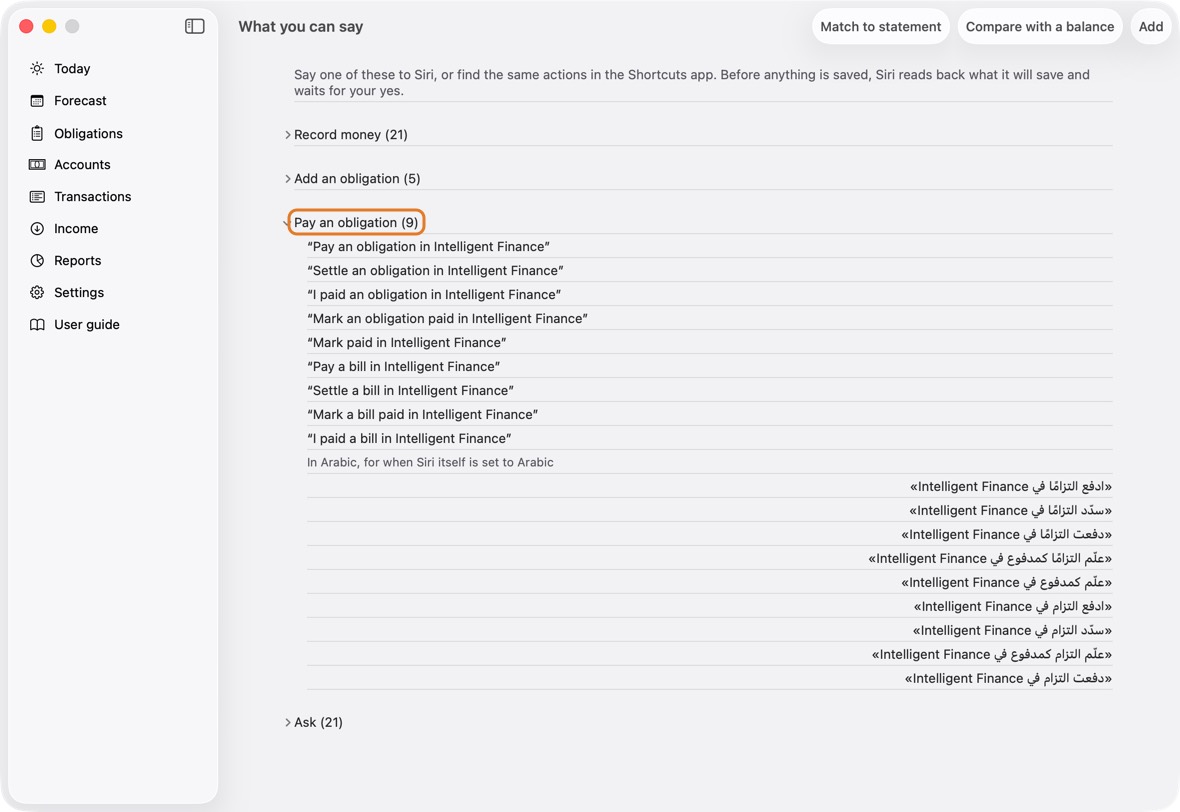
- Siri asks “Which obligation?” (this cycle's and anything overdue, nearest first), then how much (say “all” for the whole of it), then “What did you pay it from?”.
- Siri reads it back, says whether it settles it or what stays owed, and asks to save it. Say yes, or cancel.
You should now see it paid, or part paid with what is left.
- A paid payment shows Settled; a part paid one says what is left.
Ask what's due, whether you're covered, your cards and a balance
- What's due: “What's due in Intelligent Finance”; “What's due this cycle in Intelligent Finance”; “What do I owe this cycle in Intelligent Finance”; “What bills are due in Intelligent Finance”; “What obligations are due in Intelligent Finance”; “What do I have to pay in Intelligent Finance”; “What's coming up in Intelligent Finance”; “Due now in Intelligent Finance”; “What's due now in Intelligent Finance”.
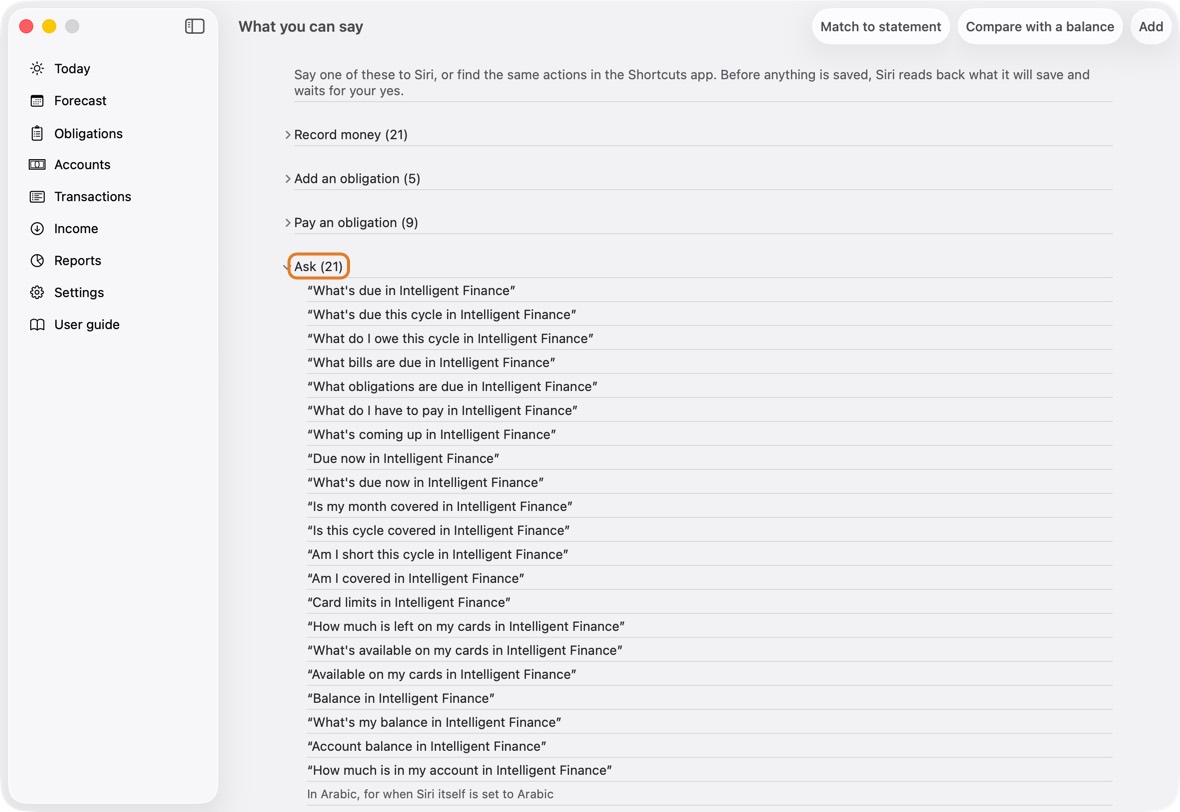
- Whether this cycle is covered: “Is my month covered in Intelligent Finance”; “Is this cycle covered in Intelligent Finance”; “Am I short this cycle in Intelligent Finance”; “Am I covered in Intelligent Finance”.
- What is left on your cards: “Card limits in Intelligent Finance”; “How much is left on my cards in Intelligent Finance”; “What's available on my cards in Intelligent Finance”; “Available on my cards in Intelligent Finance”.
- An account's balance (Siri asks which account): “Balance in Intelligent Finance”; “What's my balance in Intelligent Finance”; “Account balance in Intelligent Finance”; “How much is in my account in Intelligent Finance”.
- These only answer; nothing is saved.
You should now hear the answer; nothing is saved.
- The same phrases are listed in the app under Settings › What you can say.
Backup and safety
Export a backup
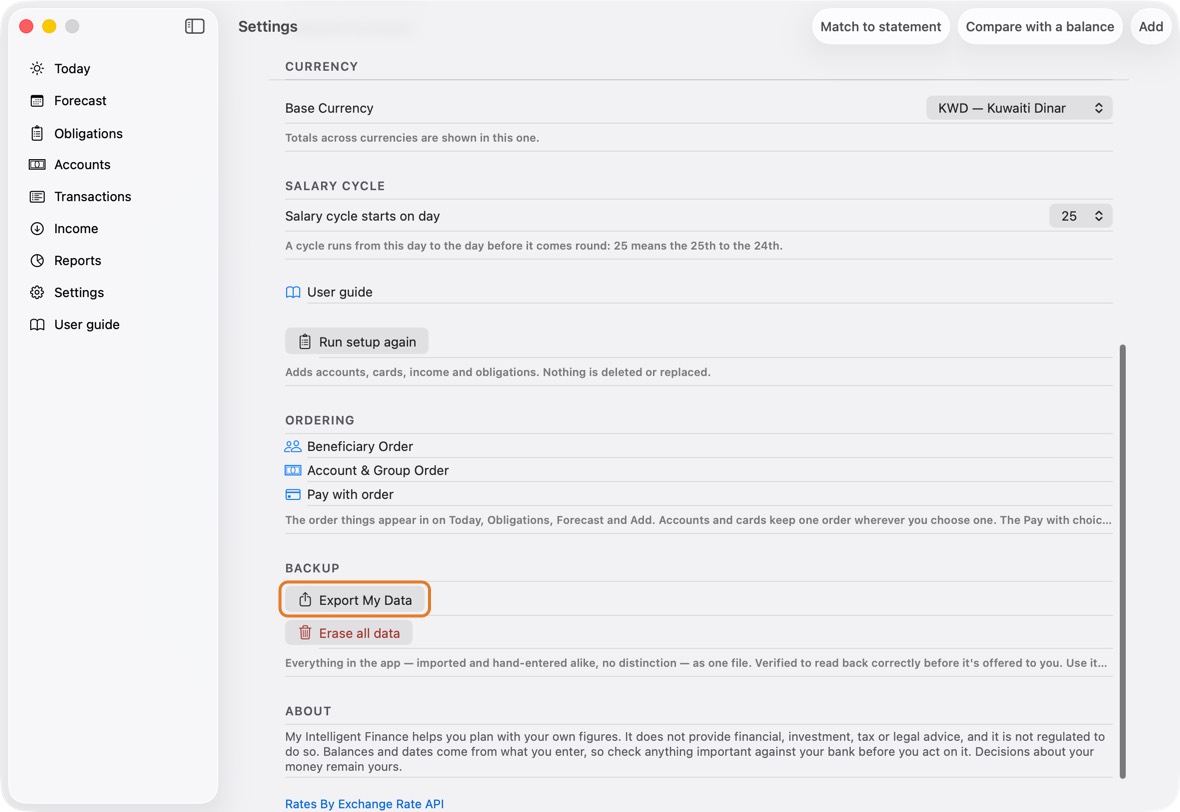
- Open Settings and click Export My Data.
- Click Share Export File and save it in a folder, in iCloud Drive or on the Mac, or send it somewhere safe.
You should now have one file with everything in the app, checked to read back correctly.
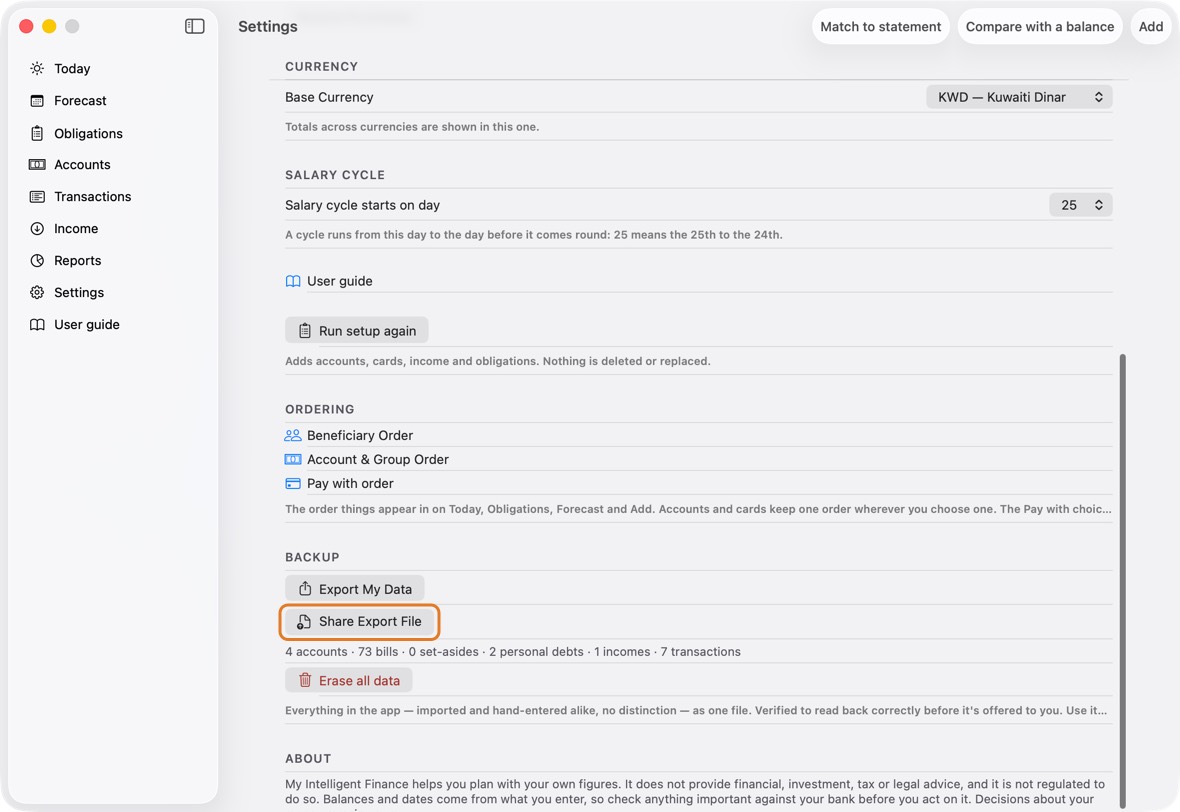
- Export My Data makes the file; Share Export File saves or sends it.
- On the Mac, ⌘E opens the same export; Save the backup… saves it.
Restore a backup
- Restore works only in an empty app: after Erase all data, or on a new iPhone.
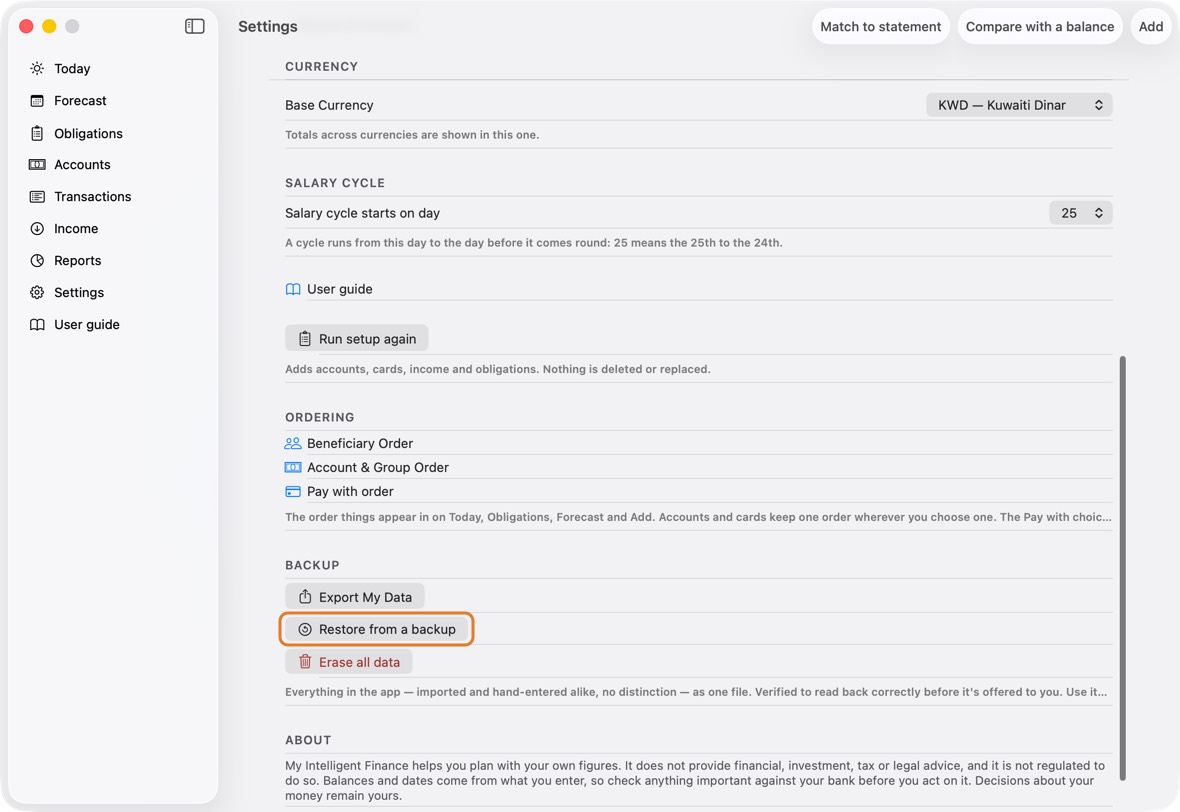
- Open Settings and click Restore from a backup.
- Choose the backup file. Check the counts it shows, then click Restore.
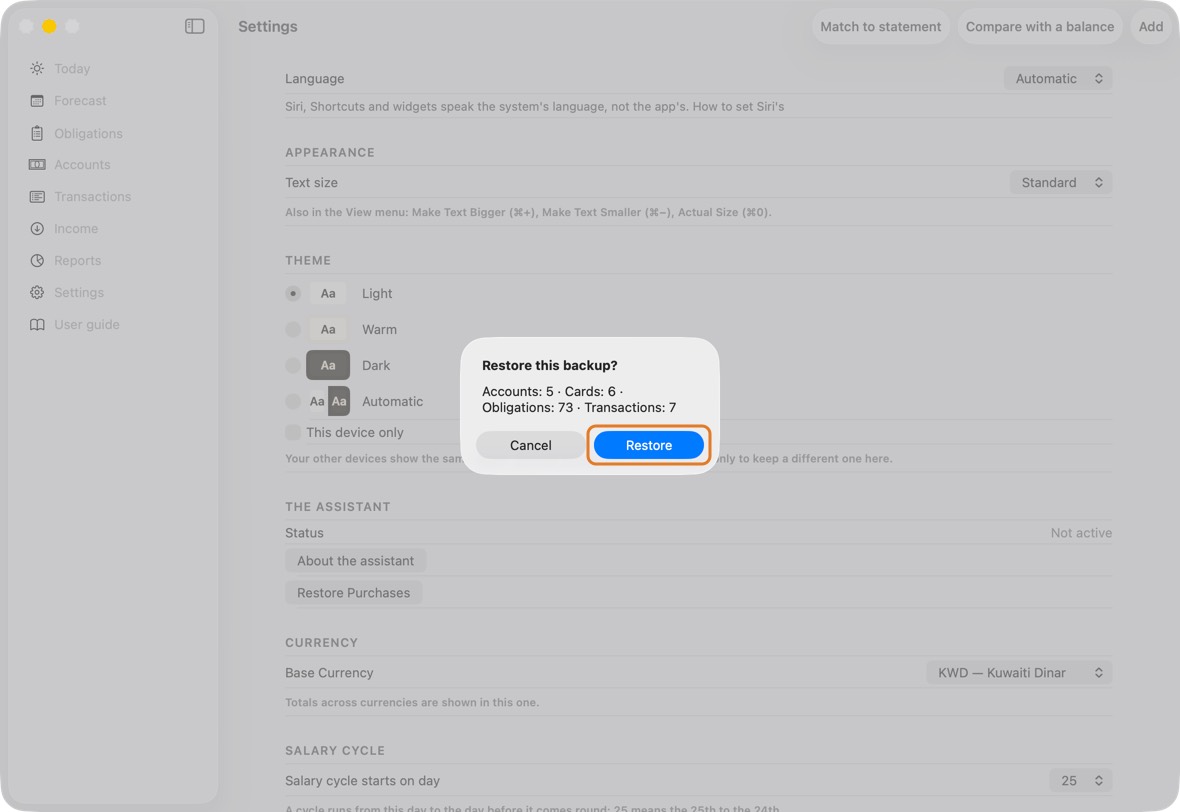
You should now see your accounts, obligations and transactions back, as they were.
- Restore from a backup, offered only while the app is empty.
A file from a newer version of the app is refused: update the app first.
Erase all data
- Open Settings and click Erase all data.
- Read what it reaches, at the top, before you type anything. On a device that syncs, everything goes from every device and from iCloud. On a device working on its own, only that device's data goes; iCloud is not touched.
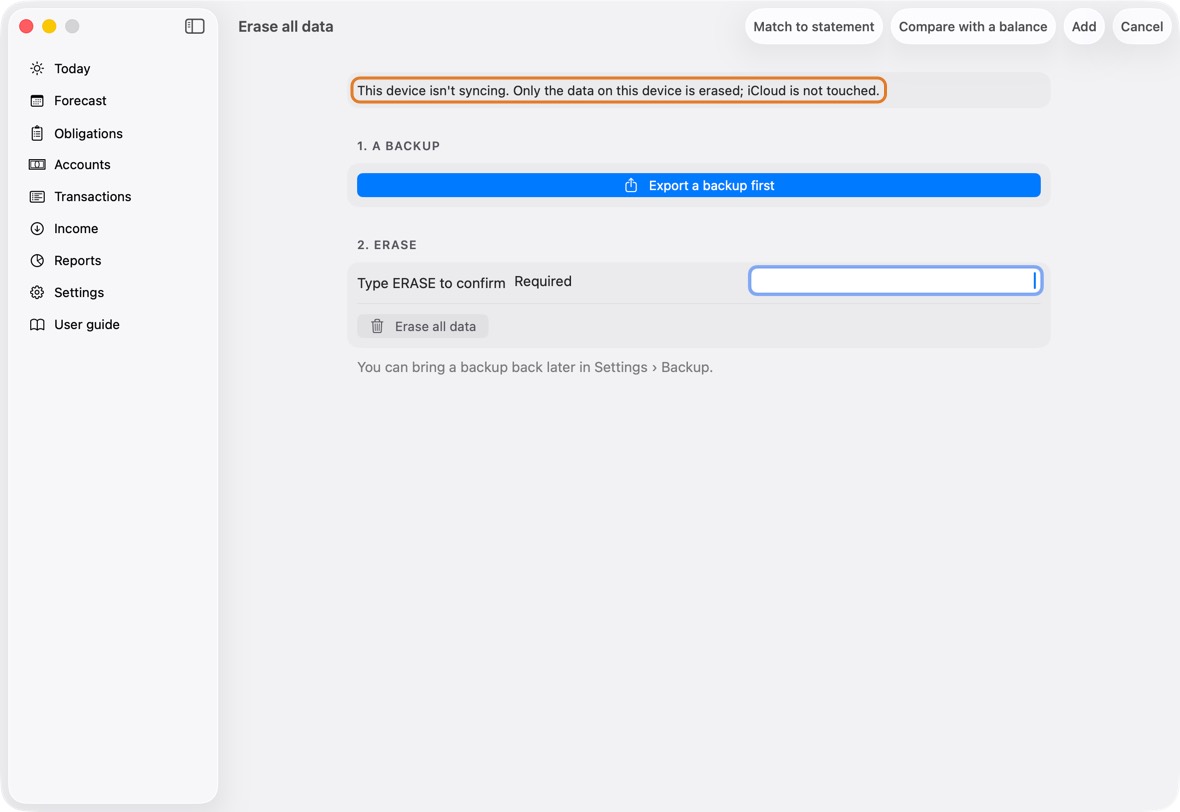
- Click Export a backup first, then Save the backup.
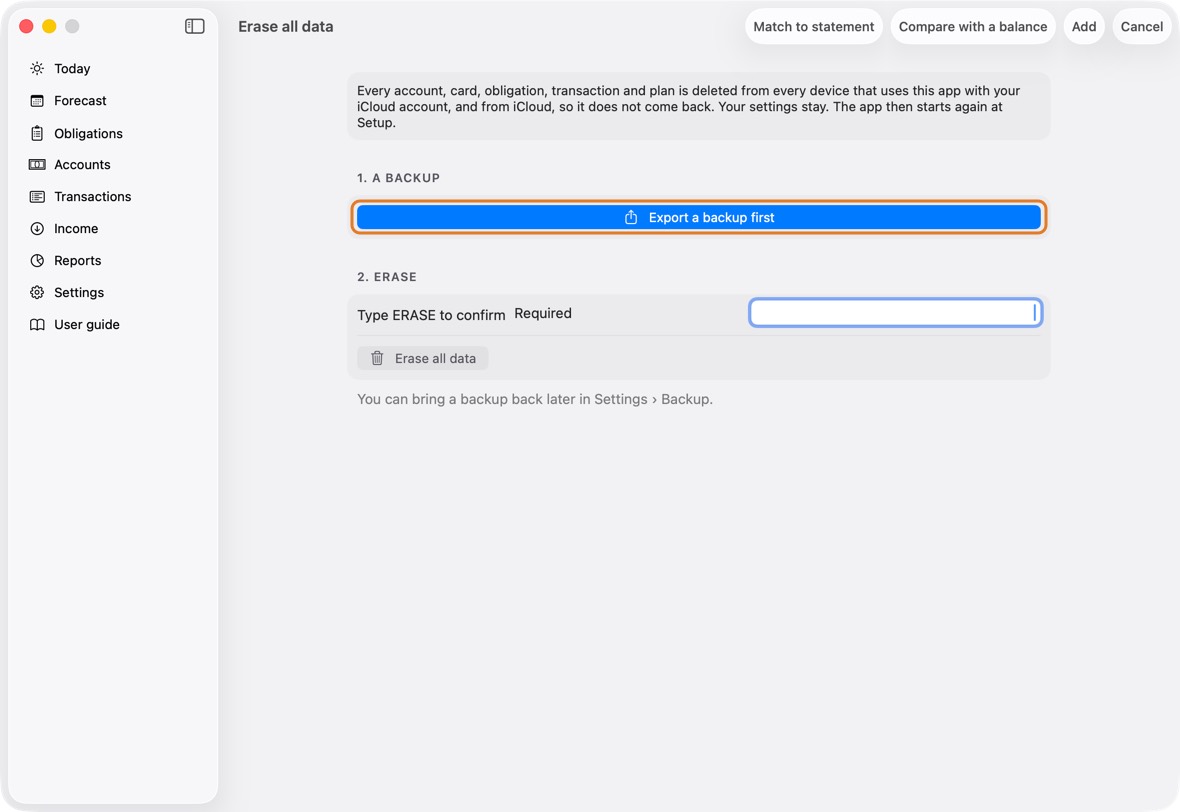
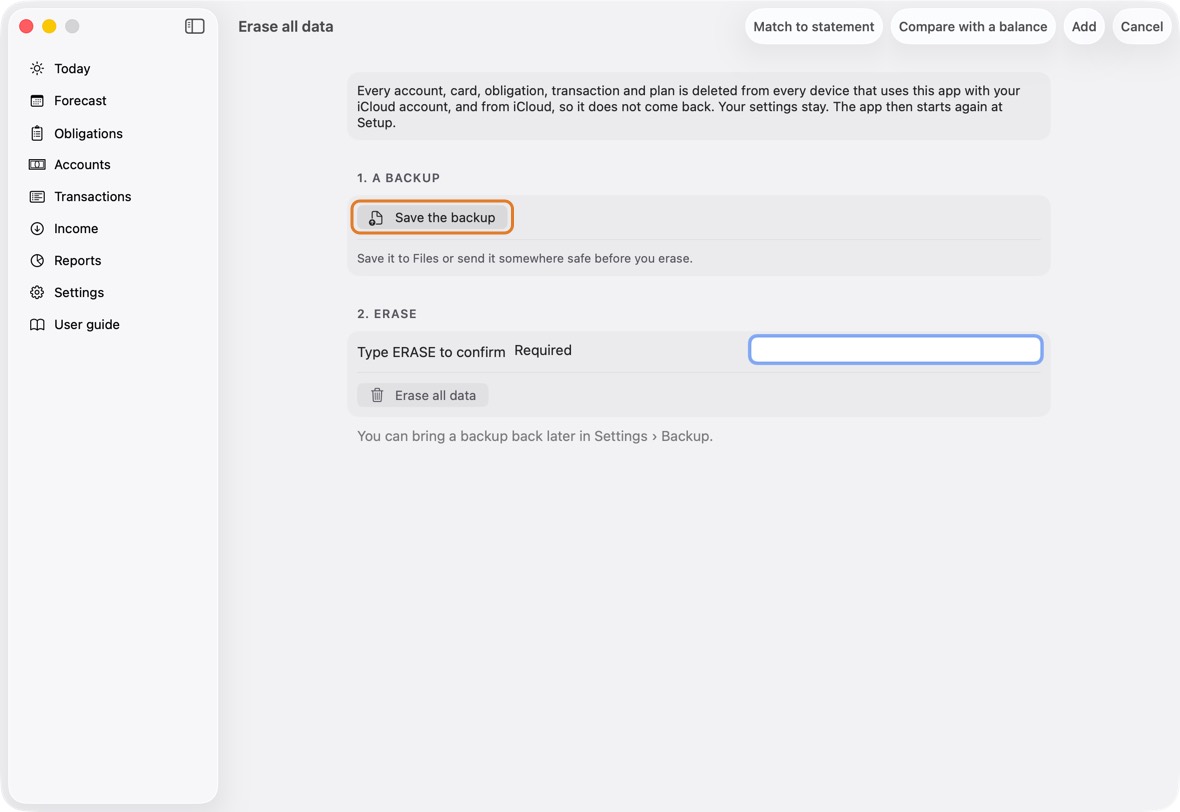
- Type the word it asks for, then click Erase all data.
Field Must fill? What it means Example Type … to confirm Yes The word it asks for, so nothing is erased by accident. ERASE
You should now see Setup, with nothing in the app: on every device and in iCloud if this device synced; on this device alone if it worked on its own.
- Set up, as on the first day: nothing is left in the app.
"This device isn't syncing": join iCloud
- The banner at the top of Today and Settings means another device's data is already in iCloud, and this device was set up on its own. Until you choose, it works normally, on its own; nothing is merged, sent or deleted.
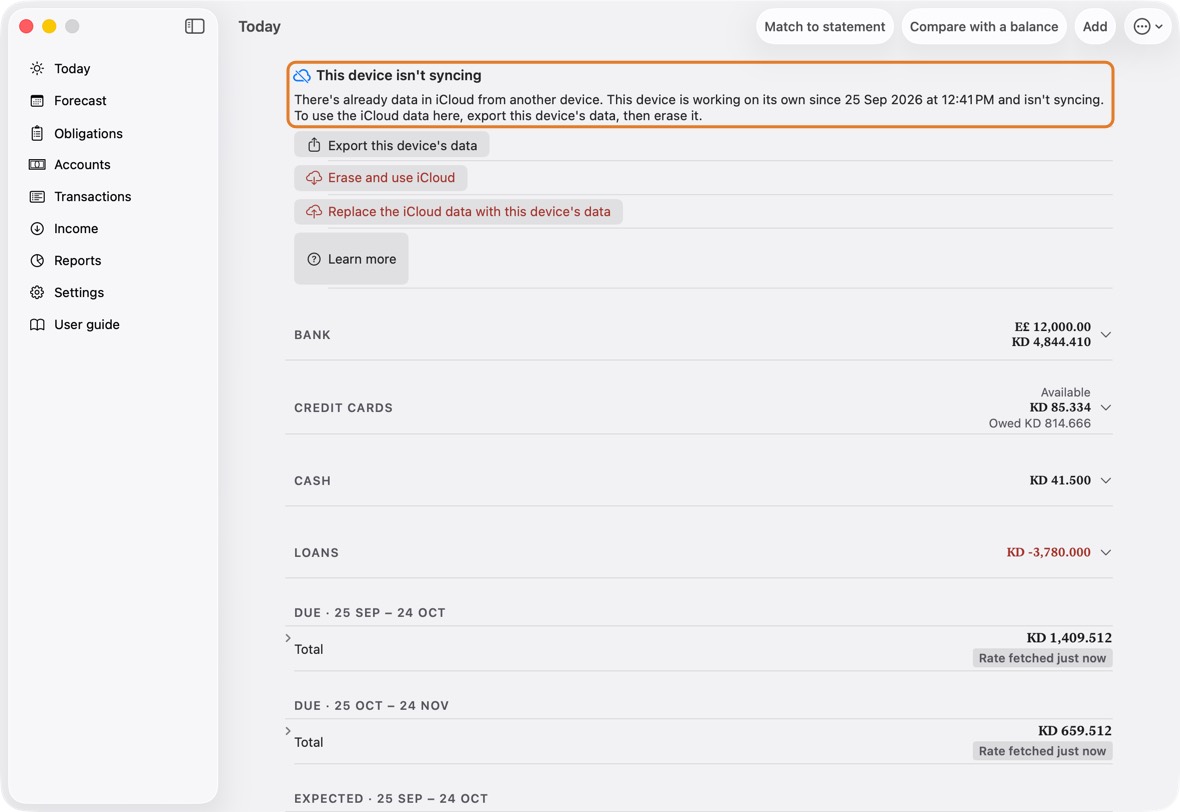
- Click Export this device's data, then Save the backup, so nothing it holds is lost.
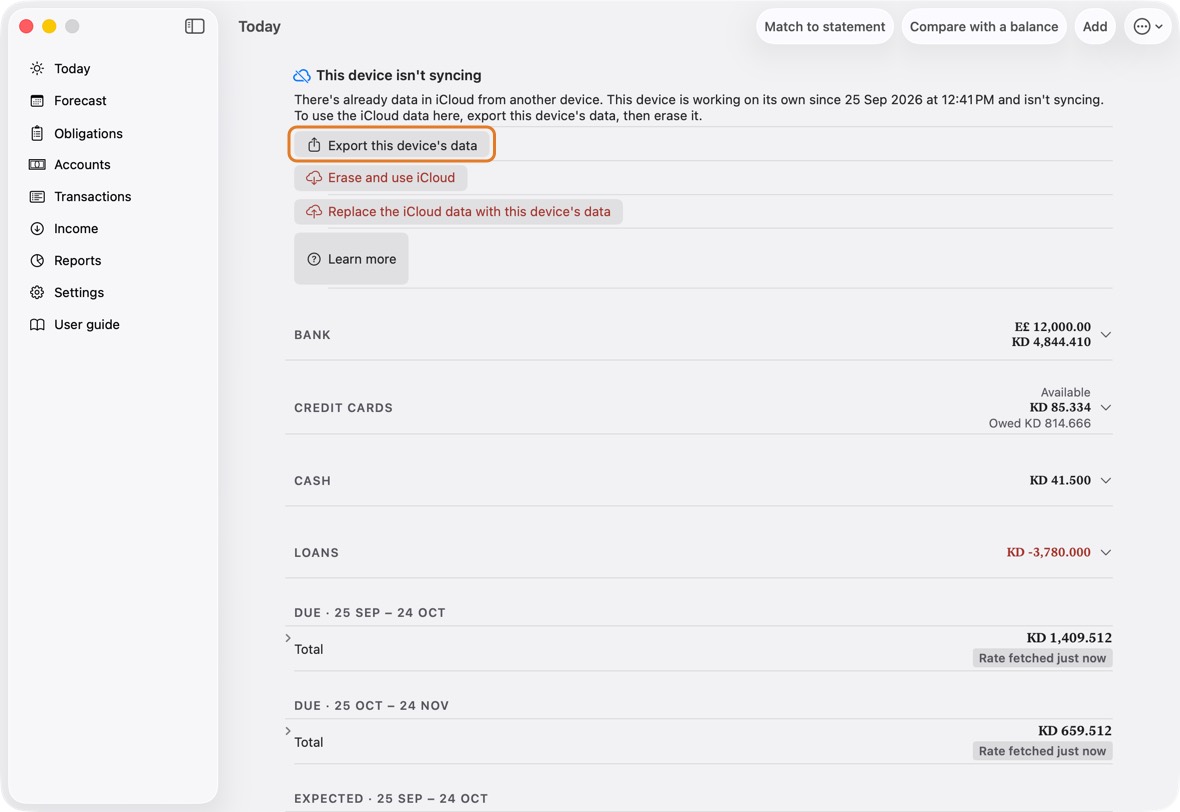
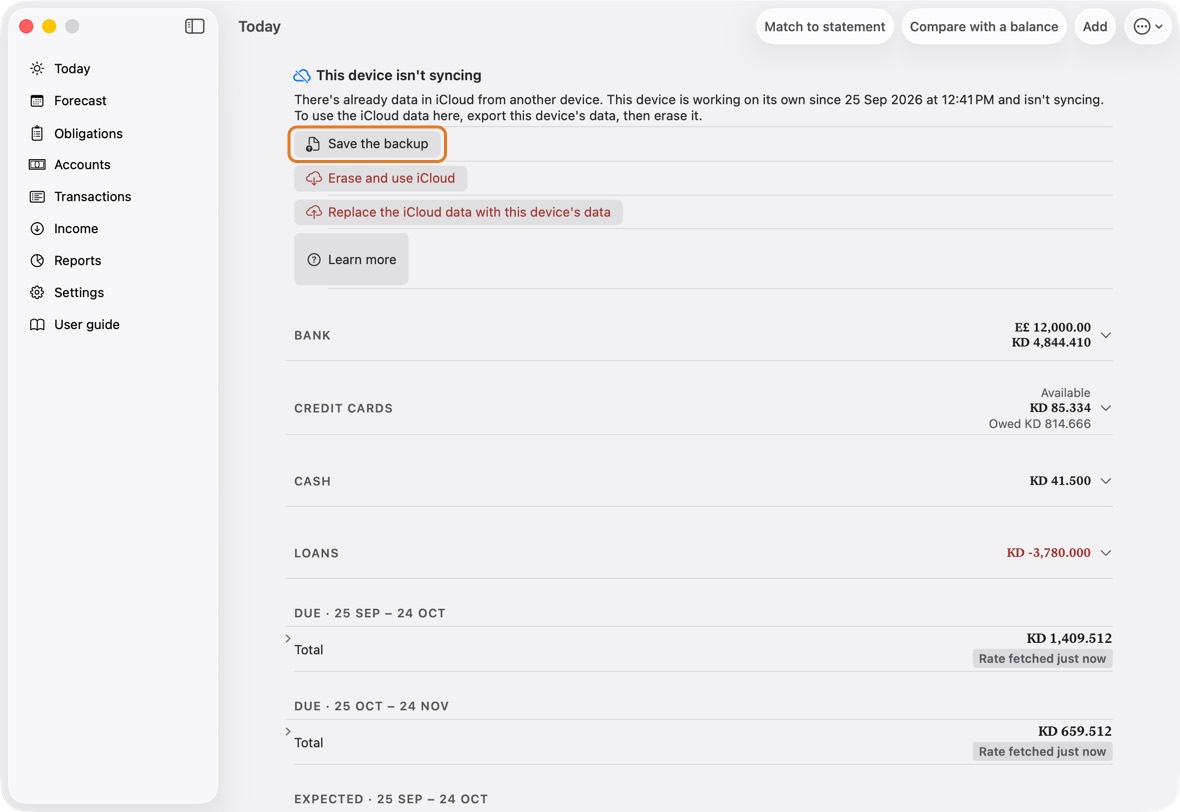
- Click Erase and use iCloud, type the word it asks for, then click Erase and use iCloud. Only this device's data is erased; iCloud is not touched.
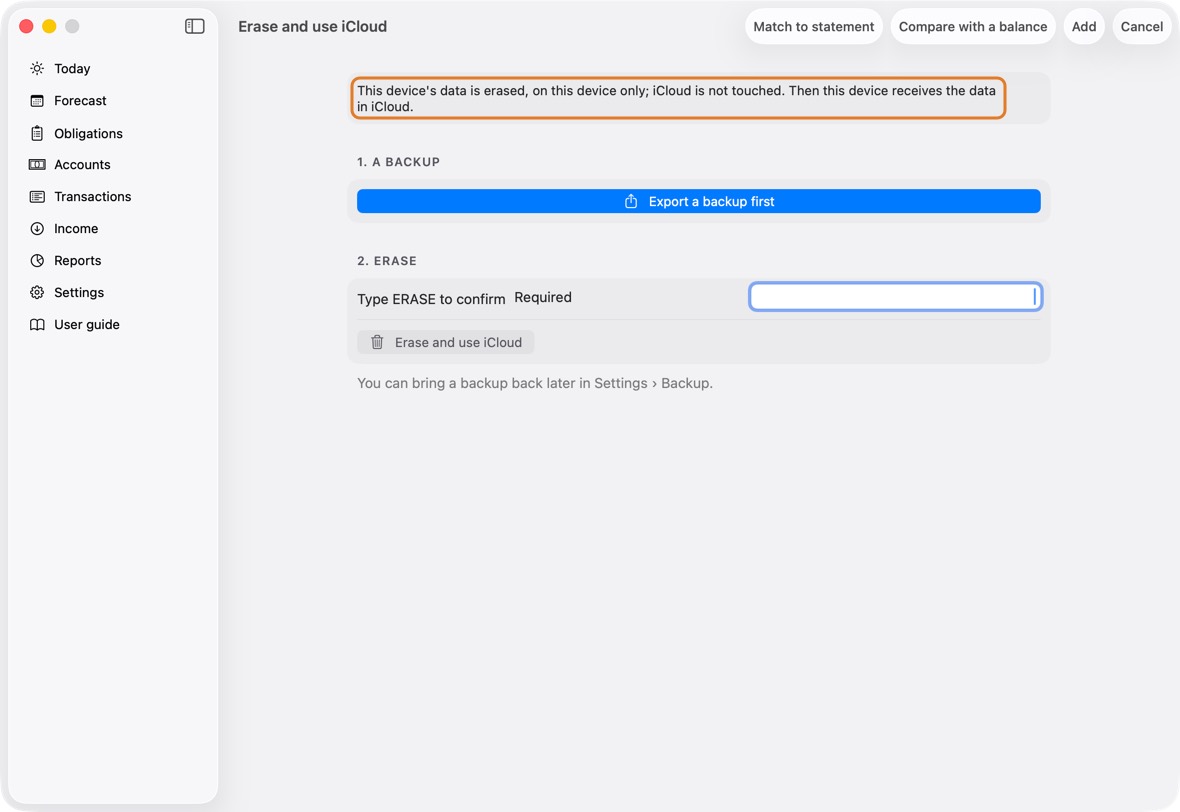
You should now see Your data is coming from iCloud, then Today with the data from your other device.
- The device receives only: it shows nothing else until iCloud's data has arrived.
Replace old iCloud data with this device's
- Use this on a device set up on its own when the data in iCloud is old (an earlier try, or test data) and this device's is the one to keep. On every other device that still holds data you want, export it there first.
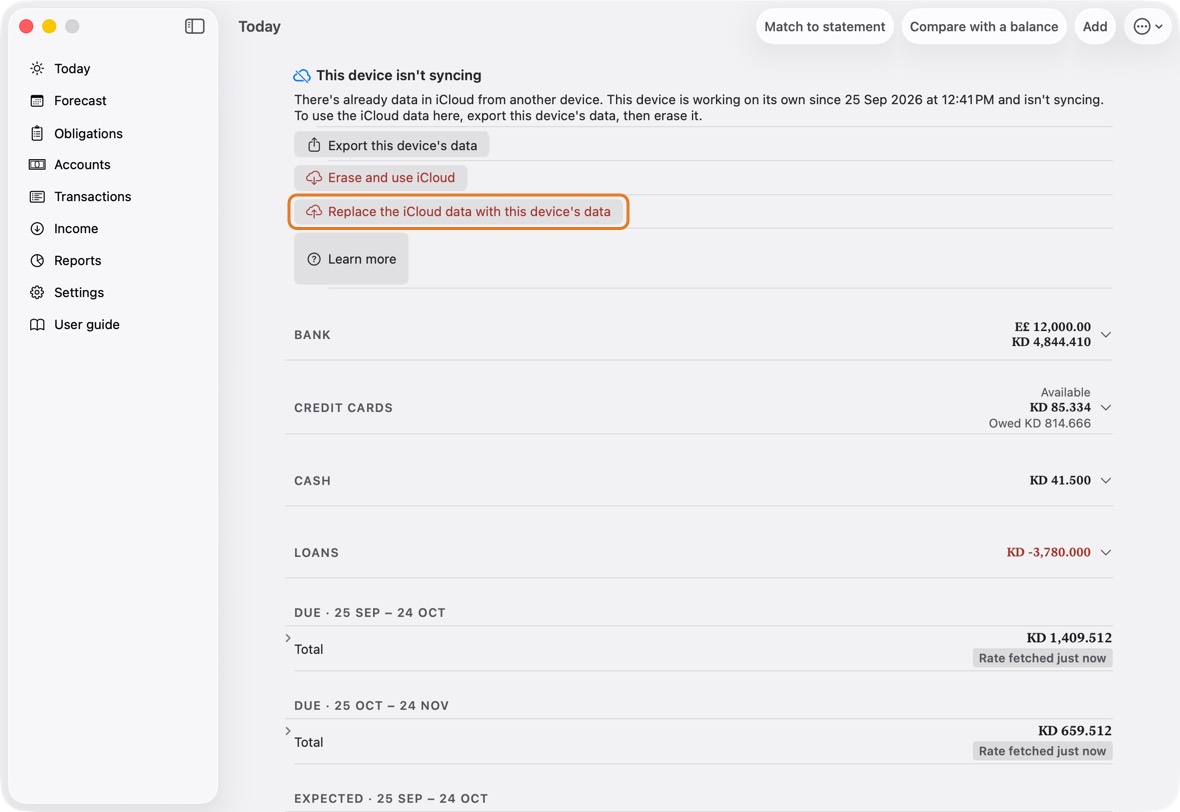
- Click Replace the iCloud data with this device's data, on the banner or in Settings, under iCloud.
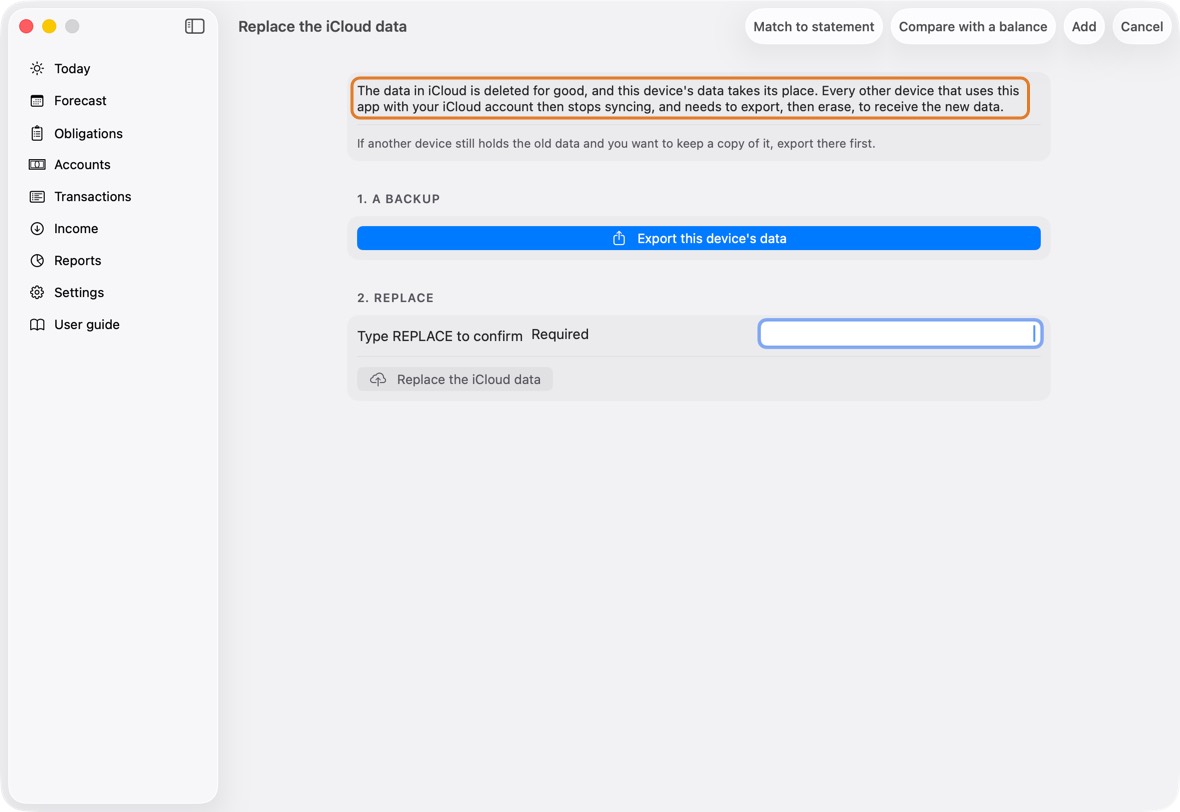
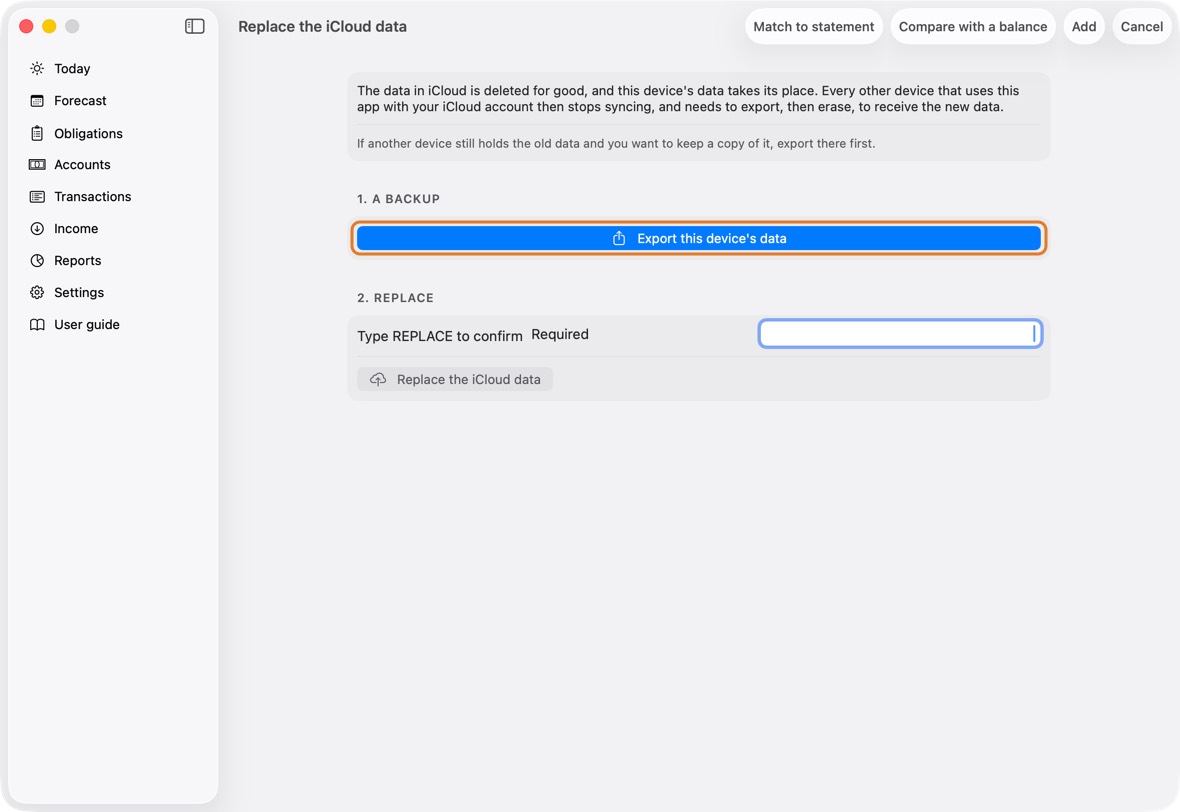
- Click Export this device's data, then Save the backup.
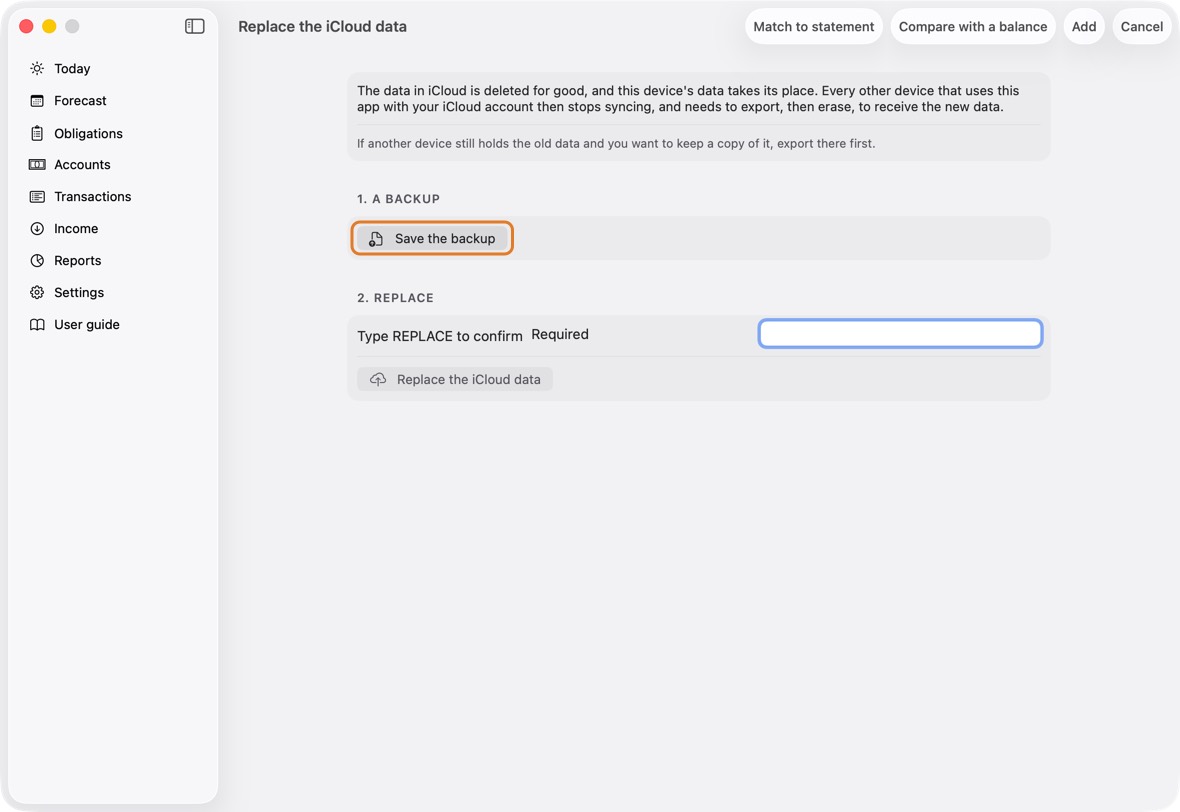
- Type the word it asks for, then click Replace the iCloud data. Without the internet, it says so and changes nothing.
Field Must fill? What it means Example Type … to confirm Yes The word it asks for, so nothing is replaced by accident. REPLACE
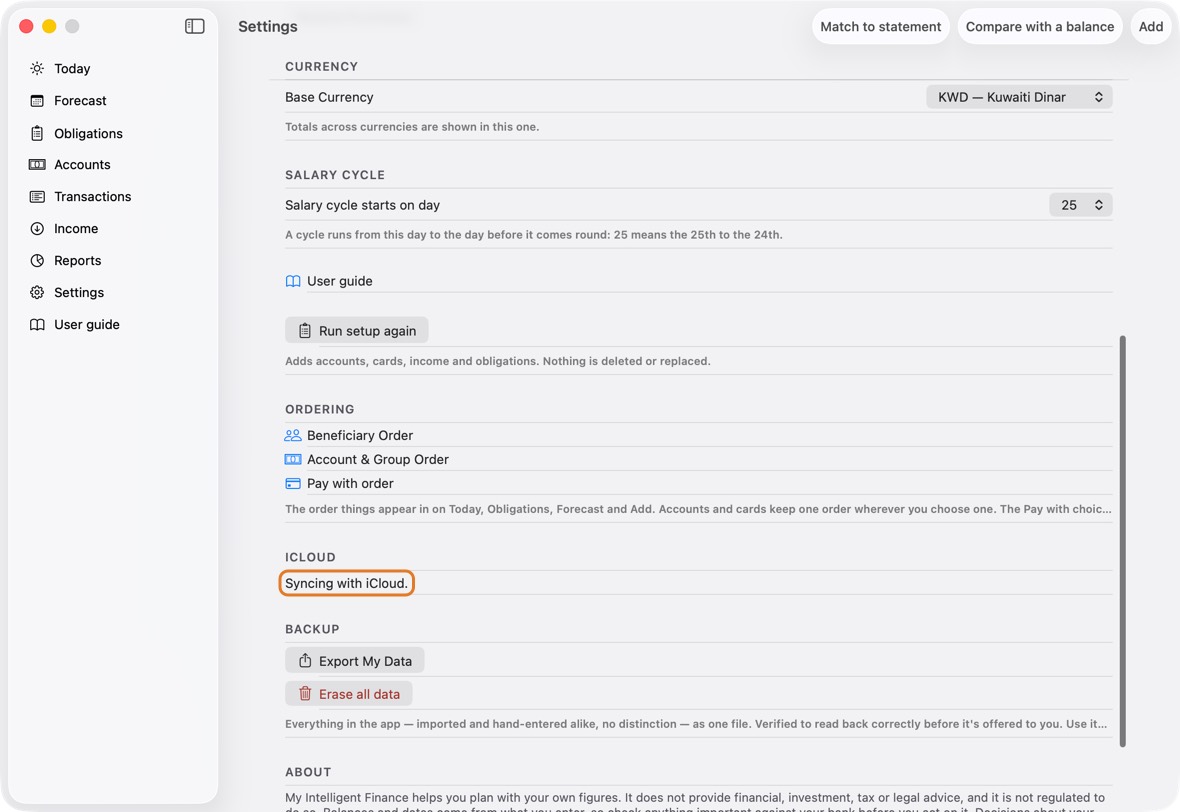
You should now see the banner gone, and Syncing with iCloud. under iCloud in Settings. Your other devices show The iCloud data was replaced; on each, export, then Erase and use iCloud.
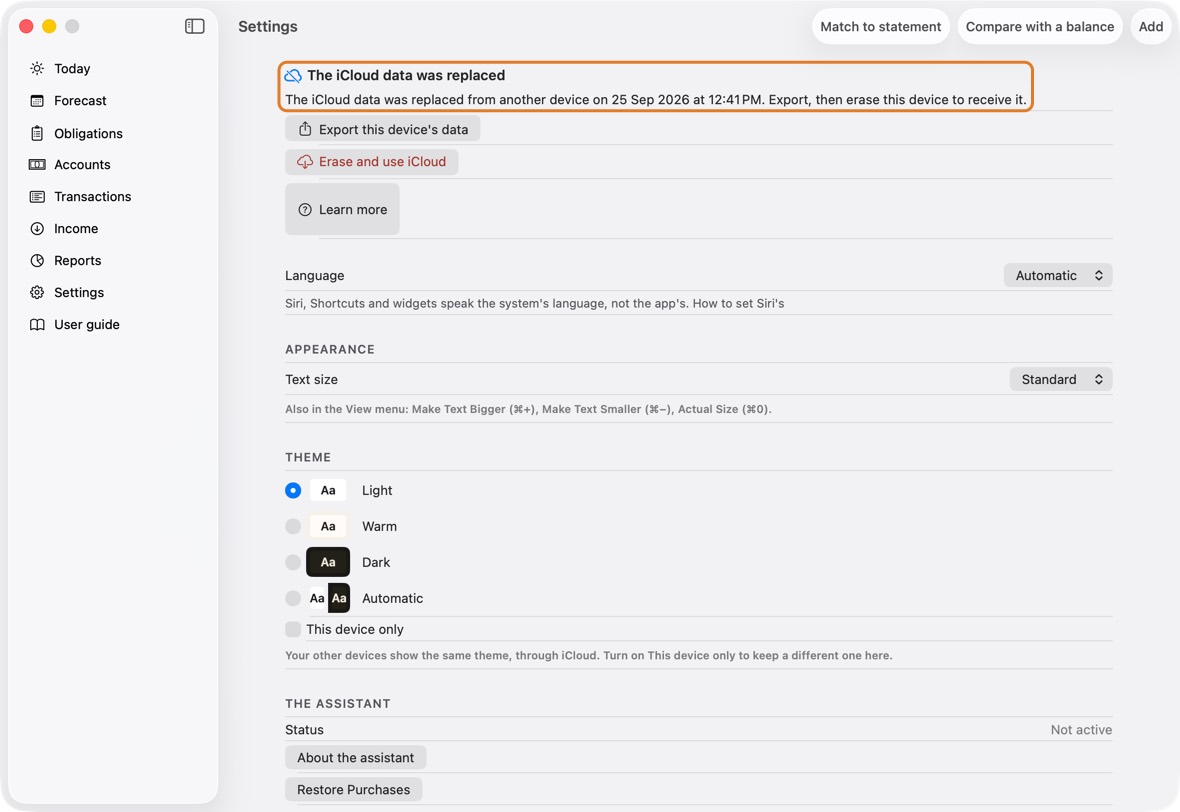
- On another device: the banner says when the iCloud data was replaced, and offers the backup and Erase and use iCloud. It does not offer Replace, so the old data can't go back over the new.
Questions
Why does a card show an estimate?
- A charge in another currency was saved with Estimate for me, so its figure uses today's rate, not your bank's.
- When the statement arrives, Match to statement replaces it with the bank's figure.
Why doesn't my balance match the bank?
- Payments you made after the statement's last day are not in it yet. Match to statement lists them under After the statement and doesn't count them.
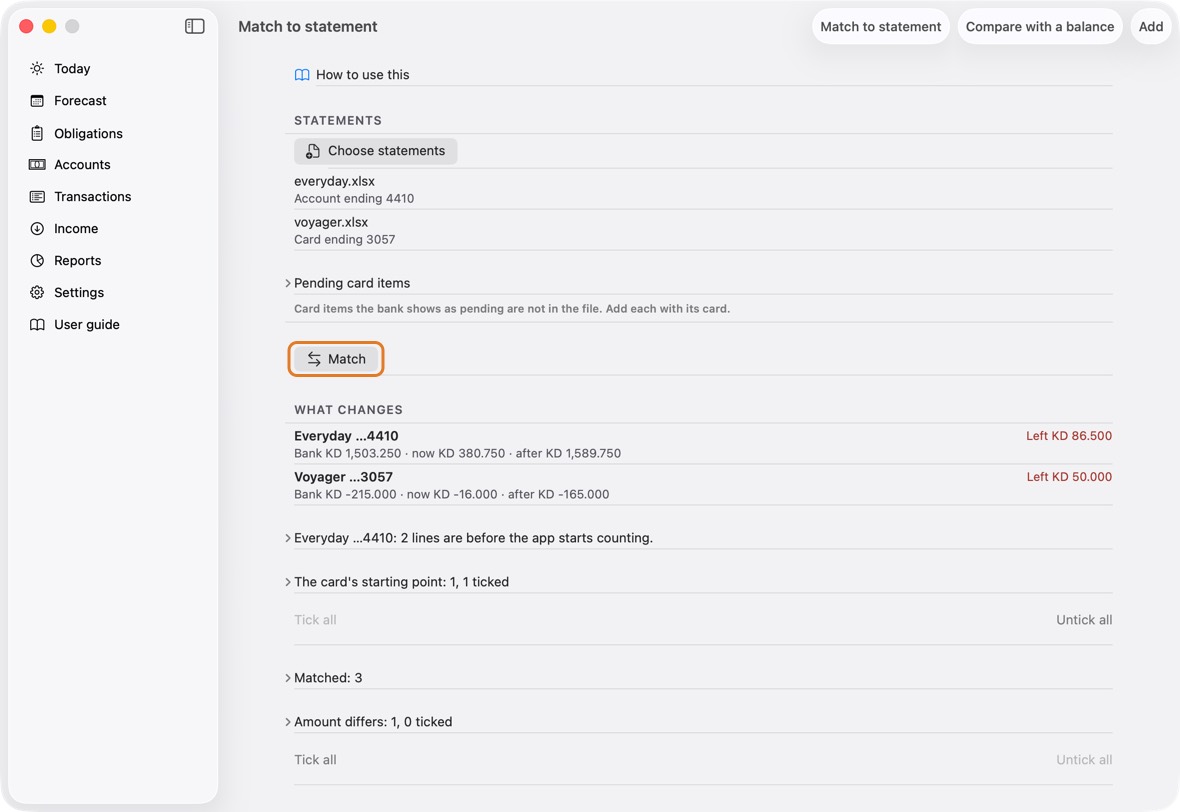
- A card's pending items are not in the file. Add them under Pending card items.
- Anything else: Match to statement shows each line that differs, and what to do.
Which iPhones run the full advisor?
- The advisor's explanation is written by Apple Intelligence on the Mac: an iPhone 15 Pro or newer, with Apple Intelligence turned on.
- On other iPhones the advisor shows the calculation on its own, which is complete, and says why.
Troubleshooting
"Looking for your data in iCloud…" doesn't finish
What you see
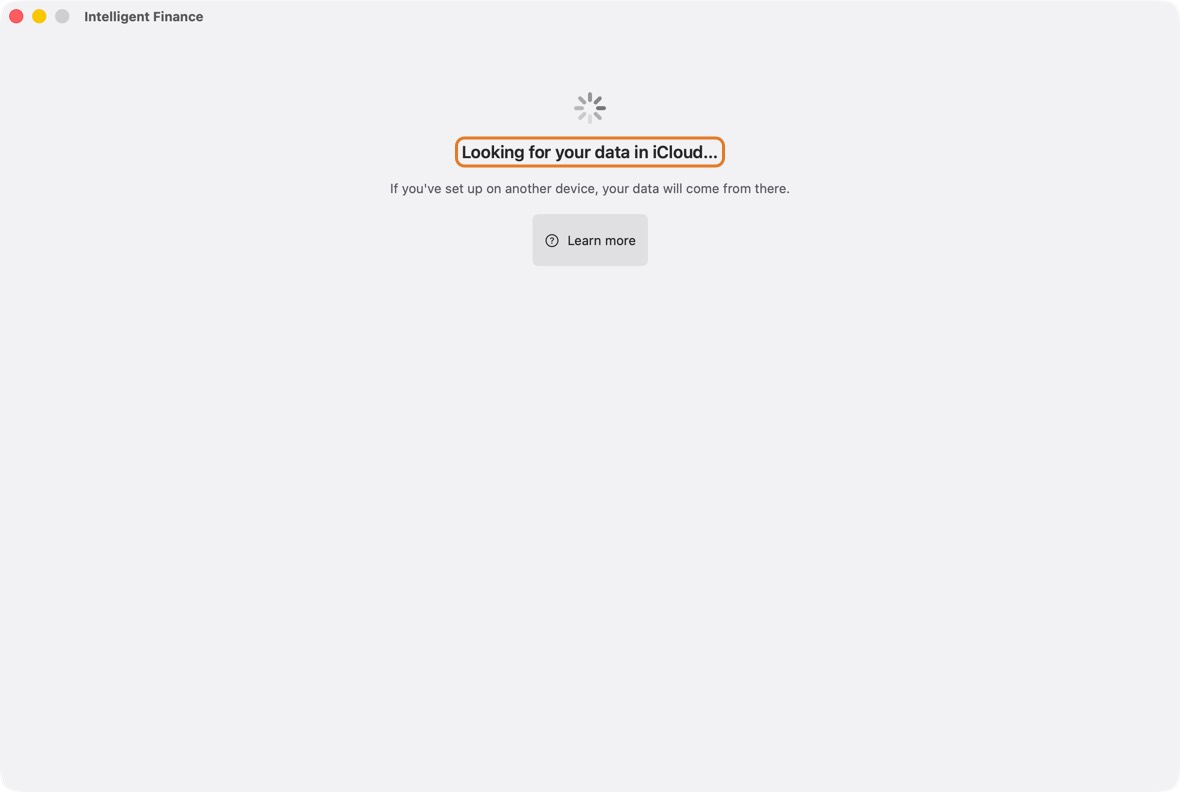
Looking for your data in iCloud…, or Your data is coming from iCloud, stays on screen for minutes.
Why it happens
A new device asks iCloud before Setup, and a device receiving waits until iCloud's data has arrived. A slow or blocked network (some office Wi-Fi) holds both.
What to do
- Check the internet: open a web page, or turn Wi-Fi off and on in System Settings › Wi-Fi.
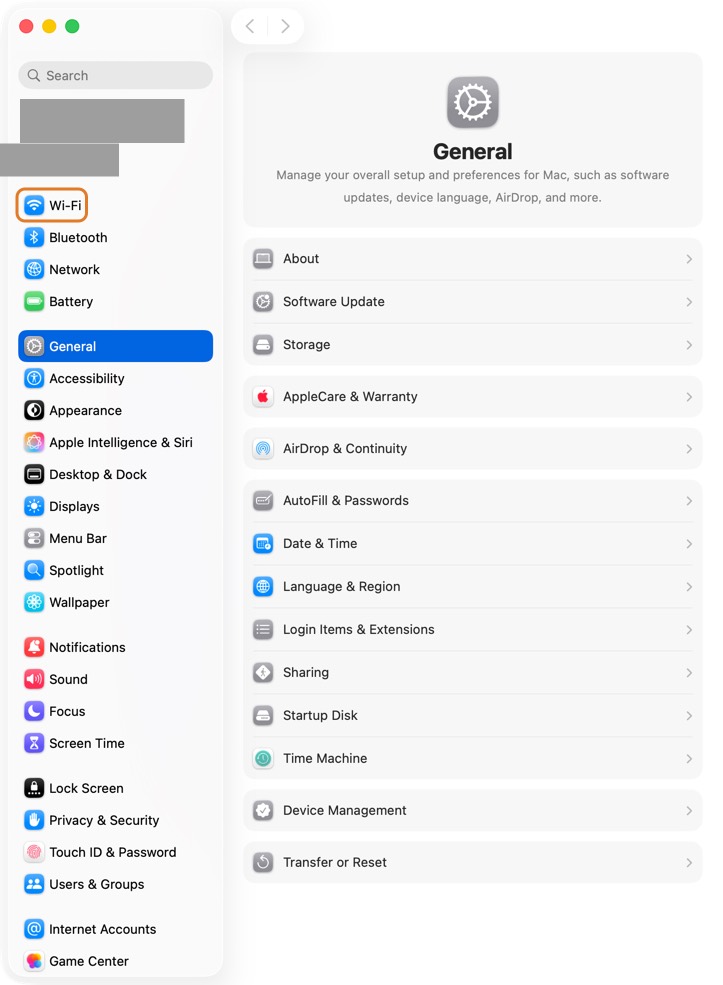
- Check you are signed in to iCloud at the top of System Settings.
- Keep the app open and the device online. The first time, a large household can take several minutes to arrive.
How you know it's fixed
You should now see Setup (nothing was in iCloud), or Today with your data from your other device.
- Today with your accounts and what is due: the data arrived.
"iCloud can't be reached" before Setup
What you see
iCloud can't be reached, or This device isn't signed in to iCloud, with Try again and Set up on this device anyway.
Why it happens
A new device checks iCloud for data you set up on another device, so it doesn't make a second copy. It couldn't ask.
What to do
- Connect to the internet, or sign in to iCloud at the top of System Settings.
- Back in the app, click Try again.
- Only if this is your only device, click Set up on this device anyway: it then works on its own (see the next entry).
How you know it's fixed
You should now see Setup, or Your data is coming from iCloud.
- Coming from iCloud: another device's data is on its way; nothing to set up here.
Set up while offline: what the mark means
What you see
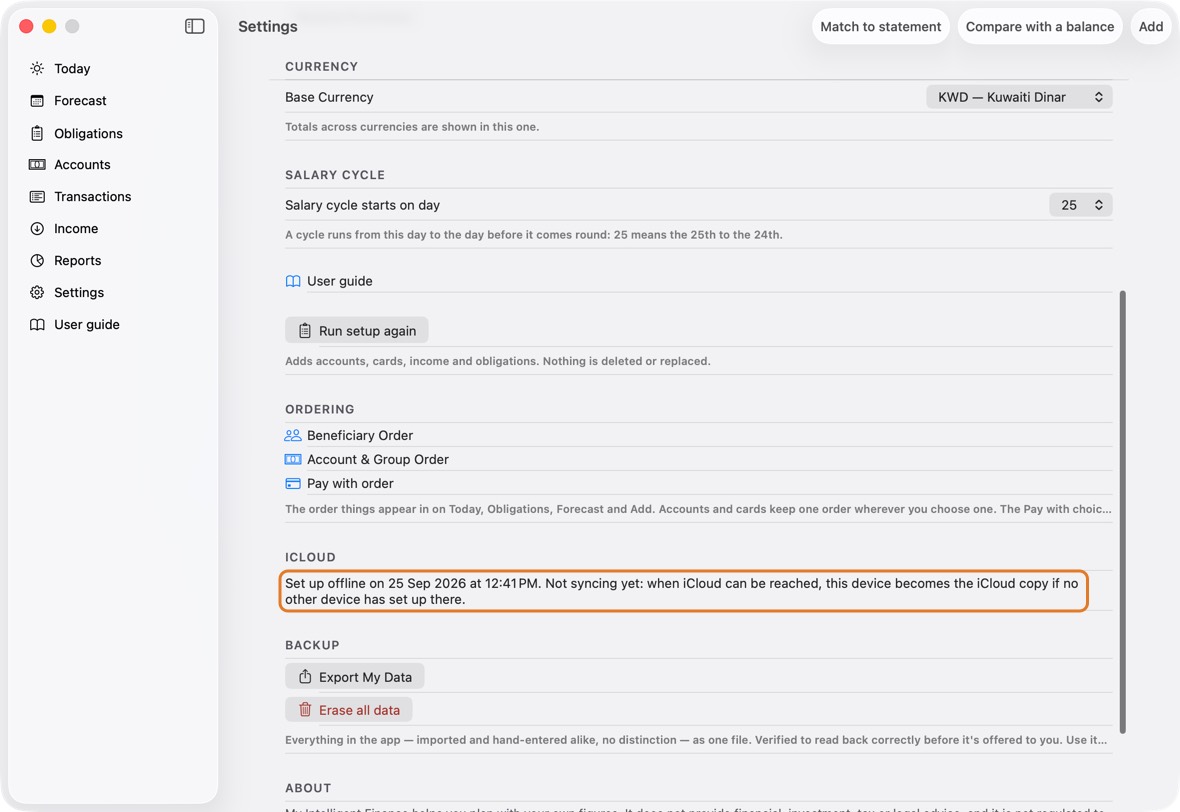
In Settings, under iCloud: Set up offline on a date and time. Not syncing yet.
Why it happens
You chose Set up on this device anyway. Until iCloud is reached, nothing is sent; the device keeps its data on its own.
What to do
- Connect to the internet and open the app. It asks iCloud each time it comes forward.
- If no other device has set up in iCloud, this device becomes the iCloud copy by itself: its data goes up and the mark clears.
- If another device has, a banner says so. Follow "There's already data in iCloud" below.
How you know it's fixed
You should now see Syncing with iCloud. under iCloud in Settings, or the banner on Today.
- The banner appears only when another device's data is already in iCloud.
"There's already data in iCloud from another device"
What you see
A banner on Today and Settings: This device isn't syncing.
Why it happens
This device was set up on its own, and another device's data is in iCloud. The app never merges two copies, so this one stays apart until you choose.
What to do
- Click Export this device's data, then Save the backup, so nothing on it is lost.
- If iCloud's data is the one to keep: click Erase and use iCloud, type the word, and confirm. Only this device is erased; iCloud is not touched.
- If this device's data is the one to keep instead, see Start again and replace old iCloud data below.
How you know it's fixed
You should now see Your data is coming from iCloud, then Today with the data from your other device.
- The device receives only, and shows nothing else until iCloud's data has arrived.
Start again and replace old iCloud data
What you see
Old data in iCloud (an earlier try, or test data), and you want a new setup instead. Which route: if your device syncs with the old data, route 1; if you set up a device on its own and the old data is in iCloud, route 2.
Why it happens
iCloud keeps one copy of your data for all your devices. Replacing it takes one of two routes, so the old data can never come back over the new.
What to do
- Route 1, a device that syncs with the old data: export a backup in Settings, under Backup.
- Then click Erase all data. It says it deletes from every device and from iCloud; type the word and confirm. Set up again; your other devices receive the new setup.
- Route 2, a device set up on its own: export there if you want, then click Replace the iCloud data with this device's data and type the word.
- On each other device, the banner says the iCloud data was replaced: export there, then click Erase and use iCloud.
How you know it's fixed
You should now see the new setup on every device, and Syncing with iCloud. under iCloud in Settings.
- Today shows the new setup's accounts on each device.
"The iCloud data was replaced from another device"
What you see
A banner: The iCloud data was replaced, with the date and time.
Why it happens
Another device replaced the iCloud data with its own. This device stopped syncing so that its old data can't go back over the new.
What to do
- Click Export this device's data, then Save the backup, if you want to keep what is on it.
- Click Erase and use iCloud, type the word, and confirm.
How you know it's fixed
You should now see Your data is coming from iCloud, then Today with the new data.
- Nothing of the old data is sent anywhere; it stays only in the backup you saved.
A new device shows nothing yet
What you see
The app on a new iPhone, iPad or Mac shows no accounts.
Why it happens
Its data comes from iCloud after it starts; the first time takes a minute or more, and only while the device is online and signed in to the same Apple Account.
What to do
- Check it is signed in with the same Apple Account as your other device, at the top of System Settings.
- Keep the app open and online until Your data is coming from iCloud gives way to Today.
- Don't run Setup on it while you wait: a second setup would stand apart from your data.
How you know it's fixed
You should now see your accounts and what is due, as on your other device.
- Today, the same as on the other device.
Two devices show different balances
What you see
An account shows one balance on the Mac and another on the iPad or Mac.
Why it happens
One device hasn't received the other's latest changes yet: it was offline, or the app wasn't opened since.
What to do
- Open the app on both devices, online, and leave them a minute.
- If one shows a sync banner, click it and follow what it says.
- Still different after that? Export a backup on each (Settings, Backup) and send both to support.
How you know it's fixed
You should now see the same balance on both, to the fils.
- The figures on Today match on both devices.
Sync is off: signed out, iCloud Drive off, or iCloud full
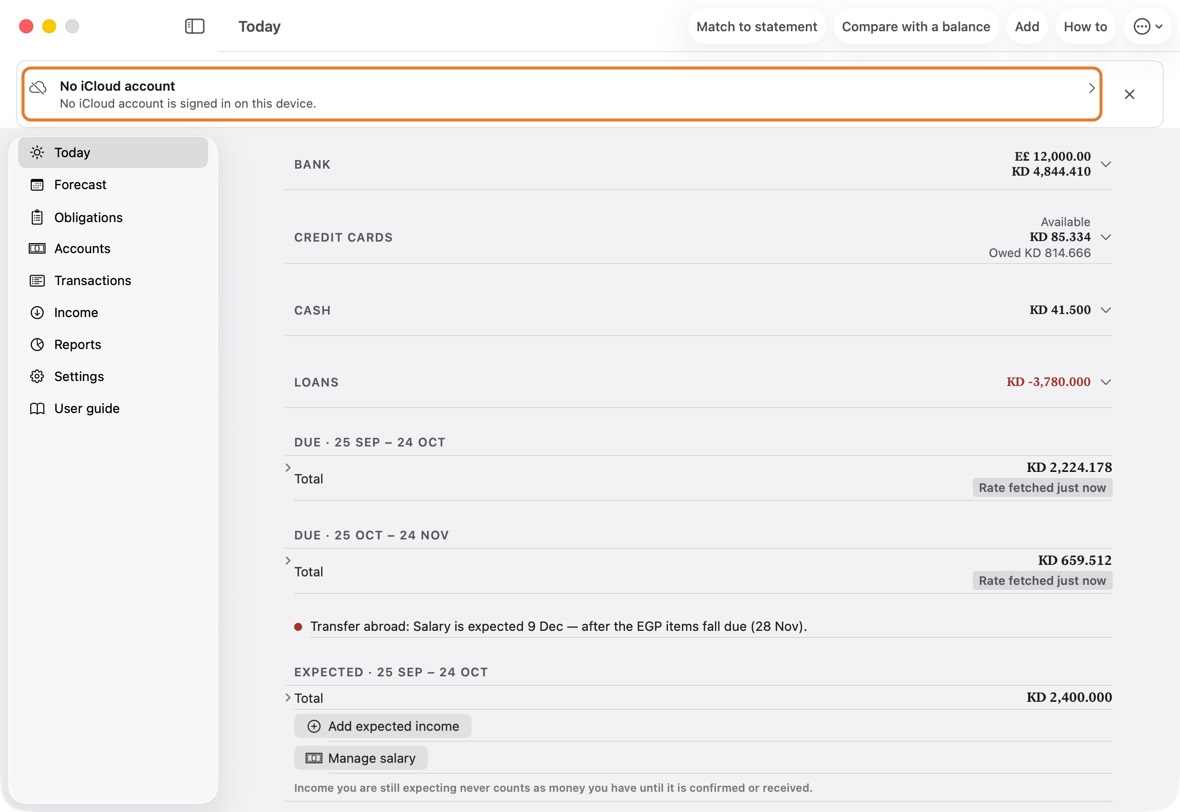
What you see
A banner at the top: No iCloud account, Sync couldn't start, Sync paused after a rough start or Sync can't reach iCloud.
Why it happens
Sync needs an Apple Account signed in, iCloud on for the app, room in iCloud and a network that reaches Apple. Until then, this device keeps its own copy; nothing is lost.
What to do
- Click the banner to see what happened and what to do.
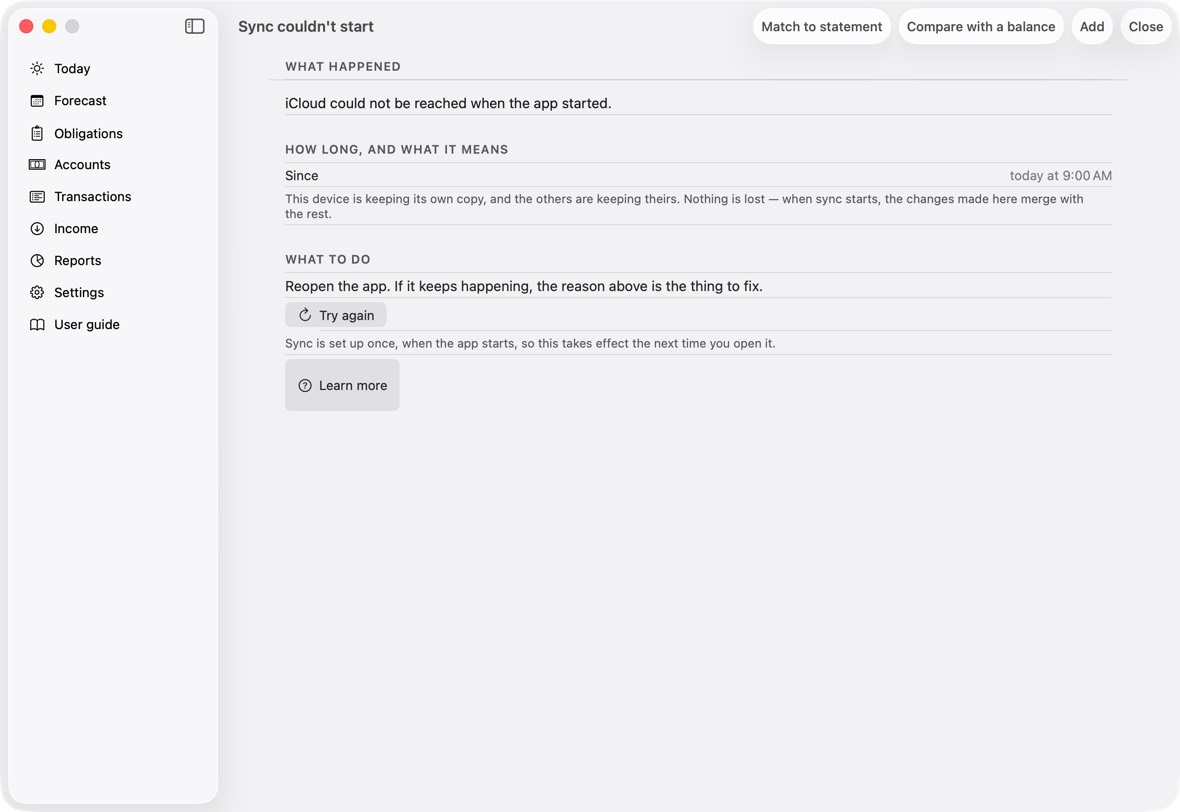
- Signed out: sign in at the top of System Settings. iCloud full: free space or add storage there, under iCloud.
- Then close the app and open it again: sync is set up when the app starts.
How you know it's fixed
You should now see no banner at the top of the app.
- No banner: sync is running.
"Your data could not be opened"
What you see
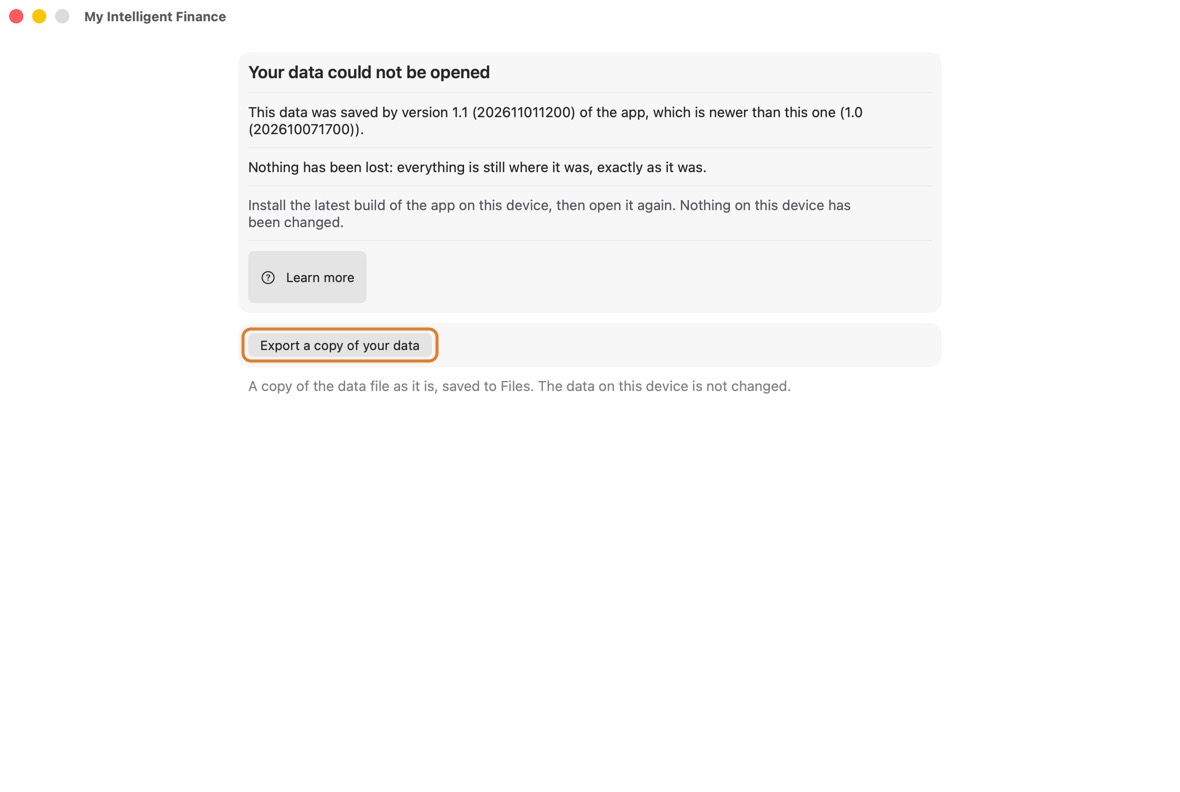
The app opens on Your data could not be opened, with the reason under it and Export a copy of your data.
Why it happens
The screen says which: the data was saved by a newer version of the app (it names that version and this one); or the file holds records this version doesn't know, which can mean it belongs to another app; or the file can't be read. Nothing has been lost; the file is left exactly as it was.
What to do
- Newer version: install that version or a later one — from the App Store, or for a test build the latest build — and open the app again.
- Another app's file, or one that can't be read: if you have more than one copy of the app on this Mac, open the one in Applications. Otherwise click Export a copy of your data, save it in a folder, and write to support with it.
How you know it's fixed
You should now see Today, with your data as it was.
- Your accounts, as before.
Restore was refused
What you see
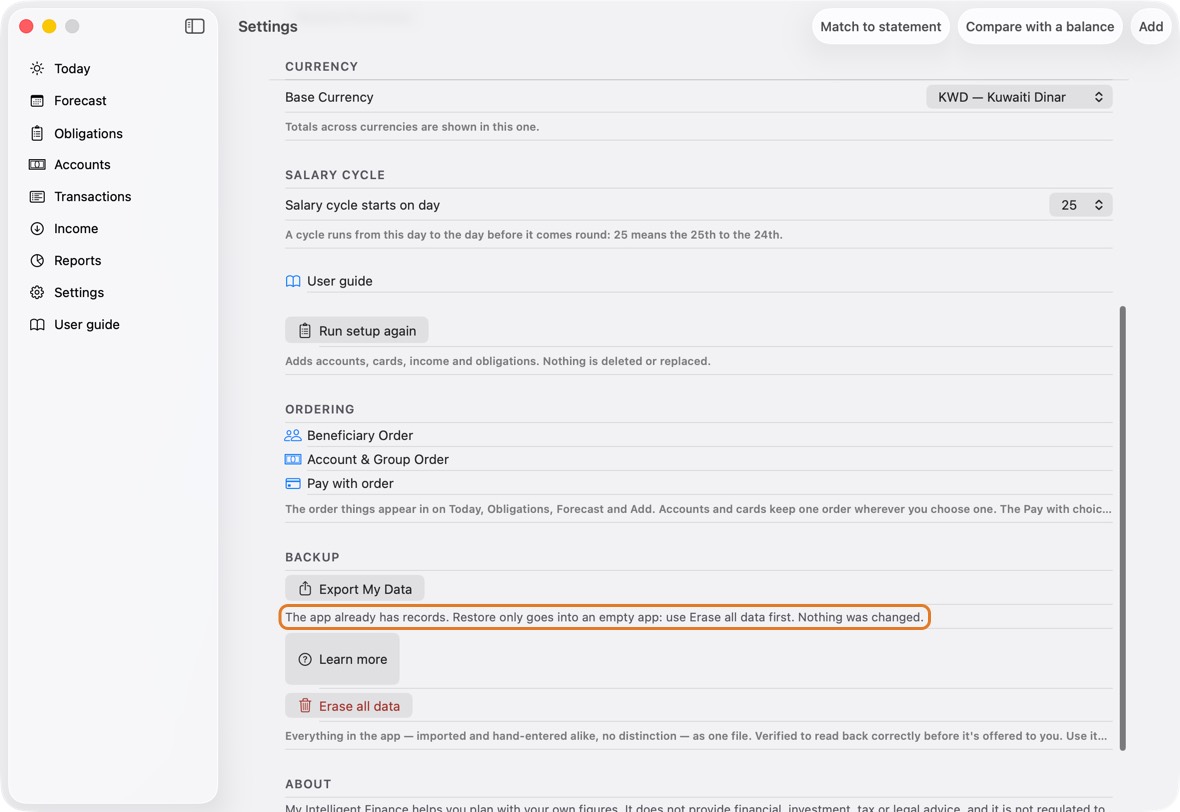
Under Backup in Settings: The app already has records, or This isn't a backup from this app, or made by a newer version.
Why it happens
Restore only goes into an empty app, so it never mixes with records; and it reads only this app's backups, from this version or older.
What to do
- To restore over what is there: export a backup first, then Erase all data.
- Then click Restore from a backup and choose the file.
- A newer version's backup: update the app first. A file that isn't a backup: choose the file the app's Export made.
How you know it's fixed
You should now see Restored: with the counts of accounts, cards, obligations and transactions.
- Today shows the restored accounts.
Where the export file went
What you see
You exported, and can't find the file.
Why it happens
The app hands the file to the share sheet; it is saved only where you choose there.
What to do
- In Settings, under Backup, click Export My Data.
- Click Share Export File and save it in a folder in iCloud Drive. Note the folder.
How you know it's fixed
You should now see the file, named with today's date, in that folder in Finder.
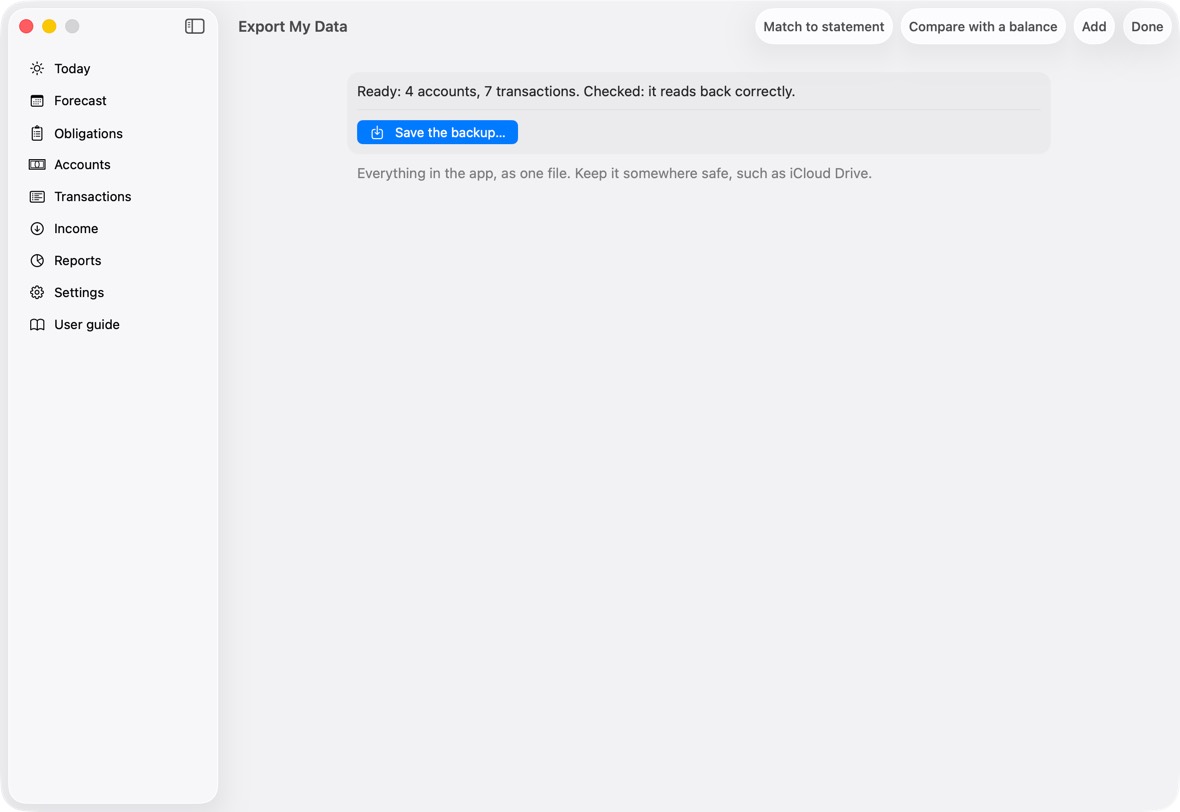
- The export's counts are under the button.
"Not everything could be erased"
What you see
On Erase all data: Not everything could be erased. Try again.
Why it happens
Something stopped the erase part way, for example the app being closed. What was erased stays erased.
What to do
- Close the app and open it again.
- Open Settings, click Erase all data again and repeat it.
How you know it's fixed
You should now see Setup, with nothing in the app.
- Setup, as on the first day.
A file isn't placed on any account or card
What you see
Under a file in Match to statement: no Account ending … or Card ending ….
Why it happens
The app places a file by the last four digits in it. The account or card in the app has no last four, or different ones.
What to do
- Open the account or card in Accounts and fill in its last four, as on the statement.
- Back in Match to statement, choose the file again.
How you know it's fixed
You should now see Account ending … or Card ending … under the file.
- The account or card the file belongs to.
A statement file couldn't be opened
What you see
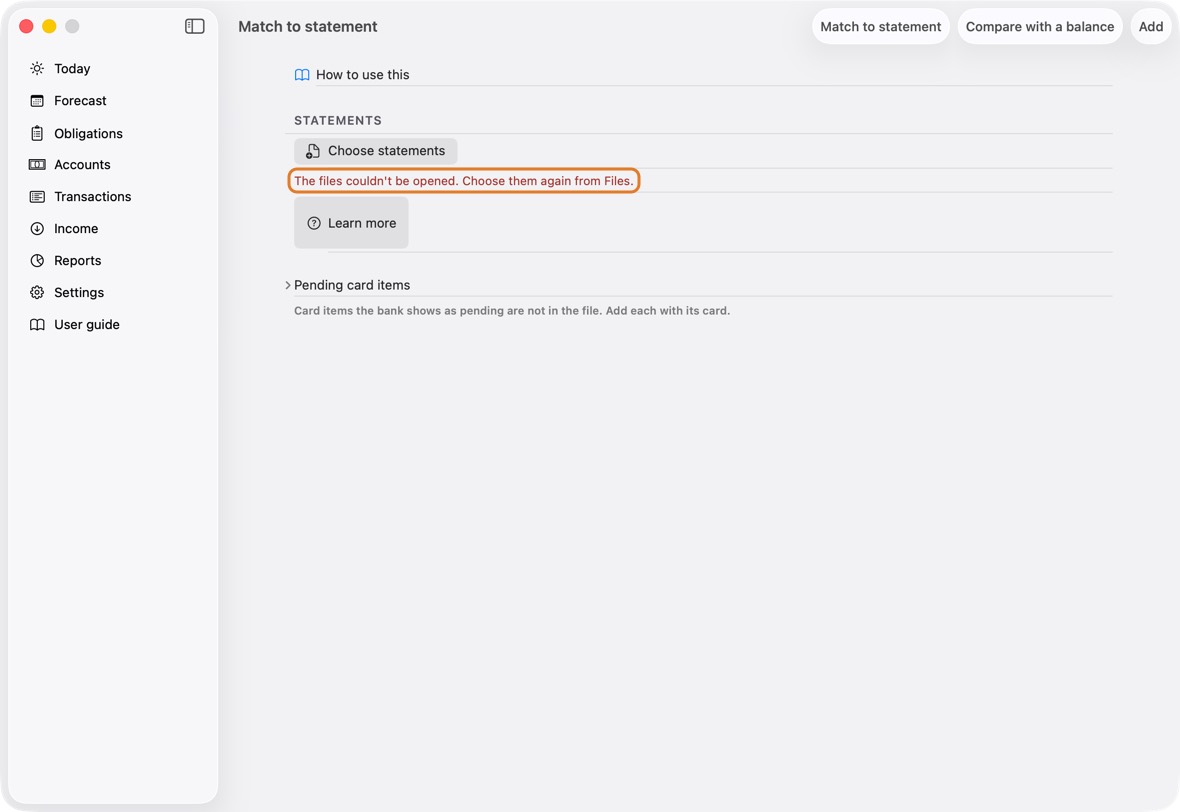
The files couldn't be opened. Choose them again from Files.
Why it happens
The file is in iCloud Drive but not downloaded to this device, or it was moved.
What to do
- Open the folder in Finder and click the cloud beside each file that has one, to download it.
- In Match to statement, click Choose statements and choose them again.
How you know it's fixed
You should now see each file listed, with the account or card it was placed on.
- Under each file: Account ending … or Card ending ….
Another bank's file isn't recognised
What you see
Under the file: Set up its columns.
Why it happens
The app knows one bank's files by itself. For any other bank, it needs to be told once which column is which.
What to do
- Click Set up its columns.
- Name the date, description and amount columns, give the layout a name, and save.
How you know it's fixed
You should now see the file placed and read, and every later file from that bank read the same way.
- The file shows its account, like any other.
Many items in Left over
What you see
Left over holds many lines.
Why it happens
Lines the app found on one side only, with nothing close on the other: often a statement covering dates before the app's starting point.
What to do
- Check the statement's dates against the account's starting date.
- Tick the ones to add to the app, leave the rest, and apply.
How you know it's fixed
You should now see Left over empty, or holding only what you chose to leave.
- The groups above it, each with its count.
"Agrees" isn't shown
What you see
Beside an account in Match to statement: Left and an amount, not Agrees.
Why it happens
After the ticked changes, the app's balance still differs from the statement's by that amount.
What to do
- Look in In the bank only and Amount differs for what makes up the difference, and tick them.
- Click Match again to see the new difference.
How you know it's fixed
You should now see Agrees beside the account.
- Agrees: the app and the statement end on the same balance.
The check after Apply warns
What you see
After Apply, a red line: an account is … away from what was shown.
Why it happens
After applying, the app works every balance out again and compares it with what it showed you. A difference means something didn't apply as shown.
What to do
- Click Undo this match: every row goes back.
- Write to support with what the line says; then match again.
How you know it's fixed
You should now see no red line after Apply.
- Each balance after Apply is what was shown before it.
Undoing a match
What you see
You applied a match and want it back as it was.
Why it happens
Each Apply is kept as one batch, so it can be undone whole.
What to do
- Open Accounts, click ⋯, then Match to statement; at the bottom, click Undo this match and confirm.
How you know it's fixed
You should now see Undone., and every row as before the match.
- The groups as they were before Apply.
Running Match again: "Already matched before"
What you see
A note: Already matched before: and a number.
Why it happens
Lines matched in an earlier run stay matched; they are counted, not offered again.
What to do
- Nothing to do: only new lines are offered.
How you know it's fixed
You should now see only the lines not matched before, in their groups.
- The note's number: lines already matched.
An account or card balance doesn't match the bank
What you see
The balance in the app differs from the bank's.
Why it happens
A transaction is missing, doubled or a different amount; or the starting balance was off.
What to do
- Use Match to statement with the bank's statement to find the lines.
- Or Compare with a balance: type the bank's balance, and the app adds one adjustment for the difference.
How you know it's fixed
You should now see the same balance as the bank's.
- The account's balance on Accounts.
A foreign amount differs from the bank's charge
What you see
A purchase in another currency shows a different amount in dinars than the bank charged.
Why it happens
Until you say what the bank charged, the app uses the day's rate.
What to do
- Open the transaction and choose I know the amount that arrived (or charged), then type the bank's figure.
How you know it's fixed
You should now see the bank's amount, and no estimated-rate mark.
- The amount charged, as the bank's statement says.
A pending card item
What you see
A card purchase is on the bank's app as pending, not on the statement yet.
Why it happens
Pending items aren't on a statement file, so Match can't see them.
What to do
- In Match to statement, under Pending card items, click Add pending item.
How you know it's fixed
You should now see it counted in the card's balance.
- The card's Owed figure includes it.
A payment is missing, or shown twice
What you see
An obligation's payment isn't on Forecast, or shows twice.
Why it happens
A plan without an end stops a year ahead; two devices that each made the same payment before they met show it twice until the app tidies up.
What to do
- Open the obligation and check its repeat and end.
- Close the app and open it again: duplicates are removed at launch.
How you know it's fixed
You should now see each payment once, on its day.
- Forecast's days, each payment once.
An overdue payment
What you see
An obligation in red, its day passed.
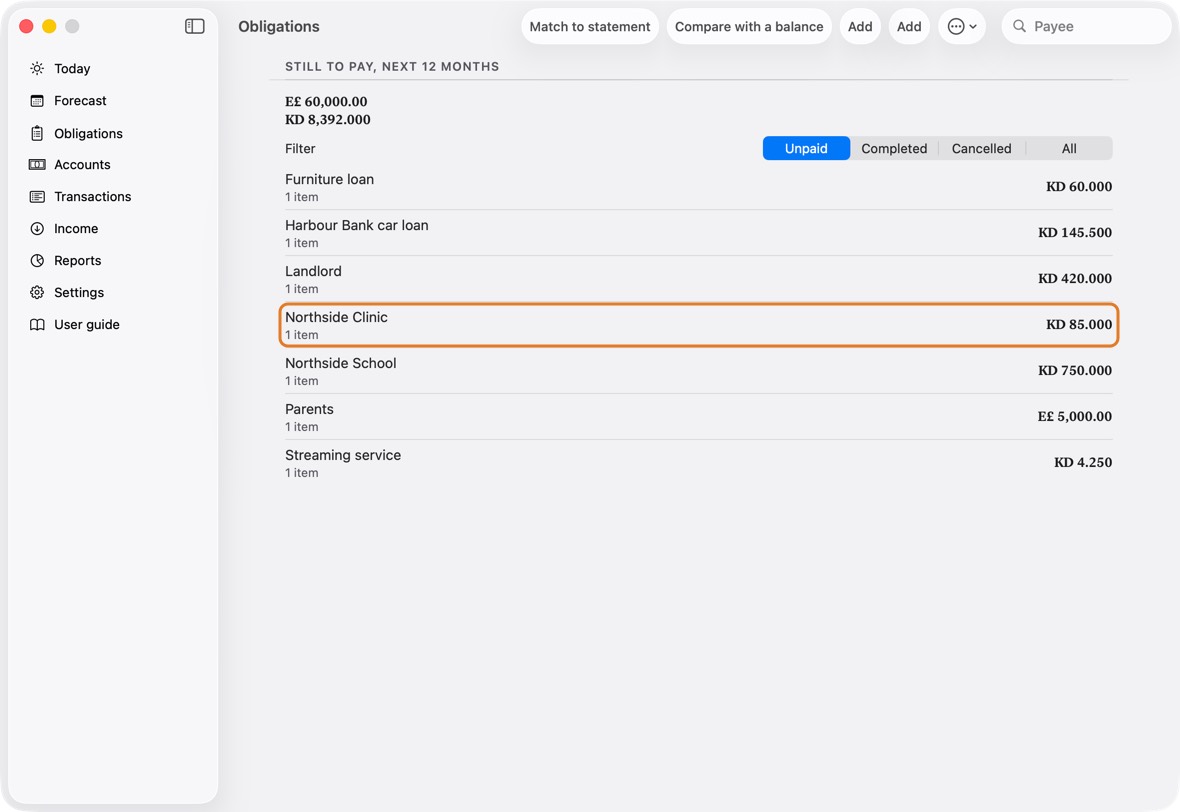
Why it happens
Its day has passed and it wasn't marked paid.
What to do
- Open it and click Settle, with the account it was paid from, if it was paid.
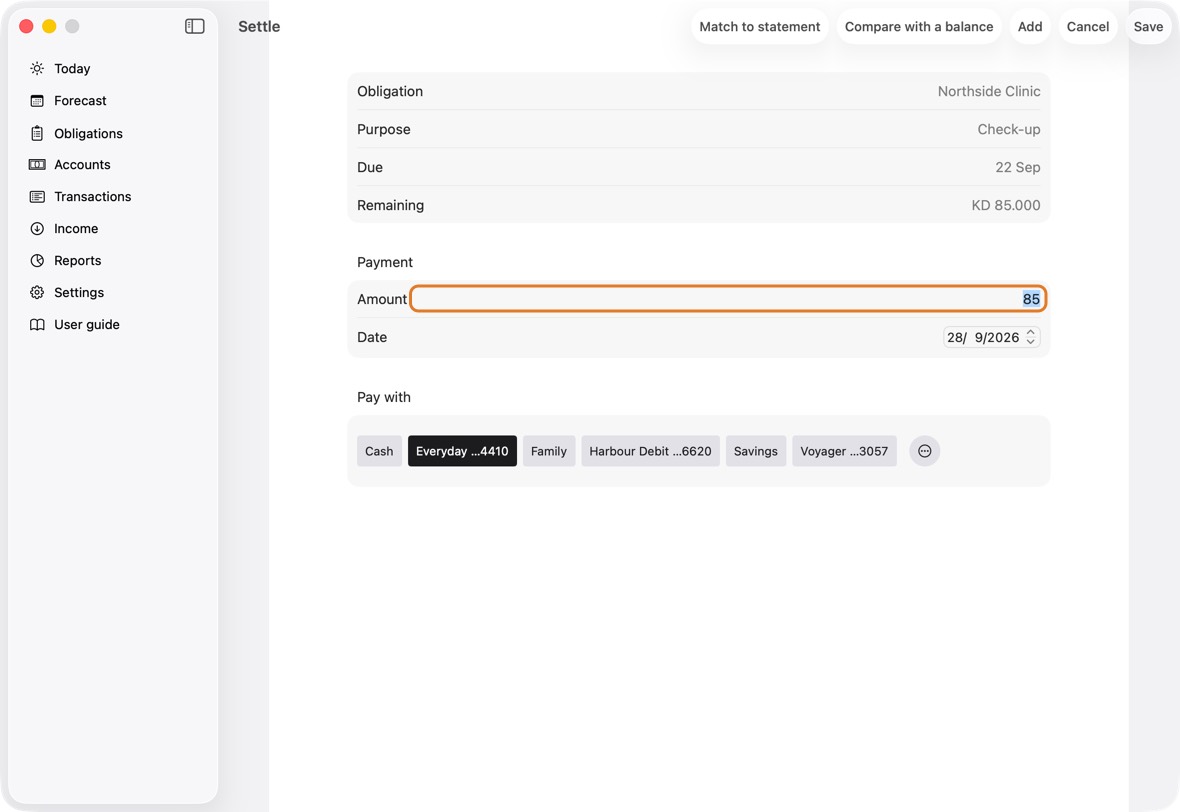
- If it won't be paid, open it and click Cancel this payment….
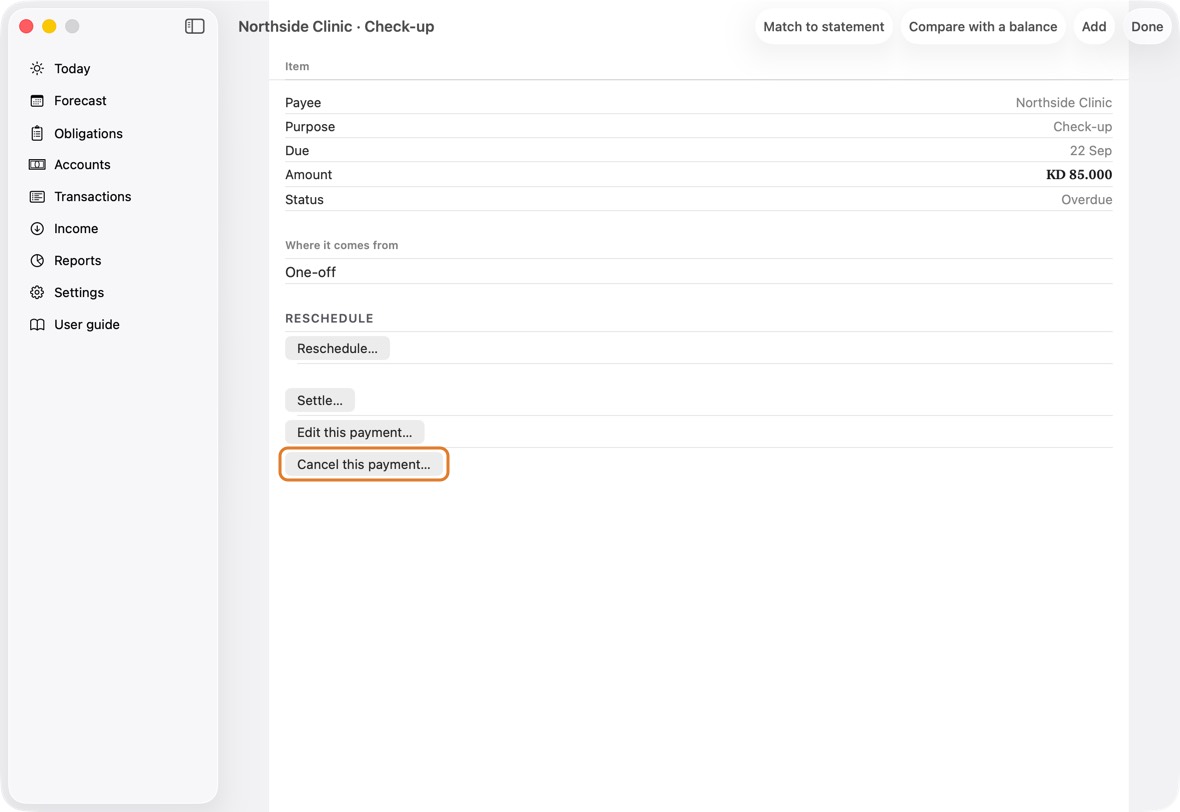
How you know it's fixed
You should now see it settled or cancelled, no longer red.
- Obligations, the red one gone.
"N of M paid" looks wrong
What you see
A loan's line says a number paid that isn't right.
Why it happens
It counts the payments marked paid against the number the loan was given. A wrong count left, or payments not marked, make it off.
What to do
- Open the loan and check How many are left, including the next one? and How many payments in the whole loan?
- Mark each paid instalment paid.
How you know it's fixed
You should now see the right count on the loan's line.
- "N of M paid · K left": paid, total, left.
"Something went wrong saving…"
What you see
A red line under a form: Something went wrong saving this, and nothing was changed.
Why it happens
The store couldn't take the change just then. Nothing was half saved.
What to do
- Click the button again.
- If it keeps happening, export a backup in Settings before anything else, and write to support.
How you know it's fixed
You should now see the form close, and the change on its screen.
- The new or changed row, on Transactions.
The assistant isn't available
What you see
The advisor shows no written explanation; Scan a receipt or Type it in words is missing or says it isn't available right now.
Why it happens
These need Apple Intelligence: an iPhone 15 Pro or later with it on, downloaded, and set to a language it supports.
What to do
- Open System Settings › Apple Intelligence & Siri and turn it on.
- Wait for it to download, on Wi-Fi and, on a laptop, power.
- Check its language is one Apple Intelligence supports.
How you know it's fixed
You should now see the advisor's written explanation above its figures.
- The heading and each cycle, in words.
The advisor shows figures only
What you see
The advisor's figures, with a line saying why there's no written explanation — or "The written explanation isn't available this time. Every figure below is complete."
Why it happens
Without Apple Intelligence the calculation is complete; only the words are missing. With it, the words are checked before they are shown: a draft that names a figure the app didn't work out is set aside and written again once, and if the second is set aside too, you see the figures alone.
What to do
- Nothing is wrong with the figures. For the words, see the entry above, or open the Advisor again later: the explanation is written afresh each time.
How you know it's fixed
You should now see the same figures, with or without the words.
- The cycles and the payments it suggests moving.
The assistant is locked
What you see
The assistant asks for a subscription.
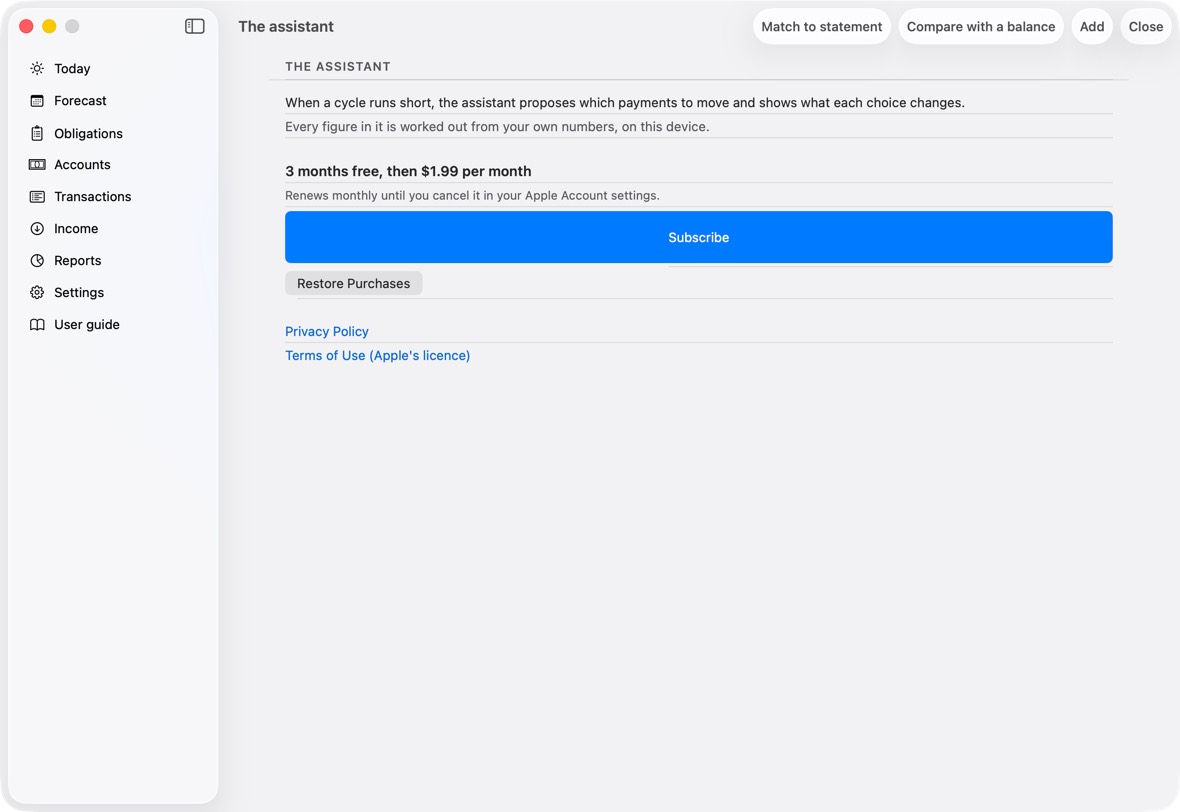
Why it happens
The assistant is a subscription. A purchase on another Apple Account isn't seen on this one.
What to do
- Click Restore Purchases if you subscribed before.
- Sign in with the Apple Account you subscribed with, at the top of System Settings.
How you know it's fixed
You should now see the assistant open.
- The advisor, unlocked.
- About the assistant, in Settings, opens The assistant: what it does and what it costs. While you subscribe, Manage subscription is there instead.
Siri answers from the web
What you see
You asked Siri, and it searched the web.
Why it happens
The phrase didn't include the app's name, or wasn't one of the app's phrases.
What to do
- Say a phrase as written on What you can say, with the app's name.
How you know it's fixed
You should now see Siri answer from the app.
- Each phrase, as Siri accepts it.
Siri's language doesn't match the app's
What you see
Siri doesn't understand the Arabic (or English) phrases.
Why it happens
Siri understands only the phrases in its own language.
What to do
- Open System Settings › Apple Intelligence & Siri › Language and choose the app's language.
How you know it's fixed
You should now see Siri accept the phrases in that language.
- The phrases in the chosen language.
Siri doesn't find the app
What you see
Siri says it can't find the app, or Shortcuts doesn't list it.
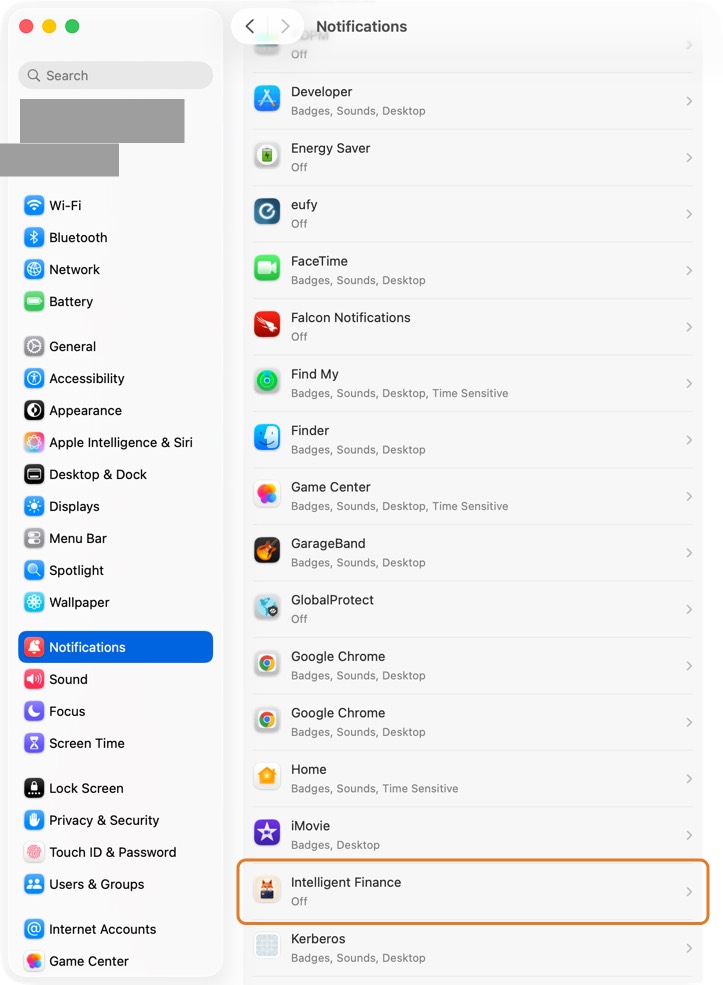
Why it happens
Siri learns the app's phrases after it has been opened once, and only if Siri is allowed for it.
What to do
- Open the app once.
- In System Settings › Apple Intelligence & Siri, check Siri is on, then ask again.
How you know it's fixed
You should now see the app in Shortcuts, and Siri answer.
- What you can say: every phrase.
Siri doesn't work when locked
What you see
Siri asks you to unlock first.
Why it happens
Answering while locked is off for Siri.
What to do
- In System Settings › Apple Intelligence & Siri, check Siri is on. On the Mac, Siri answers only while you are signed in.
How you know it's fixed
You should now see Siri answer while locked, still reading back before anything is saved.
- Allow Siri When Locked: on.
Reminders don't arrive
What you see
No notice before a payment is due.
Why it happens
Notifications are off for the app.
What to do
- In System Settings › Notifications › My Intelligent Finance, turn on Allow notifications.
How you know it's fixed
You should now see the app's reminders before payments are due.
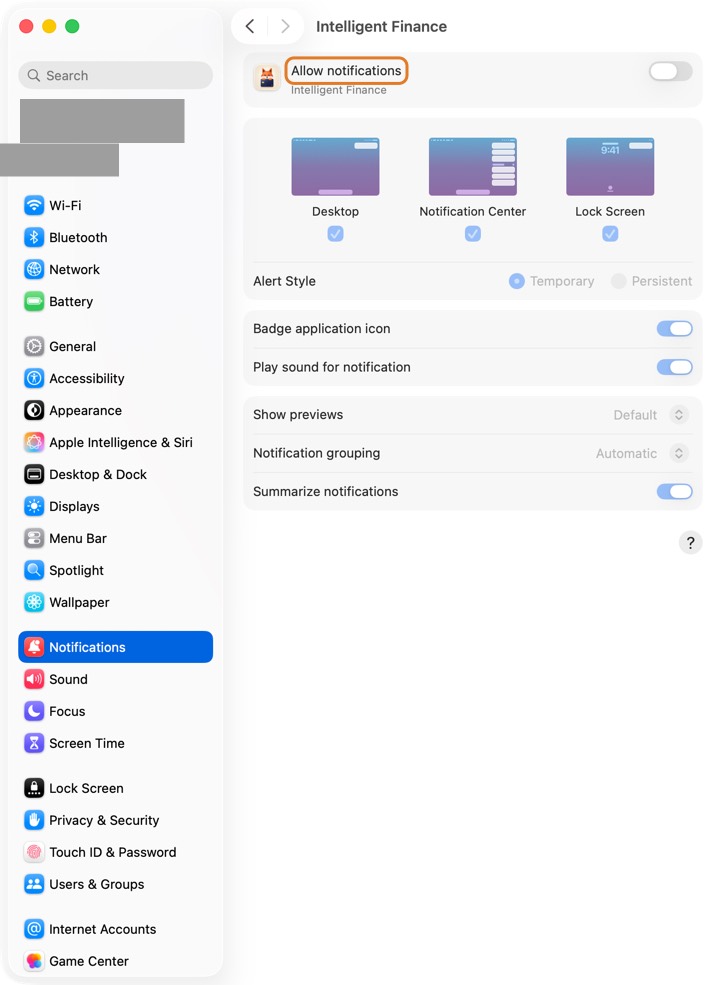
- Notifications: allowed.
The app or Siri in the wrong language
What you see
The app shows English when you want Arabic, or the reverse.
Why it happens
The app follows the Mac's language unless one is chosen for it.
What to do
- In the app, Settings › Language, then Restart now.
- For Siri: System Settings › Apple Intelligence & Siri › Language.
How you know it's fixed
You should now see the app and Siri in the language you chose.
- Language: the one chosen.
A statement or receipt couldn't be read
What you see
In Import a statement or Scan a receipt: Couldn't read that file as a card statement, This spreadsheet is not an NBK account statement, or Couldn't read that photo.
Why it happens
The file isn't the statement the app expects, or the photo is blurred.
What to do
- For a statement: choose the bank's own .xlsx export, the account statement under Account and the card statement under Card.
- For a receipt: take a clearer, flat photo, or add the purchase by hand.
How you know it's fixed
You should now see the lines read, ready to confirm.
- The new rows, on Transactions.
The Mac app
What you see
On the Mac: a dropped file doesn't open Match; ⌘F doesn't reach the search field; the assistant has no words.
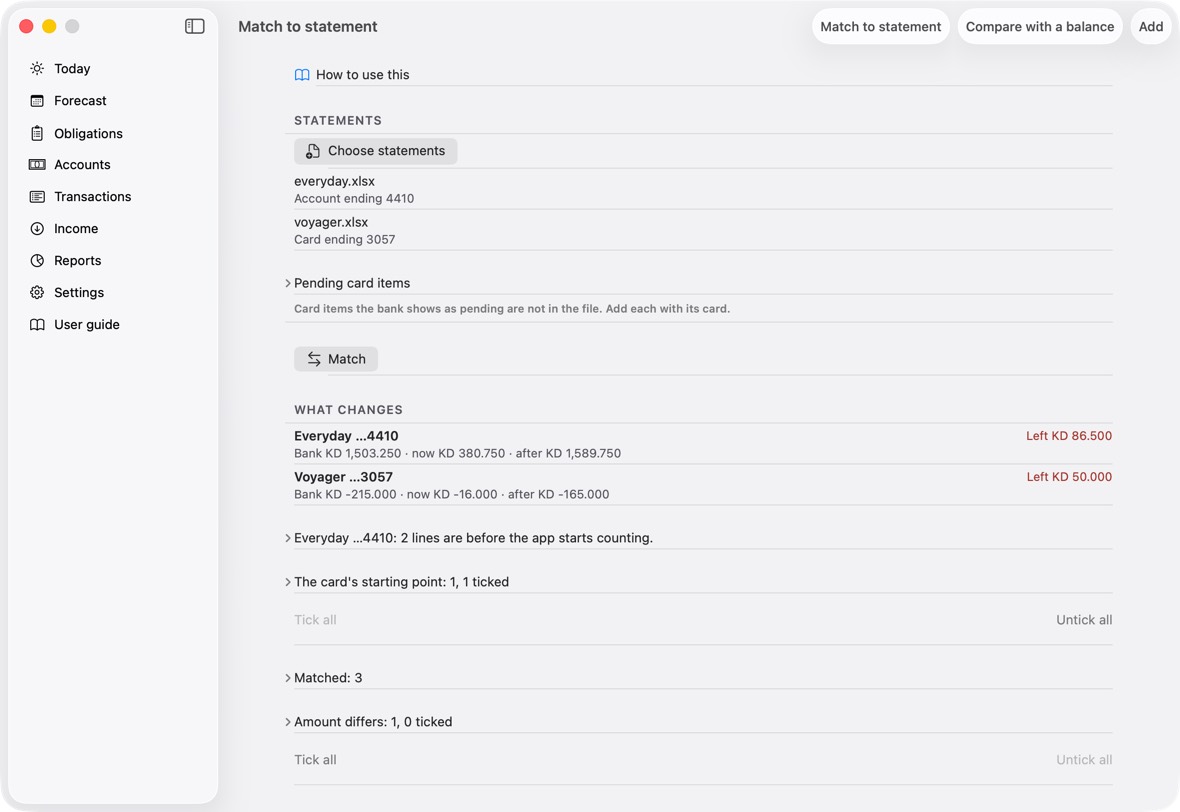
Why it happens
Match takes .xlsx and .csv files only. ⌘F's cursor needs macOS 15 or later. The assistant's words need Apple Intelligence on an Apple silicon Mac.
What to do
- Drop .xlsx or .csv files, or use File › Match to Statement… and Choose statements.
- On an older macOS, click the search field in Transactions after ⌘F.
- Turn on Apple Intelligence in System Settings › Apple Intelligence & Siri.
How you know it's fixed
You should now see Match open with your files, and the assistant's words in the advisor.
- The window's sidebar, with the section open beside it.
A form won't save: a field must be filled
What you see
The save button is grey, and a line under the form names what is missing.
Why it happens
Some fields must be filled for the record to make sense; the line names the first one missing.
What to do
- Fill in the field the line names.
- Click the save button.
How you know it's fixed
You should now see the form close and the new record on its screen.
- The new account under its group.
Today says an account will run short
What you see
A row with a red dot near the top of Today: an account and a date it runs short by.
Why it happens
What is due from that account before the next salary is more than it holds.
What to do
- Click the row to see every account's shortfalls.
- Open the advisor for the payments it suggests moving.
- Or move money in with a transfer.
How you know it's fixed
You should now see the row gone, or a smaller figure.
- Today without the red row: the payments ahead are covered.
An exchange rate is old
What you see
Beside an amount in another currency: may be stale, or stale, hasn't refreshed.
Why it happens
The app fetches rates once a day when it can reach the internet; it hasn't for two days or more.
What to do
- Connect to the internet and open the app.
- Leave Today open a moment: the rate is fetched again.
How you know it's fixed
You should now see Rate fetched just now.
- The rate's age beside each figure in another currency.
A cycle says covered but my card is debited every month
What you see
A line on Today, in Each cycle, worked out and in the Advisor: a card's monthly debit isn't counted, or is placed on your salary day. The Advisor says payments you owe aren't counted.
Why it happens
The bank takes the card's payment by itself, and the app doesn't yet know the day or how much, so it can't plan it. Until it can, the cycle may be shorter than shown.
What to do
- Click the line: the card opens.
- Set Normally settled by to Bank auto-debit, choose What the bank takes and its amount, and set the Due day.
How you know it's fixed
You should now see the line gone, and the card's debit in Forecast on its due day every month.
- Forecast: the card's debit on its day, each month.
The app asks me to send money to an account I don't pay from
What you see
Money to send asks you to fund an account abroad for payments you actually make with a card.
Why it happens
Those payments are set aside from that account. Before this version the app chose an account by itself when no card was chosen; now it never does, but a payment set up earlier keeps its account until you change it.
What to do
- Open the payment in Obligations, then Edit this payment….
- Under Set aside from, choose Decide when paying, then save. On a repeating payment, the change applies to it and the following ones.
How you know it's fixed
You should now see Money to send without those payments; they are counted in their cycle, in your main currency, marked card or account chosen when paying.
- Money to send: only what payments set aside abroad need.
An income I expected didn't arrive
What you see
An income stays in Today's Expected after its date, and the cycle still counts it.
Why it happens
An expected income is counted on its date until you confirm it, change it or delete it. It is never money held, so nothing is spent from it.
What to do
- Open Income and click it.
- If it is still coming, change Expected on and click Save. If it isn't, click Delete.
How you know it's fixed
You should now see it on its new date, or gone, and the cycle without it.
- Income: each one with its next date.
An income shows as arrived but it hasn't
What you see
An account shows money that never came, and its transaction can't be deleted: "This is … arriving. Open it and click Not arrived yet: take it back".
Why it happens
The income was confirmed as arrived. Its money and its state go together, so the transaction alone can't be deleted; the income is taken back instead.
What to do
- Click Open the income in the message, or open the income from Today or Income.
- Click Not arrived yet: take it back, and confirm.
How you know it's fixed
You should now see the income expected again, and the account without the money.
- Expected again: Edit and It arrived…, for when it really comes.
A card says "interest not known: room not counted"
What you see
In a cycle's card room, under a card the bank debits by itself: interest not known: room not counted. Its room doesn't grow after the debit.
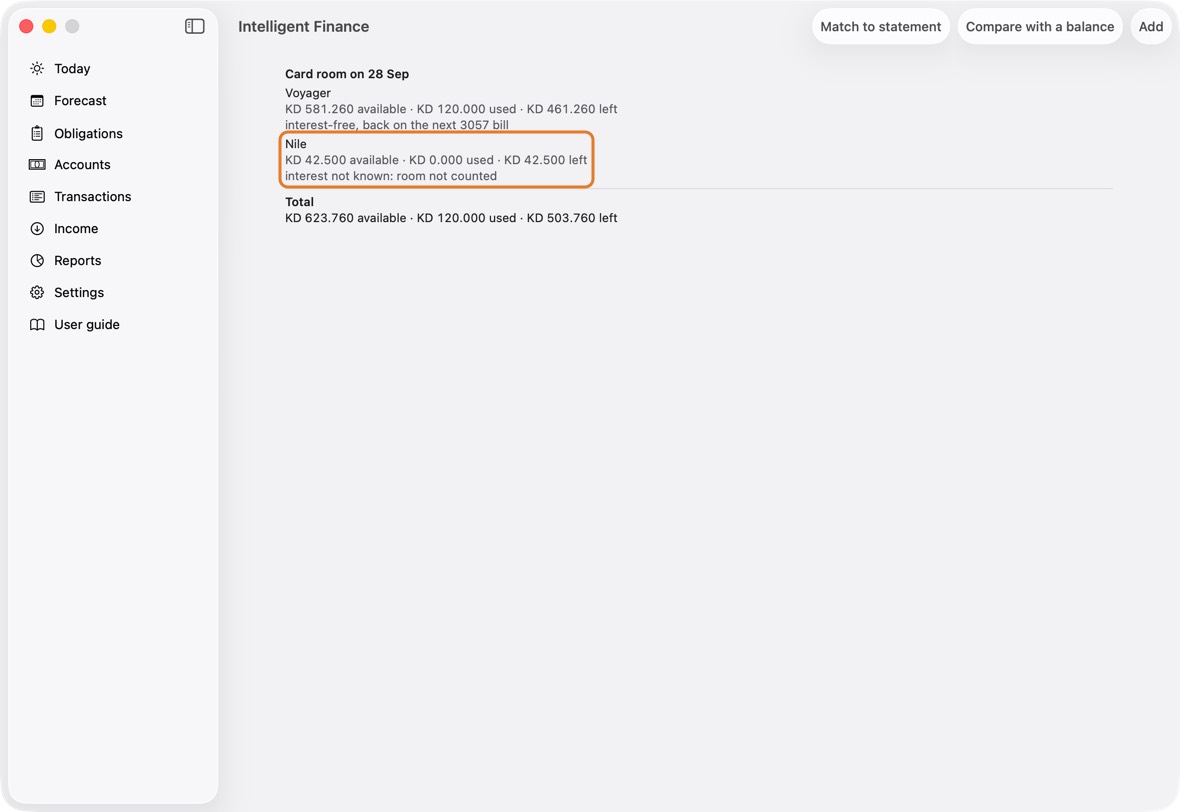
Why it happens
A fixed debit on a card near its limit mostly pays the month's interest and fees. Until the app knows them, from the card's statements or the rate you enter, it counts none of the debit as room, rather than room that may never exist.
What to do
- Open Accounts and click the card.
- Enter Monthly interest, % from your statement, and click Done. Or read the card's statements with Match to statement: their interest and fees are used first.
How you know it's fixed
You should now see the card's room grow after each debit only by what is left once interest, fees and the charges on the card are paid.
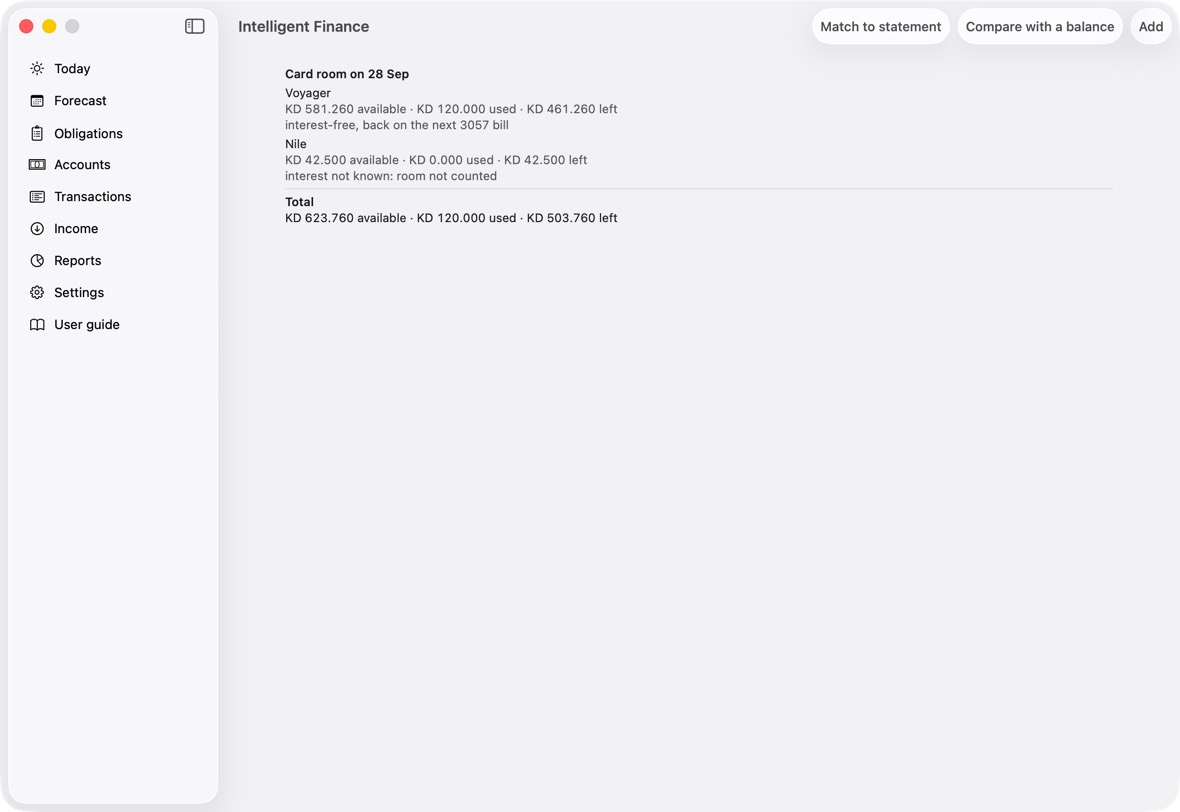
- Card room: each card's room on the day, without the note.
A card "will go over its limit"
What you see
On Today, in Each cycle, worked out and in the Advisor: … will go over its limit; the bank may charge an over-limit fee, with the day of the charge.
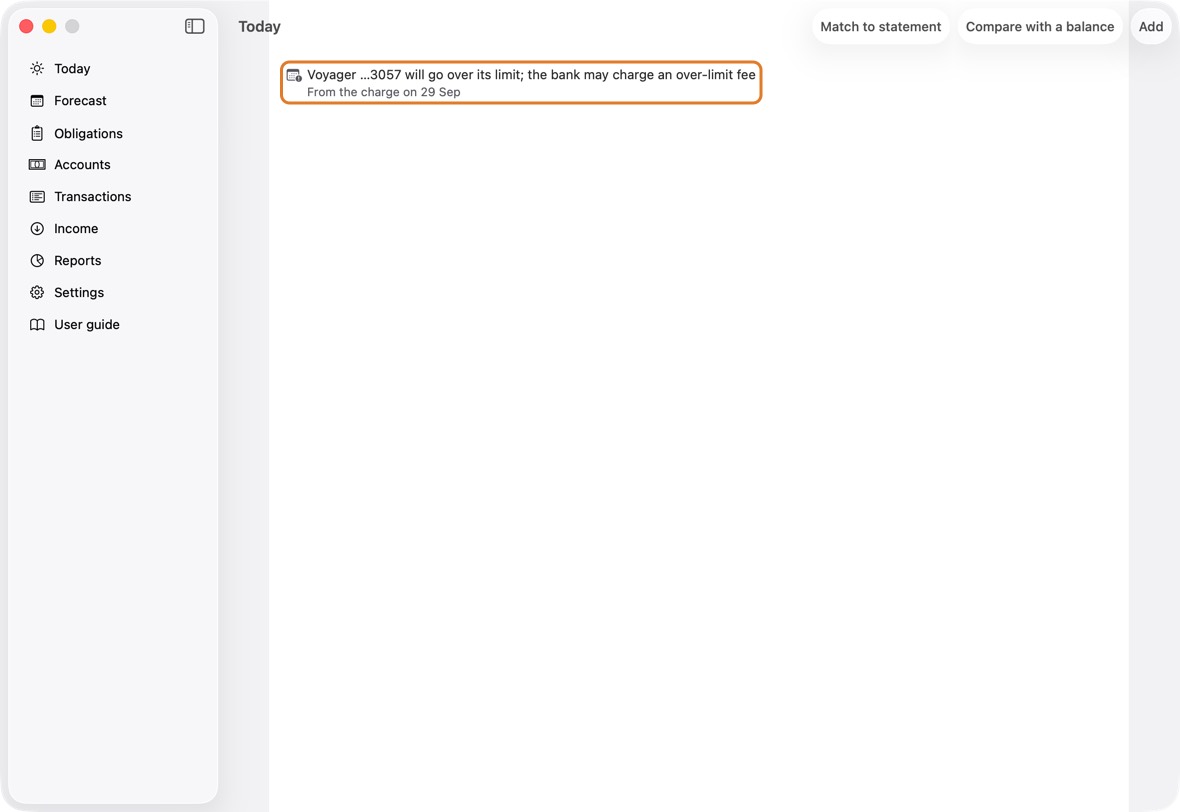
Why it happens
A charge billed to the card falls before the bill that gives it room back. The app keeps the charge on the card, as the bank will, and never moves it to an account by itself.
What to do
- Click the line: the card opens.
- Check its Credit limit and what it owes against your statement: a limit raised by the bank, or a payment not yet recorded, gives the room back.
- To pay the charge another way, open it in Obligations, choose another card or account, and save. On a repeating payment the following ones go with it.
How you know it's fixed
You should now see the line gone once the card has room for the charge, or the charge on the card or account you chose.
- Forecast: the charge on its day, where it is billed.
The Advisor won't move or cancel a card's automatic debit, a bank loan or a cheque
What you see
A card's monthly debit, a loan's instalment or a cheque isn't among the things you could move. It is listed under "Fixed: the bank takes these by itself", and asking for it by name says it can't be moved or cancelled here.
Why it happens
The bank takes the debit or the instalment on its day, and cashes a cheque on its date, whatever the app's plan says, so moving or cancelling it in the app would only make the forecast wrong.
What to do
- To change what the bank takes, or the day, open the card in Accounts and change What the bank takes or the Due day, as agreed with your bank.
- A loan or a payment you pay by hand, not the bank: open it and turn off The bank takes it automatically. One the bank does take: turn it on.
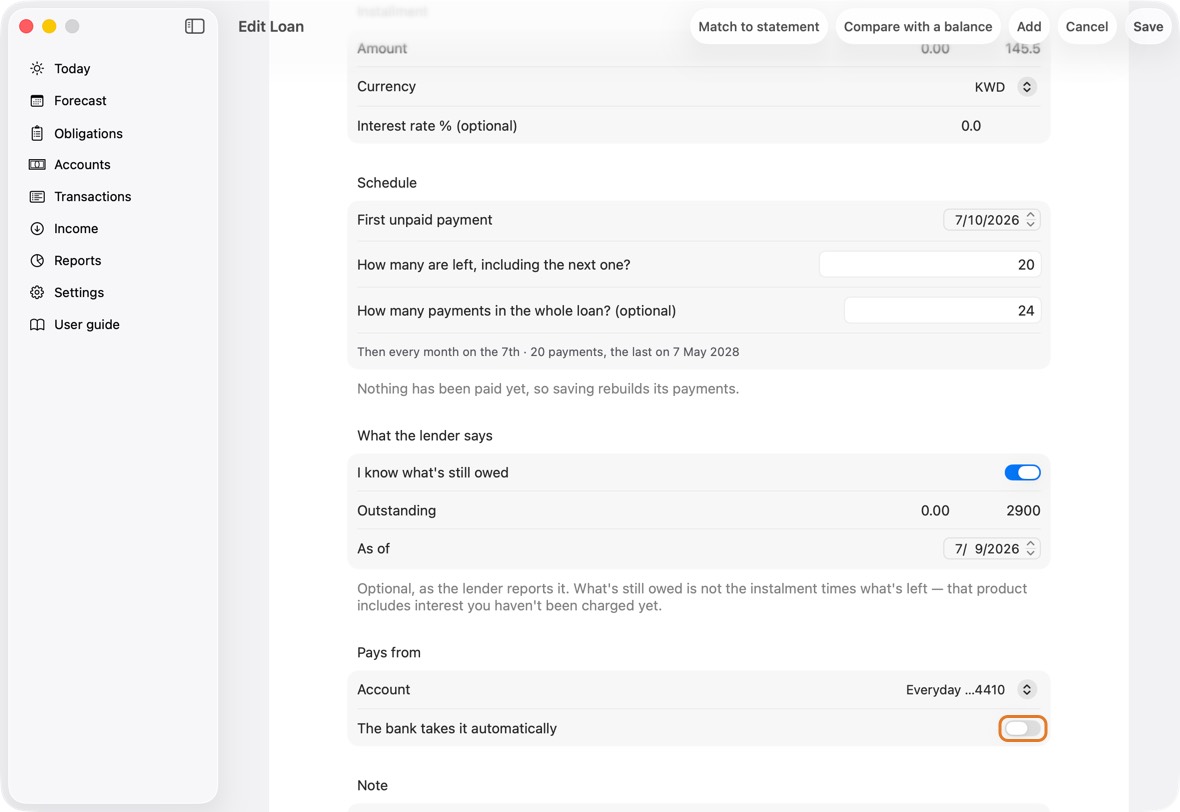
- To make room for it, move other payments: tick them in the Advisor and apply.
How you know it's fixed
You should now see the debit at its new amount or day, still fixed, and the cycle with what you moved.
- Fixed: the card's debits, each on its day.
"A transfer has both sides in …"
What you see
A line on Today: A transfer has both sides in Travel cash. Open it to fix. Or: A transfer in … is missing its other side.
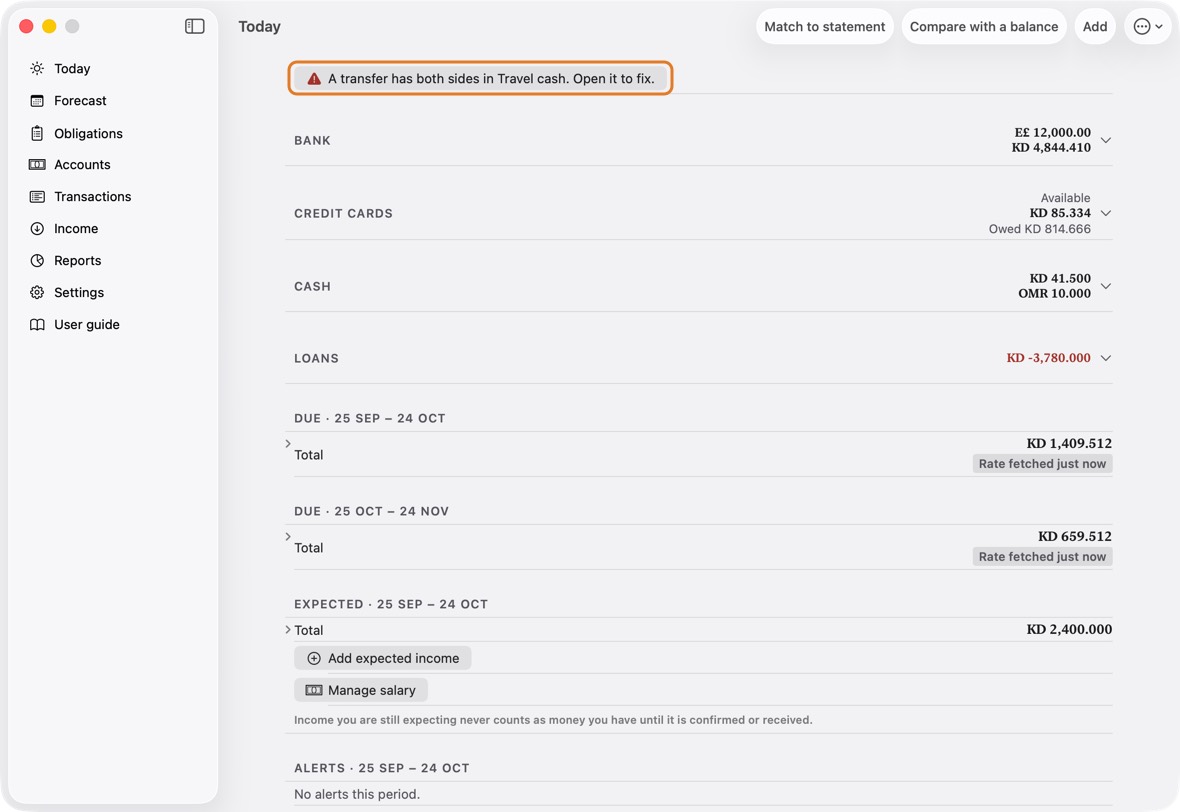
Why it happens
Both sides of the transfer are on one account, so they cancel out there, and the account the money left never shows it going. An earlier version did this when a transfer was changed in the purchase form. A transfer can also lose one side. The app never guesses the right account: it shows the line and waits for you.
What to do
- Click the line. The transfer opens and says what is wrong. Nothing has changed yet.
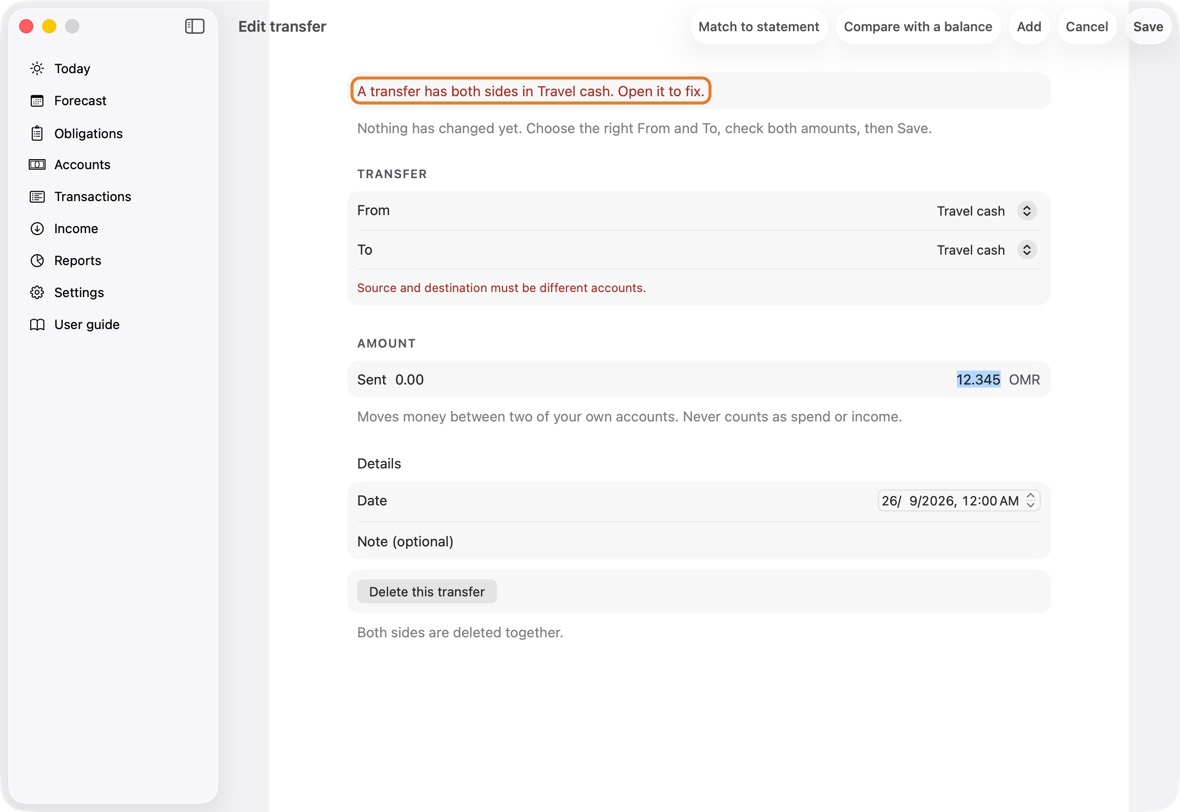
- Set From to the account the money left, and To to the one it arrived in. Check Sent and Received, then click Save.
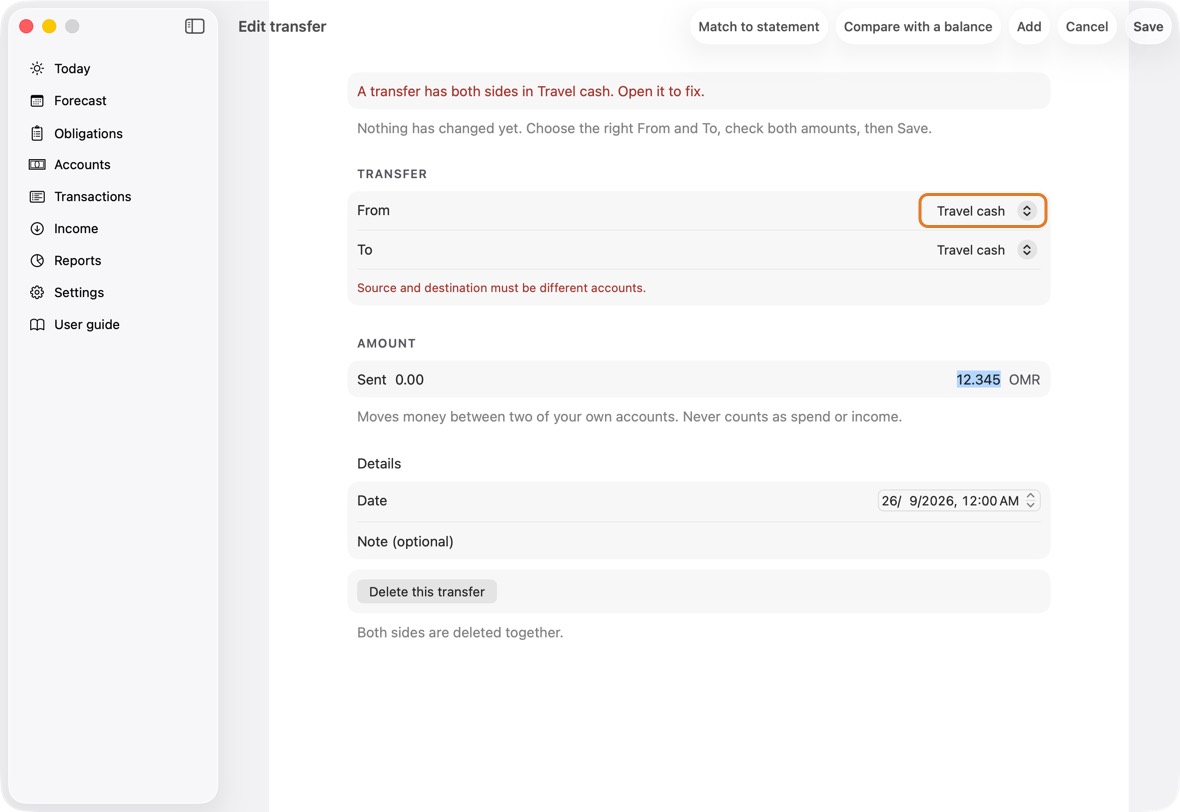
How you know it's fixed
You should now see Today without the line, and each account with its own side of the transfer.
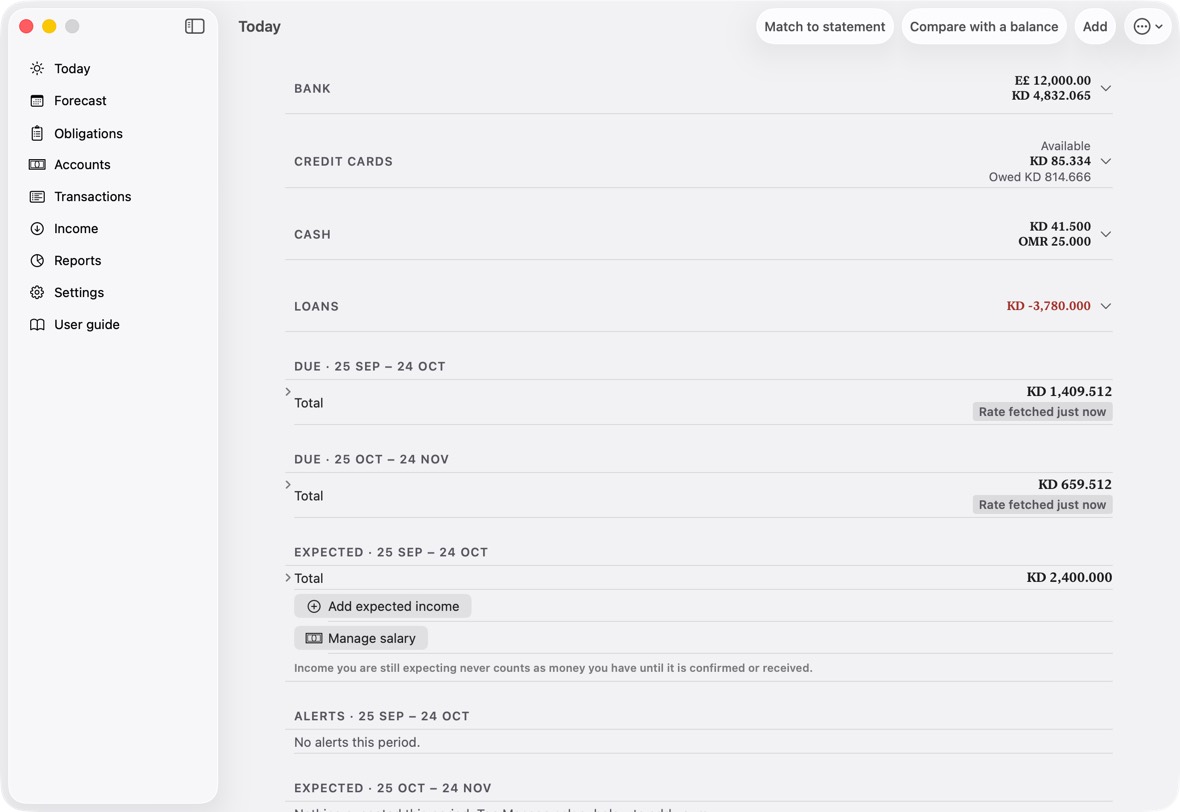
- Today without the line.
A transfer won't save
What you see
Couldn't save, with From and To must be different accounts., A transfer needs both sides. Choose From and To., Both sides of a transfer happen on the same day. or Add the amount sent and the amount received.
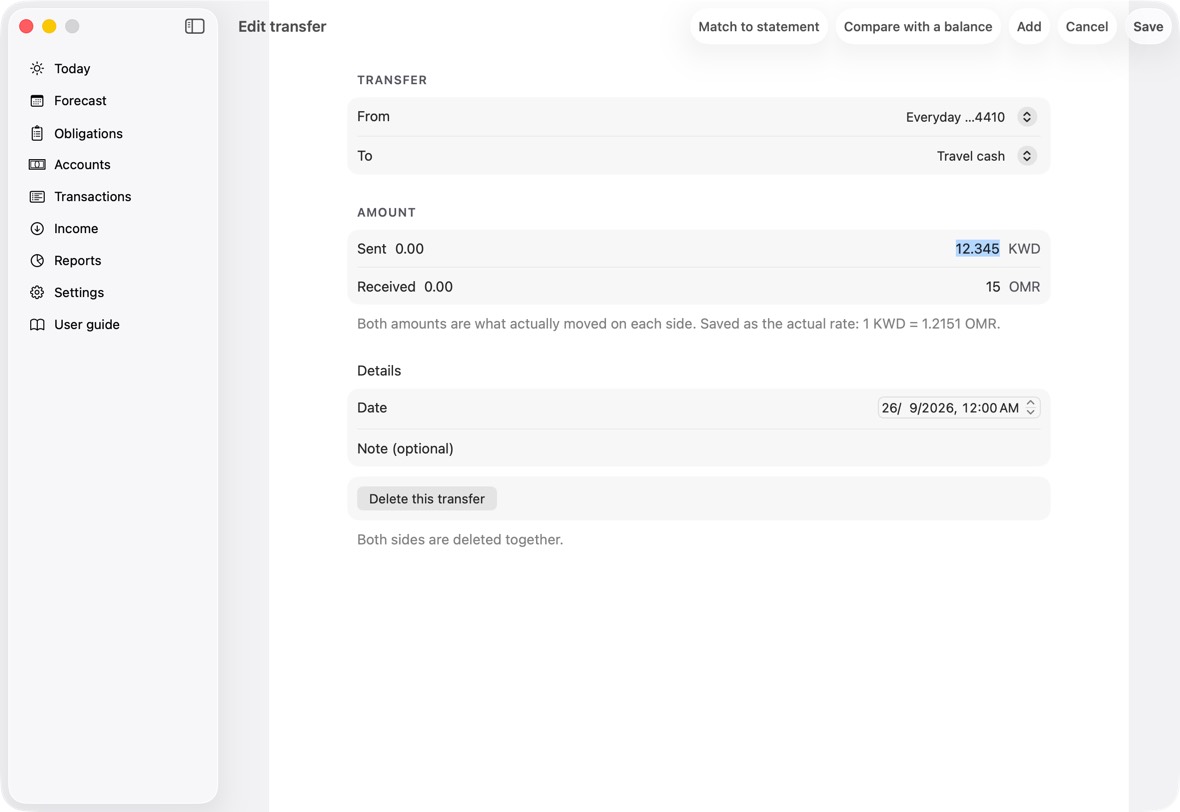
Why it happens
A transfer is two sides: money leaving one of your accounts and arriving in another, on one day. The app never saves one that would be broken, and changes nothing when it refuses.
What to do
- Click OK, then choose two different accounts in From and To.
- Fill in Sent, and Received when the currencies differ, and click Save.
How you know it's fixed
You should now see the transfer saved: one row in Transactions, each account with its own side.
- One row for the transfer.